
Are you looking to make your WordPress site look stunning without spending hours designing from scratch? Adding an Elementor template is the easiest way to get professional, eye-catching pages in just a few clicks.
Whether you want to build a blog, a portfolio, or an online store, using Elementor templates saves you time and effort while boosting your site’s appeal. In this guide, you’ll learn exactly how to add Elementor templates to your WordPress site step-by-step, so you can create beautiful pages that grab attention and keep visitors coming back.
Let’s get started and transform your website quickly and effortlessly!

Credit: www.hostinger.com
Choose The Right Elementor Template
Choosing the right Elementor template is key to building a great website. The right template saves time and fits your style. It sets the tone for your site’s look and feel. A good template also works well with your content and goals. Take your time to find one that matches your needs.
Explore Free And Premium Options
Elementor offers many templates, both free and paid. Free templates are great for simple sites. They cover basic designs and layouts. Premium templates have more features and styles. They offer unique designs and extra tools. Pick a template that fits your budget and project size. Try a few templates to see which one feels right.
Consider Template Compatibility
Check if the template works with your WordPress theme. Some templates need specific themes to function well. Make sure the template supports the latest Elementor version. Look for templates that load fast and are mobile-friendly. Avoid templates with outdated code or poor reviews. Compatibility ensures your site runs smoothly and looks good on all devices.
Install Elementor Plugin
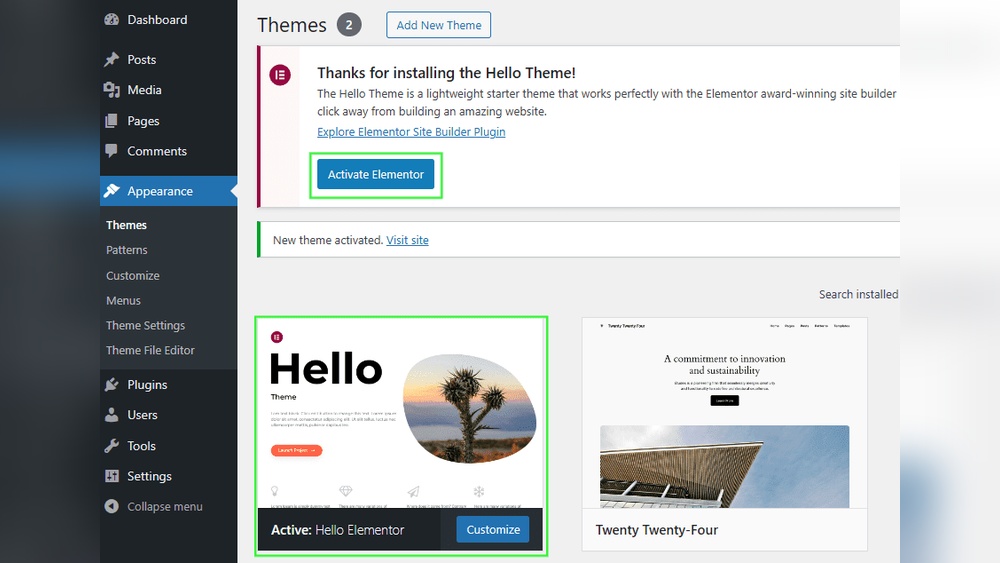
Installing the Elementor plugin is the first step to using its templates on your WordPress site. This plugin allows you to build pages easily with drag-and-drop tools. Follow simple steps to add Elementor and prepare your site for creative designs.
Download And Activate Elementor
Go to your WordPress dashboard. Find the “Plugins” menu on the left side. Click “Add New” to open the plugin library.
Type “Elementor” in the search box. Look for the official Elementor plugin by Elementor.com. Click “Install Now” to start the download.
After installation, click the “Activate” button. The plugin will become active on your site. You can now use Elementor to build pages.
Check Plugin Requirements
Ensure your WordPress version is 5.0 or higher. Elementor works best with PHP version 7.0 or greater. Check these in your hosting control panel or site settings.
Make sure your site meets the memory limit of at least 128 MB. This helps Elementor run smoothly. If needed, ask your hosting provider to increase it.
Verify that your theme supports page builders. Most modern themes work well with Elementor. This ensures no conflicts when editing pages.
Import Template To WordPress
Importing a template to WordPress with Elementor is simple and quick. Templates help you design pages faster without starting from scratch. You can use pre-built templates or upload your own designs. This section explains how to import templates into WordPress using Elementor.
Access Elementor Template Library
Open the WordPress dashboard and go to a page or post. Click the “Edit with Elementor” button to launch the editor. In the editor, click the folder icon to open the template library. Here, you will find many free and premium templates ready to use. Browse the templates and choose one that fits your page. Click “Insert” to add the template to your page. The template loads instantly, and you can start editing it right away.
Upload Custom Templates
To upload your own template, open the Elementor editor first. Click the folder icon to open the template library. Switch to the “My Templates” tab. Click the “Import Template” button at the top right. Select the JSON file of your saved template from your computer. After uploading, the template appears in your library. Click “Insert” to add the custom template to your page. Now, you can customize the template as needed to match your style.
Credit: elementor.com
Insert Template Into A Page
Inserting an Elementor template into a WordPress page makes design simple. Templates save time and keep your site looking consistent. This section explains how to place a template into any page easily.
Create Or Edit A Page With Elementor
First, open your WordPress dashboard. Go to Pages and select the page you want to edit. Click “Edit with Elementor” to launch the editor. This opens a visual builder where you can customize your page freely.
If you need a new page, click “Add New” under Pages. Give your page a name, then click “Edit with Elementor.” This step prepares your page for template insertion.
Add Template To Page Content
Inside Elementor, find the folder icon in the editor panel. Click it to open the template library. Choose the template you want to insert from your saved templates or the Elementor library.
Click “Insert” to add the template to your page. Wait a few seconds for the content to load. After insertion, you can edit the template blocks as needed. Save or publish the page to finalize changes.
Customize The Imported Template
After importing an Elementor template, customization is key. It lets you make the design truly yours. You can change text, images, and styles. This way, the page fits your brand and message perfectly.
Customizing is simple with Elementor’s drag-and-drop editor. You don’t need coding skills. Just click on elements and start editing. Small tweaks can create a big impact.
Edit Text And Images
Click on any text to edit it directly. Replace placeholder content with your own words. Keep sentences clear and short for easy reading.
Images can be swapped by clicking the image area. Upload your photos or choose from the media library. Use high-quality images to attract visitors.
Adjust Layout And Style
Change the layout by dragging sections or columns. Move elements around until the page looks balanced. Adjust spacing to avoid clutter.
Style settings allow you to change colors, fonts, and backgrounds. Match these to your brand colors and fonts. Consistent style helps build trust with visitors.
Save And Publish Your Page
Saving and publishing your page is a key step after adding an Elementor template. It locks in your design and makes your page live for visitors. This process ensures your work is not lost and is visible on your website.
Preview Changes
Previewing changes shows how your page looks before going live. It helps find any mistakes or design issues. Click the preview button in Elementor to open a new tab. Check the layout, text, and images carefully. Make sure everything fits well on different devices.
Publish Or Update The Page
After previewing, you need to publish or update the page. Publishing makes a new page live on your website. Updating saves changes to an existing page. Click the “Publish” or “Update” button in Elementor. Wait a few seconds for the changes to apply. Your new design is now visible to all visitors.
Troubleshoot Common Issues
Adding Elementor templates to WordPress is usually smooth. Sometimes, problems occur. These issues can stop your template from loading or make the design look wrong. Fixing these problems is easier than it seems. Here are ways to solve common troubles fast.
Resolve Template Loading Errors
Template loading errors happen when WordPress can’t open the file. Check your internet connection first. Slow or unstable internet can cause this. Next, clear your browser cache. Old data can block new templates from loading.
Make sure your Elementor plugin is updated. Outdated plugins often cause conflicts. Also, check if your WordPress version works well with Elementor. If not, update WordPress.
Disable other plugins one by one. Some plugins conflict with Elementor and stop templates from loading. After disabling each plugin, try loading the template again.
Fix Styling Problems
Styling issues happen when your template looks different than expected. Clear your browser cache first. Cached styles can cause wrong displays. Then, regenerate CSS files in Elementor settings. This refreshes style data and fixes many issues.
Check your theme’s compatibility with Elementor. Some themes override Elementor styles. Try switching to a default WordPress theme to see if styles improve.
Disable any custom CSS that may conflict with Elementor. Custom codes sometimes break styling. Remove or adjust those codes to fix the look.

Credit: premiumaddons.com
Frequently Asked Questions
What Is An Elementor Template In WordPress?
An Elementor template is a pre-designed layout you can import into WordPress. It saves time by providing ready-made sections or pages, which you can customize easily using Elementor’s drag-and-drop editor.
How Do I Import An Elementor Template To WordPress?
To import, go to Elementor > Templates > Import Templates in WordPress. Upload your. json or. zip template file, then insert it into your page with the Elementor editor.
Can I Customize Elementor Templates After Adding Them?
Yes, Elementor templates are fully customizable. You can edit text, images, colors, and layouts using Elementor’s visual editor to match your site’s style and branding.
Are Elementor Templates Compatible With All WordPress Themes?
Most Elementor templates work well with many WordPress themes. However, using themes optimized for Elementor ensures better compatibility and styling consistency.
Conclusion
Adding an Elementor template to WordPress is simple and quick. You just need to follow a few clear steps. This method saves time and helps create beautiful pages. Templates give your site a consistent and professional look. Keep practicing to feel more confident using Elementor.
Your website will look great and work well. Start adding templates today and enjoy building your site.


