Want to grow your WordPress blog and keep your readers coming back? Adding a subscribe button is one of the easiest and smartest ways to do that.
It lets your visitors stay connected and get your latest updates right in their inbox. But if you’re not sure how to add one, don’t worry—you’re in the right place. You’ll discover simple steps to add a subscribe button that fits your blog perfectly.
By the end, you’ll have a powerful tool to boost your audience and keep them engaged. Ready to make your blog work harder for you? Let’s dive in!
Choose The Right Subscription Plugin
Choosing the right subscription plugin is key for your WordPress blog. It controls how visitors join your mailing list. A good plugin works well with your site and is easy to use. It should also help you grow your audience smoothly. This section will guide you through popular plugins, what to consider, and how to install one.
Popular Subscription Plugins
Some plugins are trusted by many bloggers. Mailchimp for WordPress is one. It links your site to your Mailchimp account easily. Another is Subscribe2, which sends posts by email. Jetpack offers a simple subscription widget that fits most blogs. WPForms lets you create custom signup forms. Each plugin has unique features to explore.
Factors To Consider
Check plugin compatibility with your WordPress version. Speed matters; avoid plugins that slow down your site. Look for plugins with good reviews and regular updates. Choose one that fits your budget, many are free with paid options. Think about your email service provider and if the plugin supports it. User-friendly design helps visitors subscribe without hassle.
Installing The Plugin
Go to your WordPress dashboard. Click on “Plugins” then “Add New.” Type the plugin name in the search box. Click “Install Now” next to the plugin you want. After installation, click “Activate” to start using it. Follow the plugin’s setup guide to connect your email service. Finally, place the subscribe button where visitors can see it easily.
Create A Subscription Form
Creating a subscription form is a key step to grow your WordPress blog audience. It collects visitor emails easily. Visitors can sign up for updates or newsletters. A clear, simple form encourages more subscriptions. Customizing the form fields, designing for engagement, and setting confirmation messages improve user experience. These factors help build trust and keep subscribers informed.
Customizing Form Fields
Start by choosing the right fields for your form. The email address field is essential. You may add name or preferences to personalize emails. Avoid asking for too much information. Too many fields can discourage sign-ups. Keep the form short and simple. Label each field clearly. Make required fields obvious. This reduces user confusion and errors.
Design Tips For Engagement
Use colors that match your blog theme. A clean, uncluttered design draws attention to the form. Use a readable font size. Place the form where visitors can easily see it. A sidebar or at the end of posts works well. Add a clear call-to-action button. Use phrases like “Subscribe Now” or “Join Free.” A contrasting button color helps it stand out.
Setting Up Confirmation Messages
After a visitor subscribes, show a thank you message. Confirm their subscription and what to expect next. For example, “Thank you for joining our newsletter!” Include details on when the next email will arrive. Use simple language and a friendly tone. Confirmation messages reassure visitors their signup worked. This builds trust and reduces confusion.
Add Subscribe Button To Your Blog
Adding a subscribe button to your WordPress blog helps grow your audience. Visitors can easily sign up for updates. This simple step keeps readers connected to your new posts. It also builds trust and loyalty over time. Here are some easy ways to add a subscribe button.
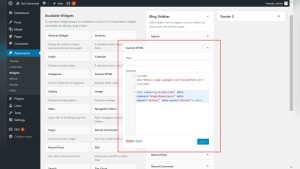
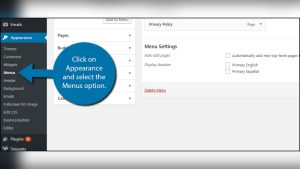
Using Widgets
Widgets offer a quick way to add a subscribe button. Go to your WordPress dashboard and open the Appearance menu. Click on Widgets to see available options. Find the Text or Custom HTML widget. Drag it to your desired widget area. Paste your subscribe button code or add the link. Save the changes and check your site. The button will now appear where you placed the widget.
Embedding In Posts Or Pages
Embedding the subscribe button inside posts or pages works well too. Edit the post or page where you want the button. Switch to the HTML or code editor view. Paste the subscribe button code directly into the content. Update or publish the page. Visitors can now subscribe from within your content. This method helps capture attention in the middle of reading.
Placing In The Sidebar Or Footer
The sidebar and footer are visible on many pages. Adding a subscribe button here increases exposure. Use the widget method to place the button in these areas. Customize the widget title to invite subscriptions. Test on different devices to ensure it looks good. A well-placed button encourages sign-ups without interrupting reading.

Credit: natalieducey.com
Test The Subscription Process
Testing the subscription process ensures your readers receive emails after signing up. It helps confirm your subscribe button works correctly. Testing avoids mistakes that stop subscribers from getting updates.
Check every step from clicking the button to receiving the email. This gives a smooth experience for your visitors. Let’s explore how to test and fix common problems.
Verifying Email Deliverability
Start by subscribing using a real email address. Watch for the confirmation email in the inbox or spam folder. Make sure the email arrives quickly and is easy to read.
Check the email’s subject line and content. They should match your blog style and message. If no email arrives, try another address or email provider.
Troubleshooting Common Issues
Emails may land in spam, or not arrive at all. Check your email settings and spam filters. Verify the subscription plugin is connected to your mailing service.
Clear any cache and test again. Look for plugin updates or conflicts with other tools. Fixing these issues keeps your subscription process smooth and reliable.
Optimize For Mobile Users
Optimizing your subscribe button for mobile users is essential. Many visitors use phones or tablets. Your button must be easy to see and tap. A good mobile experience can increase subscriptions and keep users happy.
Responsive Design Tips
Use a button size that fits small screens. Make sure it is not too close to other elements. Choose colors that stand out on all devices. Use simple fonts that are easy to read on small screens. Avoid using fixed widths that break the layout on phones.
Testing On Different Devices
Check how your subscribe button looks on various phones and tablets. Test on both Android and iOS devices. Use tools like browser developer mode to preview mobile views. Ask friends or family to test on their devices. Fix any issues before publishing the changes.

Credit: hughsviewsandnews.com
Promote Your Subscription Button
Promoting your subscription button helps grow your blog audience. It makes readers aware of your updates and encourages them to join. Without promotion, many visitors may miss the chance to subscribe. Simple steps can boost your subscription rate effectively.
Encouraging Sign-ups
Use clear and friendly language near your subscribe button. Tell readers what they get by subscribing. Offer reasons like exclusive content or regular updates. Place the button in visible spots on your blog. Try using pop-ups or banners that catch attention.
Make the sign-up process quick and easy. Ask only for essential information like email. Avoid long forms that may discourage readers. Thank new subscribers with a welcome message to build trust. Show them they made a good choice.
Using Social Media And Newsletters
Share your subscribe button link on your social media pages. Write short posts inviting followers to join your mailing list. Highlight benefits and what they will receive. Include the button or link in your email newsletters too.
Remind your readers regularly about subscribing. Use simple calls to action like “Subscribe for updates.” Cross-promote on all platforms to reach more people. Consistent promotion helps maintain steady growth in subscribers.

Credit: iftiseo.com
Frequently Asked Questions
How Do I Add A Subscribe Button To WordPress?
To add a subscribe button, use a plugin like Mailchimp or Jetpack. Install it, customize your form, and place the button using widgets or shortcodes.
Which Plugin Is Best For WordPress Subscribe Buttons?
Mailchimp and Jetpack are popular for subscribe buttons. They offer easy setup, customization, and integration with email marketing tools.
Can I Customize The Subscribe Button Design?
Yes, most plugins allow button design customization. You can change colors, text, size, and placement to match your blog’s style.
Where Should I Place The Subscribe Button On My Blog?
Place the subscribe button in visible areas like the sidebar, header, or after posts to maximize subscriber sign-ups.
Conclusion
Adding a subscribe button helps grow your blog audience fast. It makes it easy for visitors to stay updated. Use simple steps to place the button where readers can see it. Test different spots to find the best one. Keep your button clear and inviting for clicks.
Regularly check if it works well on all devices. A well-placed subscribe button keeps readers coming back. Start adding it today and watch your community grow.