Are you looking to grow your email list and boost your sales? Adding a Klaviyo form to your WordPress site is one of the smartest moves you can make.
But if you’re not sure where to start, it can feel overwhelming. Don’t worry—this guide will walk you through every step in a simple, clear way. By the end, you’ll have a powerful tool ready to capture your visitors’ attention and turn them into loyal customers.
Keep reading, and let’s make your WordPress site work harder for you!
Benefits Of Klaviyo Forms
Klaviyo forms offer many benefits for your WordPress site. They help you connect with visitors and grow your email list. Using these forms can make your marketing more effective. Here are some key benefits of Klaviyo forms.
Boosting Email List Growth
Klaviyo forms make it easy for visitors to sign up. They collect emails smoothly and quickly. More sign-ups mean a larger audience for your emails. This helps you reach more people with your messages.
Enhancing User Engagement
These forms invite visitors to interact with your site. Engaged visitors spend more time on your pages. They are more likely to explore your products or services. This creates a stronger connection with your audience.
Improving Conversion Rates
Klaviyo forms guide visitors to take action. Clear calls to action increase the chances of sign-ups or purchases. Better conversions lead to more sales or leads. This helps your business grow steadily and reliably.
Credit: mailoptin.io
Preparing Your Klaviyo Account
Preparing your Klaviyo account is the first step to add a signup form to WordPress. This step ensures your form collects the right data. It also helps your form look good and work well on your website. Follow these simple steps to get your Klaviyo account ready for your WordPress site.
Creating A Signup Form
Start by logging into your Klaviyo dashboard. Find the “Signup Forms” section in the menu. Click “Create Signup Form” to begin. Choose a form type that fits your website style. You can pick from popup, flyout, or embedded forms. Name your form so you can find it later. Save your new form to move to the next step.
Customizing Form Fields
Now, customize the fields on your signup form. Decide which information you want from visitors. Common fields include email, first name, and last name. You can add or remove fields as needed. Keep the form simple to encourage signups. Use clear labels for each field. This helps visitors understand what to enter.
Setting Form Display Options
Choose how and when your form appears on your WordPress site. Set triggers like time delay, scroll percentage, or exit intent. Decide on which pages to show the form. You may want it on all pages or just the homepage. Adjust display frequency to avoid annoying visitors. Preview your settings to see how the form works. Save these settings before moving on.
Setting Up WordPress For Klaviyo
Setting up WordPress for Klaviyo is a simple process. It prepares your site to collect email addresses using Klaviyo forms. This setup helps you connect your WordPress site to Klaviyo smoothly. Follow these steps to ensure everything works well.
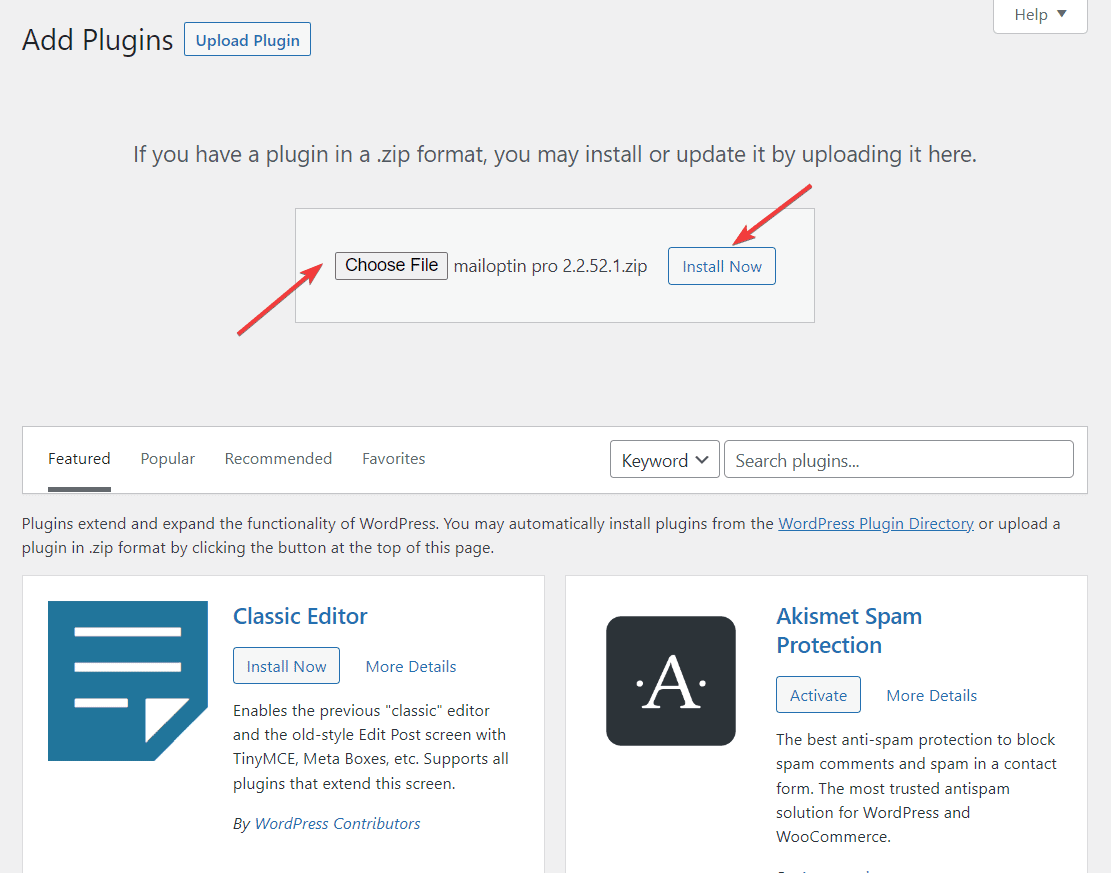
Installing Required Plugins
First, install the necessary plugins on your WordPress site. The most common plugin is “Klaviyo for WordPress.” It allows easy integration between your site and Klaviyo. Go to your WordPress dashboard, click “Plugins,” then “Add New.” Search for “Klaviyo for WordPress” and click “Install Now.” Activate the plugin once installed.
Generating Klaviyo Api Key
Next, you need an API key from Klaviyo. Log in to your Klaviyo account and go to “Account Settings.” Find the “API Keys” section and click “Create API Key.” Copy this key. The API key lets WordPress and Klaviyo communicate securely.
Connecting Klaviyo To WordPress
Return to your WordPress dashboard. In the Klaviyo plugin settings, paste the API key you copied earlier. Save the changes. This connection links your WordPress site to your Klaviyo account. Now, your site is ready to use Klaviyo forms and collect emails effectively.

Credit: wordpress.org
Adding Klaviyo Form To WordPress
Adding a Klaviyo form to your WordPress site helps collect email addresses easily. It boosts your email list and connects you with visitors. Several simple methods exist for placing the form on your site. Choose the one that fits your needs and skills.
Using Klaviyo Plugin Shortcodes
Install the Klaviyo plugin from the WordPress plugin directory. Activate it and link it to your Klaviyo account. After setup, create a form inside your Klaviyo dashboard.
Copy the shortcode provided for your form. Paste this shortcode into any WordPress post or page. The form will appear exactly where you place the shortcode. This method is quick and requires no coding skills.
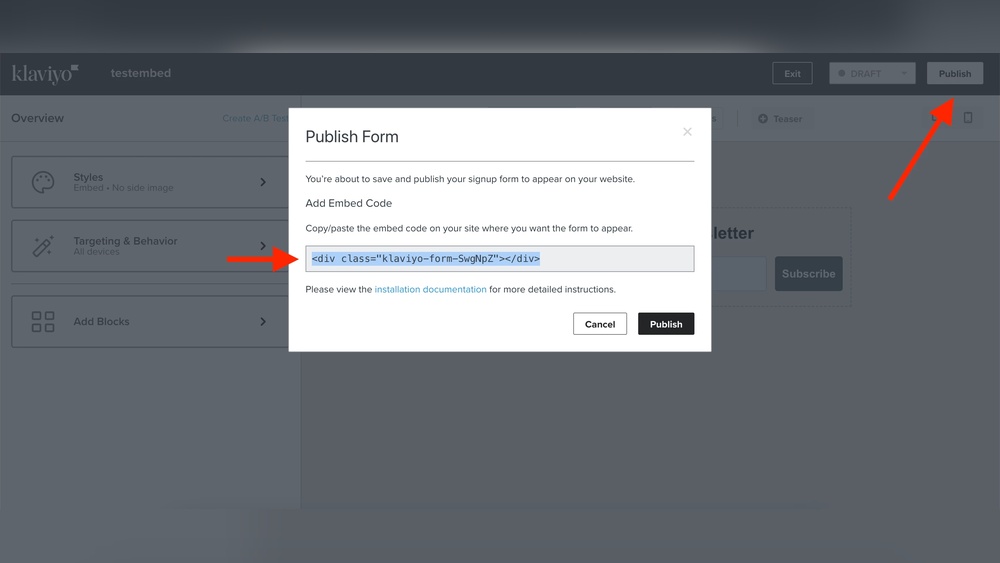
Embedding Form Via Html Block
Create your form in Klaviyo and find the embed code. Copy the HTML code snippet.
Go to the WordPress editor and add a Custom HTML block. Paste the embed code inside this block. Update or publish your page. The form will display and work like any other embedded form.
Placing Form In Sidebar Or Footer
Open the WordPress dashboard and go to Appearance > Widgets. Add a Custom HTML widget to the sidebar or footer area. Paste your Klaviyo form’s embed code or shortcode here.
Save the widget settings. Your form will now appear on all pages using that widget area. This placement works well for email signup forms that should be visible site-wide.
Testing And Optimizing Forms
Testing and optimizing Klaviyo forms on WordPress helps increase sign-ups. It ensures the form works well and meets your visitors’ needs. Careful checks and improvements lead to better user experience and higher conversions.
Checking Form Functionality
Test the form on different devices and browsers. Make sure all fields accept input correctly. Verify the submit button works and sends data to Klaviyo. Check confirmation messages appear after submission. Fix any errors that stop the form from working.
Analyzing User Interaction
Use analytics tools to track how users interact with the form. See how many visitors start and finish the form. Look for drop-off points where users leave. Understand what may confuse or block users. This data helps find areas needing improvement.
Improving Form Design
Simplify the form by reducing the number of fields. Make labels clear and easy to read. Use contrasting colors for buttons and text. Ensure the form fits well on mobile screens. Test different designs to see which one gets more sign-ups.
Credit: www.crosspeaksoftware.com
Troubleshooting Common Issues
Adding a Klaviyo form to WordPress can sometimes lead to common issues. These problems can stop your form from showing or working properly. Understanding how to fix these issues helps keep your email list growing without trouble. This section covers simple solutions to frequent problems.
Fixing Form Display Problems
Check if the form shortcode is correctly placed in your WordPress editor. Sometimes, the form does not show because of a theme conflict. Try switching to a default WordPress theme to test if the form appears. Clear your browser cache and refresh the page. Also, check if any plugins block the form scripts. Disable plugins one by one to find the cause. Make sure your WordPress and Klaviyo plugin are up to date.
Resolving Api Connection Errors
API connection errors happen when Klaviyo cannot communicate with your site. Verify your API key is correct and active in your Klaviyo account. Enter the key carefully in the WordPress plugin settings. Check your site’s server allows outbound connections to Klaviyo. Some firewalls or security plugins can block API calls. Temporarily disable these to test the connection. If errors persist, contact your hosting provider for help.
Handling Submission Failures
Submission failures mean users cannot send their data through the form. Confirm that the form fields are correctly set up and required fields are not missing. Test the form yourself to see if errors show. Look for JavaScript conflicts by checking your browser console. Disable other plugins that might interfere with form scripts. Ensure Klaviyo lists and tags are properly configured to accept submissions. Fix these issues to make your form reliable.
Frequently Asked Questions
How Do I Create A Klaviyo Form For WordPress?
To create a Klaviyo form, log in to your Klaviyo account. Navigate to the Signup Forms tab and select “Create Signup Form. ” Customize the form to your needs. Save and publish it before adding it to your WordPress site.
How Can I Embed A Klaviyo Form In WordPress?
Copy the Klaviyo form’s embed code from the form editor. In WordPress, go to the desired page or post. Use the Custom HTML block or widget and paste the code. Save and preview your form on the site.
Is There A Plugin To Integrate Klaviyo Forms With WordPress?
Yes, the official Klaviyo plugin for WordPress allows easy integration. Install and activate the plugin, then connect your Klaviyo account. This plugin helps sync forms, lists, and tracking seamlessly.
Can I Customize Klaviyo Forms On WordPress?
Absolutely. Klaviyo’s form builder offers styling options. You can change colors, fonts, and fields to match your WordPress site’s branding for a consistent look.
Conclusion
Adding a Klaviyo form to WordPress is simple and effective. You can collect emails and grow your list quickly. Follow each step carefully to avoid errors. Customize the form to fit your website style. Test the form to make sure it works well.
Keep your visitors engaged with clear messages. This small effort can improve your marketing results. Start adding forms today and watch your audience grow.