
Want to make it easier for visitors to log in to your WordPress site? Adding a login button to your WordPress menu is a simple yet powerful way to improve user experience.
When you give your users a clear, easy path to access their accounts, they’re more likely to stay engaged and return. In this post, you’ll discover step-by-step how to add a login button to your WordPress menu—no coding skills needed.
Keep reading, and by the end, you’ll have a sleek, functional login button that fits perfectly with your site’s design.
Choose The Right Login Plugin
Choosing the right login plugin is important for your WordPress site. It controls how users sign in and affects site security and usability. A good plugin offers easy setup and fits your site design. It also helps keep user data safe and works well with other tools on your site.
Not all plugins are the same. Some are simple, while others have many features. Picking the right one saves time and improves user experience. Consider your site needs before deciding.
Popular Login Plugins For WordPress
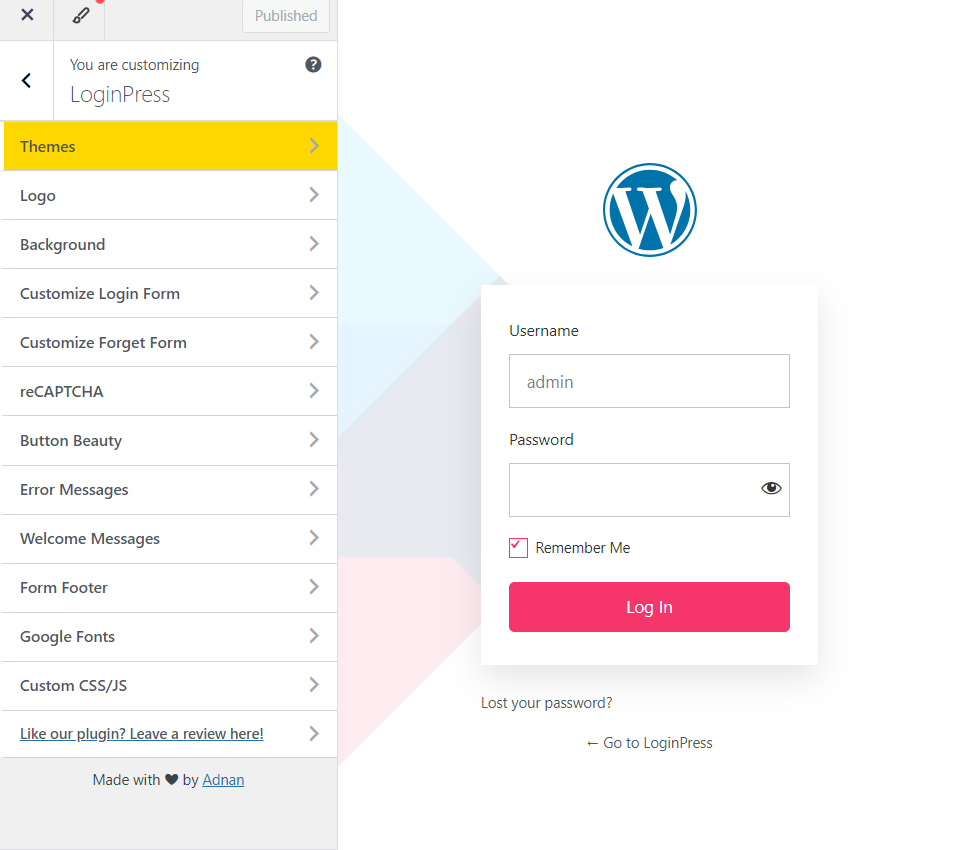
Many plugins can add a login button to your WordPress menu. LoginPress lets you customize the login form easily. WPForms includes login form options with drag-and-drop building. Theme My Login matches the login page with your site theme. Ultimate Member offers user profile and login features. These plugins are tested and trusted by many users.
Criteria For Selecting A Plugin
Choose a plugin that is easy to use and set up. Check if it updates regularly for security. It should work with your WordPress version and other plugins. Look for plugins with good support and clear documentation. Consider how the plugin handles user data and privacy. Make sure it allows customizing the login button style and location. The plugin’s speed impact on your site matters too. Pick one that fits your site’s design and user needs.
Credit: loginpress.pro
Install And Activate The Plugin
Adding a login button to your WordPress menu requires a plugin. The plugin helps create and manage the button easily. This section explains how to install and activate the plugin step-by-step.
Accessing The WordPress Plugin Directory
First, log in to your WordPress dashboard. On the left menu, find and click “Plugins.” Then, click “Add New.” This opens the WordPress Plugin Directory. Here, you can search for many free plugins.
Installing The Plugin
Use the search bar to type keywords like “login button.” Find a plugin that matches your needs. Click the “Install Now” button next to the plugin. Wait a few seconds while WordPress downloads and installs it.
Activating The Plugin
After installation, click the “Activate” button. Activation turns the plugin on and ready to use. You will see new settings or options in your dashboard. Now, you can start adding the login button to your menu.
Configure Plugin Settings
After installing the login button plugin, the next step is to configure its settings. This process helps you control how the login button works and looks on your WordPress menu. Proper configuration ensures users have a smooth login experience. It also helps the button fit well with your site’s design.
Setting Up Login Options
Start by choosing how users will log in. Some plugins let you enable social logins or keep it simple with just username and password fields. Decide if you want users to stay logged in after closing the browser. You can also set where users go after logging in, such as the homepage or a profile page.
Enable or disable the registration option. This controls if new users can sign up from the login button. Check if the plugin supports password recovery links. These help users reset their passwords easily.
Customizing Login Button Appearance
Make the login button match your site’s style. Most plugins let you change the button’s color, size, and shape. Choose colors that stand out but still fit your website’s theme. Adjust the font style and size for better readability.
You can also add icons or text to the button. This makes it clear that it is for logging in. Position the button in your menu so users find it easily. Preview your changes before saving to ensure the button looks good on all devices.
Add Login Button To Menu
Adding a login button to your WordPress menu helps visitors access their accounts quickly. It improves user experience by making login easy to find. This guide explains simple ways to add a login button to your site’s menu.
Accessing WordPress Menus
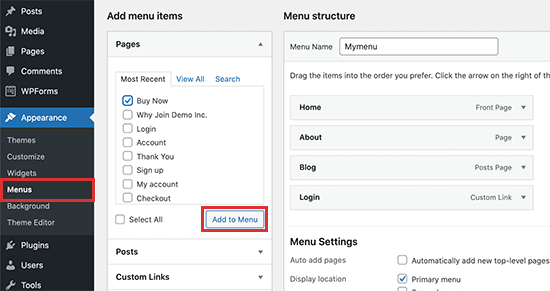
First, log in to your WordPress dashboard. From the left sidebar, go to Appearance and click Menus. Here, you will see your current menus. Choose the menu where you want to add the login button. This is the place to make changes to your menu items.
Adding Custom Links
Inside the Menus screen, look for the Custom Links section. Enter the URL of your login page, usually /wp-login.php or a custom login page URL. In the Link Text box, type “Login.” Click Add to Menu. The login link will appear in the menu structure. Drag it to the position you want and save the menu.
Using Plugin-generated Menu Items
Some plugins create login buttons automatically. Install a plugin like “Login Logout Menu” or “WP User Manager.” After activation, these plugins add login/logout links to your menu options. Go back to Appearance > Menus. Find the new login item under the plugin’s menu section. Add it to your menu and save. This method updates the button based on user login status.
Test The Login Button
Testing the login button is a key step after adding it to your WordPress menu. It ensures the button works properly and is easy for visitors to use. Proper testing prevents user frustration and keeps your site professional.
Checking Button Visibility
First, check if the login button appears on the menu. Look at your website on different devices like desktop and mobile. The button should be clear and easy to find. Make sure it does not blend into the background or get hidden behind other menu items.
Check the button’s color and size. It should stand out but fit well with your site’s design. If you used custom styles, confirm they load correctly on the live site.
Verifying Login Functionality
Click the login button to test its function. It must direct users to the login page without errors. Try logging in with a test account to verify the process works smoothly.
Check the login form for usability. The fields should accept input and the submit button should respond. After logging in, ensure the site redirects to the right page, like the user dashboard or homepage.
Test logging out too. Confirm the logout button appears after login and ends the session properly.
Credit: www.wpbeginner.com
Troubleshooting Common Issues
Troubleshooting common issues helps keep your login button working well. Problems may block users from logging in smoothly. Fixing these quickly improves your site’s user experience. Below are simple solutions for typical problems.
Fixing Button Placement Problems
Sometimes the login button does not show in the right place. Check your theme’s menu settings first. The button might be hidden or placed outside the visible menu area. Try dragging the button item in the menu editor. Save changes and refresh your site.
Clear your browser cache if the button still looks misplaced. Old files can cause display errors. Also, test your site on different devices. This helps find if the problem is device-specific. Adjust CSS styles if needed to align the button properly.
Resolving Plugin Conflicts
Plugins can clash and stop the login button from working. Deactivate all plugins except the one that adds the login button. Check if the button works now. If yes, activate plugins one by one to find the conflict.
Update all plugins and your WordPress version. Outdated software often causes issues. Use plugins from trusted sources only. If conflicts persist, contact plugin support or consider alternatives that work better together.
Credit: loginpress.pro
Frequently Asked Questions
How Do I Add A Login Button To WordPress Menu?
To add a login button, use a plugin or custom code. Plugins like “WP Login Menu” simplify this. Alternatively, add a custom link to your menu pointing to the login page URL.
Can I Customize The Login Button Appearance In WordPress?
Yes, you can customize the login button using CSS. Most plugins allow style changes. You can also add custom classes to your menu item for styling.
Is It Possible To Show Login/logout On The Same Menu?
Yes, many plugins show login and logout buttons dynamically. They display “Login” for guests and “Logout” for logged-in users automatically.
Do I Need Coding Skills To Add A Login Button?
No, plugins make it easy without coding. However, basic HTML or PHP helps for custom solutions or advanced customization.
Conclusion
Adding a login button to your WordPress menu helps users access your site quickly. It improves user experience and makes navigation simple. You can choose from different methods to add the button. Each option fits different skill levels and needs.
Take your time to follow the steps carefully. Your site will look more professional and user-friendly. Keep your menu clear and easy to use. This small change can make a big difference for your visitors. Try it today and see how it works for you.



