
Are you struggling to make your WordPress website easier to navigate? Adding a new page to your menu can be the simple change that improves your visitors’ experience—and keeps them coming back.
If you want your site to look professional and help your audience find exactly what they need, learning how to add a page to your WordPress menu is a must. You’ll discover clear, step-by-step instructions that anyone can follow. Ready to take control of your site’s navigation and make it work for you?
Let’s dive in!
Accessing The WordPress Dashboard
The WordPress dashboard is the central place to control your website. It lets you create pages, posts, and menus.
Accessing the dashboard is simple. You need to log in with your username and password.
Open Your Web Browser
Start by opening a web browser like Chrome, Firefox, or Safari. This is where you enter your website’s address.
Go To The Login Page
Type your website’s URL followed by /wp-admin. For example, www.yoursite.com/wp-admin. Press enter to open the login page.
Enter Your Username And Password
On the login page, fill in your username and password. These details were created when setting up WordPress.
Click The Login Button
After entering your details, click the login button. This will take you to the WordPress dashboard.
Explore The Dashboard Menu
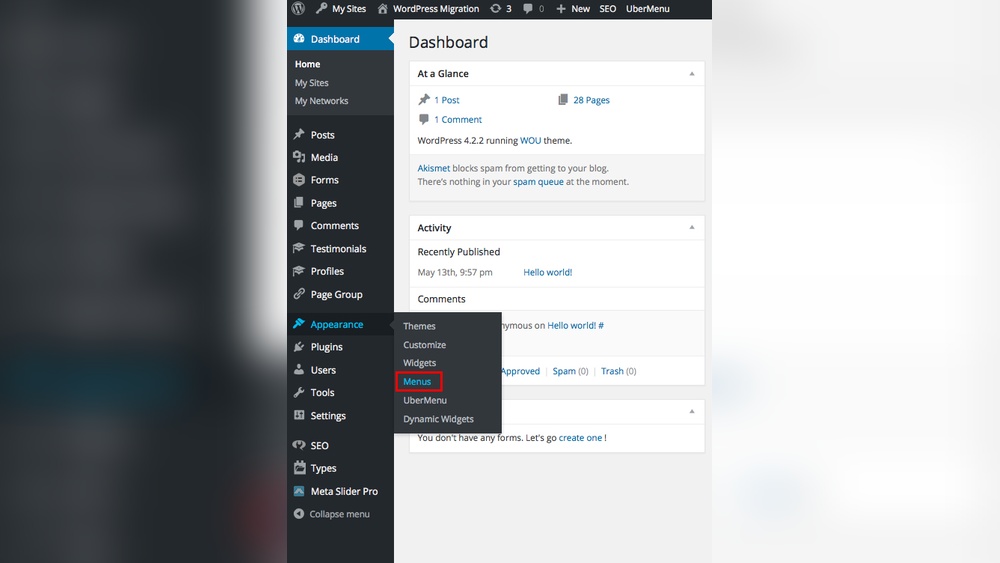
Once logged in, you see the dashboard menu on the left side. This menu helps you manage your website easily.
Credit: wou.edu
Navigating To The Menus Section
Accessing the Menus section in WordPress is the first step to customizing your site’s navigation. This area lets you control which pages appear in your menu and how visitors move through your content.
The process is simple and takes just a few clicks inside your WordPress dashboard. Knowing how to find this section helps you manage your website easily.
Logging Into Your WordPress Dashboard
Start by logging into your WordPress admin area. Use your username and password on the login page. Once logged in, you will see the dashboard with many options.
Finding The Appearance Menu
Look at the left sidebar in the dashboard. Find the menu item called “Appearance.” Click on it to open a list of design options.
Opening The Menus Section
Under “Appearance,” find and click on “Menus.” This opens the Menus screen where you can create and edit your navigation menus. Here you manage all menu items and structure.
Selecting The Right Menu To Edit
Choosing the correct menu to edit is an important step in adding a page to a WordPress menu. WordPress allows multiple menus for different parts of your site. Editing the wrong menu may not show your new page where you want it. This makes understanding menus key to successful site navigation.
Menus can appear in different places like the header, footer, or sidebar. Each menu serves a specific function and audience. Some themes come with several default menus. You need to identify the menu linked to the area you want to change.
Accessing the menu settings is simple but knowing which menu to pick requires attention. WordPress shows all created menus in the menu editor. You must select the one connected to your site’s main navigation or the location you want to update.
Selecting Menus By Location
Menus have assigned locations based on your theme setup. Locations could be named “Primary,” “Footer,” or “Social Links.” These labels help you find the right menu quickly. Choose the location that matches where you want your new page to appear.
Identifying Menus By Name
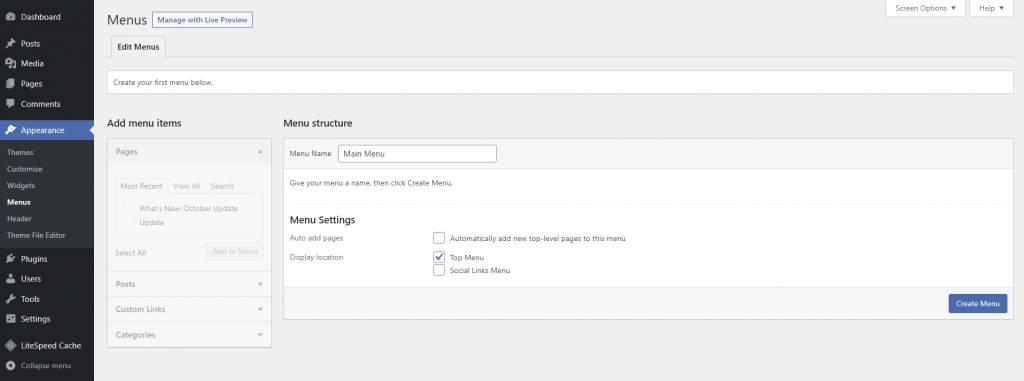
Each menu has a unique name given during creation. Names like “Main Menu” or “Top Menu” describe their purpose. Look for a menu name that fits your site’s structure. This step avoids confusion between multiple menus.
Previewing Menu Items
Before editing, preview the existing menu items. Check if the menu includes pages, categories, or custom links. Confirm it matches the navigation area you intend to update. This preview helps ensure you edit the correct menu.

Credit: www.youtube.com
Adding A New Page To The Menu
Adding a new page to the WordPress menu helps visitors find important content easily. The process is simple and quick. This guide explains how to add a page step-by-step. Follow along to improve your website navigation.
Choosing Pages From The Menu Options
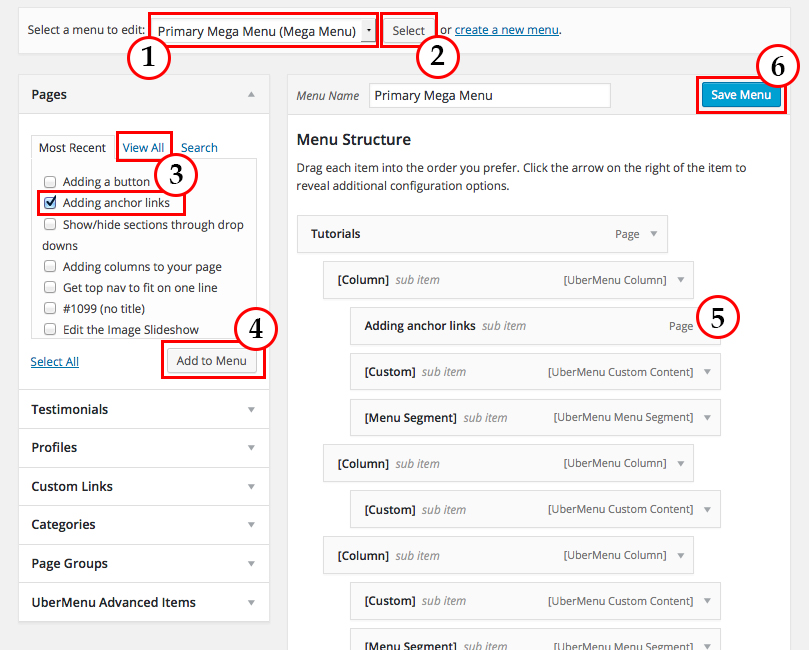
Start by opening the WordPress dashboard. Go to the “Appearance” section. Click on “Menus” to open the menu editor. On the left side, find the “Pages” box. This box shows all available pages you can add. You can see your recent, most viewed, or all pages here. Select the pages you want to add to the menu.
Selecting The Desired Page
Look through the list and find the page you want. Use the search bar if you have many pages. Check the box next to the page name. This step tells WordPress which pages to add. You can select one or multiple pages at once. Make sure you choose the correct page to avoid confusion.
Adding The Page To The Menu Structure
After selecting, click the “Add to Menu” button. The page will appear in the menu structure on the right. You can drag and drop to change the order. Place the new page where it fits best. Save the menu by clicking the “Save Menu” button. Your new page now shows in the site menu for visitors.
Organizing Menu Items
Organizing your WordPress menu helps visitors find pages quickly. A clear menu improves website navigation. You can arrange menu items in many ways. This section shows how to reorder items and create submenus. These steps make your menu neat and easy to use.
Reordering Menu Items
To reorder menu items, drag and drop them in the menu editor. Click and hold a menu item. Move it up or down to the desired position. Drop it when you see a blue line. This change updates the menu order on your site. Organizing items by importance helps visitors navigate.
Creating Submenus
Submenus group related pages under a main menu item. Drag a menu item slightly to the right below another item. This action nests the item as a submenu. Submenus keep your menu clean and structured. Visitors can see categories and explore more easily.
Credit: www.hostinger.com
Saving And Previewing The Menu
Saving and previewing your WordPress menu ensures your changes are not lost. It also helps you see how the menu looks before publishing it live. This step is crucial to avoid errors and improve site navigation.
After adding pages or rearranging menu items, saving locks in those updates. Without saving, your work disappears if you leave the page. Previewing shows the menu exactly as visitors will see it.
Saving The Menu
Locate the “Save Menu” button at the bottom or top right of the menu editor. Click it once to save all changes. Wait a moment for WordPress to confirm the update. Avoid clicking multiple times to prevent errors.
Saving ensures the menu reflects your new structure. Changes remain even if you close the browser. Always save after making edits to keep progress safe.
Previewing The Menu
Preview the menu by visiting your website in a new tab or window. Look for the menu location where you added the page. Check the layout and order of menu items carefully.
Ensure the new page link works and is easy to find. Previewing helps spot mistakes like broken links or wrong order. Make adjustments in the menu editor and save again if needed.
Troubleshooting Common Issues
Troubleshooting common issues helps keep your WordPress menu working well. Some problems can block pages from showing. Others stop menus from appearing on your site. Fixing these issues ensures visitors find your content easily.
Menu Not Showing On Site
Check if the menu is assigned to a location. Open Appearance > Menus and confirm the display location is set. Sometimes themes use different menu areas. Choose the right one for your site.
Clear your browser cache. Old data might hide the menu updates. Refresh the page after clearing the cache. Also, check your theme settings for menu display options. Some themes disable menus by default.
Page Not Appearing In Menu Options
Make sure the page is published and not set to private or draft. Only published pages appear in the menu list. Refresh the menu page to update available options.
Look for screen options at the top right of the menu editor. Ensure the checkbox for Pages is selected. This setting controls what shows in the menu panel.
Frequently Asked Questions
How Do I Add A New Page To My WordPress Menu?
To add a page, go to Appearance > Menus in your WordPress dashboard. Select the page from the left panel, click “Add to Menu,” then save changes.
Can I Rearrange Pages Within The WordPress Menu?
Yes, you can easily drag and drop menu items to reorder them. After arranging, click “Save Menu” to apply changes.
How Do I Create A Custom Menu With Specific Pages?
Create a new menu under Appearance > Menus. Add desired pages, links, or categories, then assign the menu to a location.
Why Is My New Page Not Showing In The Menu?
Make sure the page is added to the menu and saved. Refresh the site; some themes may require menu location assignment.
Conclusion
Adding a page to your WordPress menu is simple and quick. You only need a few clicks to organize your site better. This helps visitors find important pages easily. Keeping your menu clear improves the overall user experience. Try adding different pages and see what works best.
Your website will look more professional and user-friendly. Keep practicing these steps to build a great menu. You have the tools to make your site easy to navigate.



