
Are you about to make important updates to your WordPress site but worried about how it will look to visitors during the process? Activating maintenance mode is the perfect way to keep your site professional and user-friendly while you work behind the scenes.
You’ll learn simple, step-by-step instructions to turn on maintenance mode quickly and easily. By the end, you’ll have the confidence to update your site without any interruptions or confusion for your visitors. Let’s get started and keep your website running smoothly!
Credit: blog.hubspot.com
Why Use Maintenance Mode
Activating maintenance mode in WordPress helps control what visitors see during site updates. It keeps your website professional and safe while you work behind the scenes. Using maintenance mode stops visitors from seeing broken pages or errors.
Benefits For Website Updates
Maintenance mode hides unfinished work from visitors. It gives you time to fix bugs and add new features without interruptions. Visitors see a friendly message instead of broken pages. This keeps your website’s reputation strong.
Improving User Experience
Visitors get a clear message about site updates. They know the website is temporarily unavailable and will return soon. This reduces confusion and frustration. Users are more likely to come back after updates finish.
Preventing Data Loss
Maintenance mode stops users from changing data during updates. It prevents errors caused by simultaneous changes. This keeps your database safe and consistent. Your website runs smoothly after updates without missing information.
Methods To Activate Maintenance Mode
Activating maintenance mode in WordPress helps you work on your site without showing unfinished changes to visitors. Several methods exist to enable this mode. Each method suits different skill levels and needs.
Choose the best approach to keep your site safe during updates or fixes. Below are three common ways to activate maintenance mode effectively.
Using Plugins
Plugins offer a simple way to turn on maintenance mode. Install a plugin like “WP Maintenance Mode” or “Coming Soon.” These plugins provide ready-made pages for visitors during downtime. You can customize the message and design easily. No coding is needed, which makes this method beginner-friendly.
Editing The .htaccess File
Editing the .htaccess file lets you control maintenance mode at the server level. This method blocks visitors by redirecting them to a custom page. You add specific rules to the .htaccess file in your WordPress root folder. This approach requires some knowledge of file management and server rules. Use it to create a quick, secure maintenance page.
Adding Code To Functions.php
You can add a snippet to your theme’s functions.php file to show a maintenance message. This method activates maintenance mode without extra plugins. Insert PHP code that detects visitors and displays a maintenance notice. It allows you to customize the message fully. Be careful while editing this file to avoid breaking your site.
Top Plugins For Maintenance Mode
Choosing the right plugin can make activating maintenance mode easy and fast. These plugins help you show a clear message to visitors during updates. They keep your site professional and prevent visitor confusion. Below are some top plugins trusted by many WordPress users.
Seedprod
SeedProd offers a simple way to enable maintenance mode. It comes with many ready-to-use templates. You can customize the look without coding. It also supports email marketing integration. This helps collect visitor emails while your site is offline.
Wp Maintenance Mode
WP Maintenance Mode is a popular free plugin. It lets you set a maintenance page quickly. You can add a countdown timer and contact form. The plugin allows you to control who sees the site during maintenance. It works well for small and large websites.
Coming Soon Page & Maintenance Mode
This plugin combines coming soon and maintenance modes in one tool. It has easy settings and attractive templates. You can add social media icons and custom messages. It helps keep visitors informed and engaged while you work on your site.

Credit: www.interserver.net
Step-by-step Plugin Activation
Activating maintenance mode in WordPress is simple with a plugin. Plugins make this process fast and easy. You do not need any coding skills.
This section explains how to install and use a plugin step-by-step. Follow each step carefully to enable maintenance mode correctly.
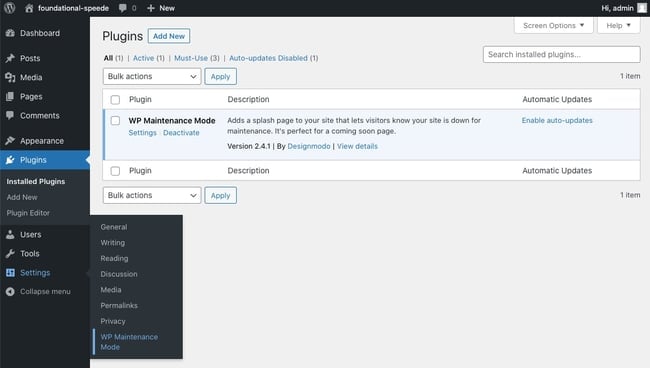
Installing The Plugin
Log in to your WordPress dashboard. Go to the “Plugins” menu on the left side. Click “Add New” at the top of the page.
Type “maintenance mode” in the search bar. Find a plugin with good ratings and reviews. Click “Install Now” next to the plugin.
After installation, click “Activate” to enable the plugin on your site.
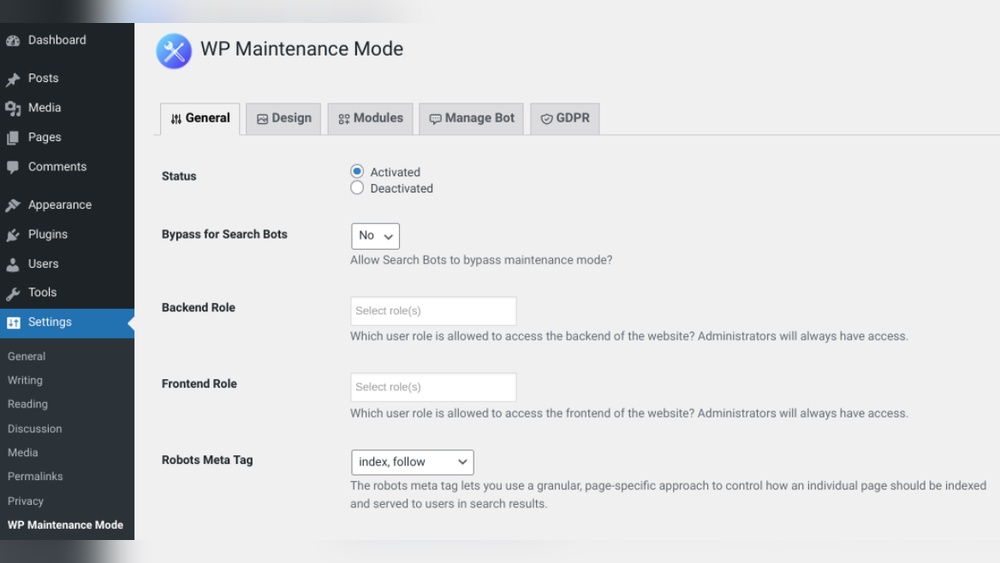
Configuring Settings
Once the plugin is active, go to its settings page. This is usually under the “Settings” or plugin menu.
Choose the maintenance mode design you want. Add a message visitors will see during maintenance.
Set who can view the site while it is in maintenance mode. Usually, you can allow only admins to access the site.
Enabling Maintenance Mode
Look for the option to turn on maintenance mode in the plugin settings. Toggle it to “On” or click “Enable.”
Save your changes. Visit your website in a new browser or incognito mode to check the maintenance page.
Make sure the maintenance message shows and your site visitors cannot access the regular pages.
Manual Activation Via Code
Activating maintenance mode manually in WordPress gives you full control over the process. It helps you show a custom message to visitors while you update your site. This method uses simple code added to your theme’s functions.php file. It is a good choice for users who prefer not to install extra plugins.
Manual activation requires some basic knowledge of PHP and WordPress files. Always back up your site before editing any code. A small mistake in the code can break your site. Let’s explore how to safely add and remove maintenance mode using code.
Editing Functions.php Safely
Access your WordPress site files via FTP or your hosting control panel. Locate the functions.php file inside your active theme folder. Always download a copy of the original file to your computer. This helps you restore it if something goes wrong.
Use a plain text editor to open the file. Avoid word processors like Microsoft Word. Add the maintenance mode code at the end of the file. Save changes and upload the file back to your server. Clear your browser cache to see the changes on your site.
Sample Maintenance Mode Code
function wp_maintenance_mode() { if (!current_user_can('edit_themes') || !is_user_logged_in()) { wp_die('Maintenance Mode
Our website is down for maintenance. Please check back soon.
'); } } add_action('get_header', 'wp_maintenance_mode'); This code shows a simple maintenance message to all visitors except logged-in admins. It stops users from seeing the normal site during updates. You can customize the message inside the wp_die() function.
Disabling Maintenance Mode
To turn off maintenance mode, remove the added code from the functions.php file. Save and upload the file again to your server. Refresh your website to check if the site is live. This will restore normal access for all visitors.
Customizing Maintenance Pages
Customizing maintenance pages helps keep visitors informed during site updates. It shows professionalism and care for user experience. A well-designed page reduces frustration and keeps users interested.
Simple, clear customization makes your site look active even when offline. It also gives visitors ways to reach you or follow your updates. This section covers design tips, adding contact info, and social media links.
Design Tips
Use a clean layout with your brand colors. Choose easy-to-read fonts and keep text short. Add a logo to remind visitors who you are. Include a friendly message explaining the maintenance. Avoid clutter to keep the page calm and clear.
Adding Contact Information
Provide an email address or phone number for questions. Add a contact form for quick messages. Make sure the info is easy to find on the page. This helps visitors get help if needed during downtime.
Including Social Media Links
Show icons linking to your social media profiles. Let users follow updates on platforms like Facebook or Twitter. Place links where they stand out but do not distract. Social media keeps visitors connected while your site is offline.
Testing Maintenance Mode
Testing maintenance mode is an important step after activation. It ensures visitors see the right message. It also confirms you can still access your site backend. Testing helps avoid confusion and downtime issues.
Checking Frontend Display
First, open your website in a new browser tab. The maintenance mode message should appear on the homepage. Make sure it looks clear and professional. Check on different devices if possible. Visitors must know the site is temporarily offline.
Verifying Admin Access
Next, log in to your WordPress dashboard. You should have full access despite maintenance mode. Try editing a post or page to confirm. This step ensures you can work on your site. Maintenance mode should not block admins from managing content.
Common Issues And Fixes
Activating maintenance mode in WordPress may cause some common issues. These issues can stop your website from working properly. Knowing how to fix them helps keep your site safe and running smoothly. Below are some common problems and simple ways to solve them.
Plugin Conflicts
Plugins may clash with your maintenance mode tool. This can cause errors or stop the mode from working. Try deactivating other plugins one by one. Check if the maintenance mode starts working after each deactivation. This helps find the conflicting plugin.
Update all plugins to their latest versions. Old plugins often cause conflicts. Use plugins from trusted sources only. If conflicts continue, contact the plugin support team.
Caching Problems
Caching can show the old version of your site. This means visitors do not see the maintenance mode page. Clear your browser cache first. Then clear your WordPress cache and server cache if available.
Deactivate caching plugins temporarily to test if caching causes the issue. Some hosting providers also have caching features. Disable them or ask for help if needed. Proper cache clearing ensures visitors see the correct page.
Access Denied Errors
Access denied errors appear when users cannot view the maintenance page. This happens due to wrong file permissions or security settings. Check your .htaccess file for any rules blocking access. Correct these rules or remove them.
Set proper file permissions for WordPress files and folders. Usually, folders need 755 and files need 644. If errors continue, check your security plugins and firewall settings. They might block access to the maintenance page.

Credit: www.interserver.net
Frequently Asked Questions
How Do I Enable Maintenance Mode In WordPress?
You can enable maintenance mode by using plugins like “WP Maintenance Mode. ” Install, activate, and configure the plugin to display a maintenance page during updates or changes.
Why Use Maintenance Mode On A WordPress Site?
Maintenance mode informs visitors your site is temporarily offline. It improves user experience and prevents errors while you update or fix your site.
Can I Customize The Maintenance Mode Page?
Yes, most maintenance mode plugins let you customize text, design, and branding. This keeps your site professional and informs visitors clearly during downtime.
Does Maintenance Mode Affect Seo Rankings?
Maintenance mode temporarily pauses your site but does not harm SEO if used briefly. Avoid long downtimes to prevent negative SEO impacts.
Conclusion
Activating maintenance mode keeps your site safe during updates. Visitors see a clear message while you work behind the scenes. This helps avoid broken pages or errors. Choose a plugin or code method that fits your needs. Test the mode before making your site live again.
Regular use improves your site’s professionalism and user experience. Keep your website smooth and secure with simple steps. Maintenance mode is a useful tool for every WordPress user.


