
Are you locked out of your WordPress admin or need to add a new admin quickly? Using phpMyAdmin is a powerful way to take control and fix admin access issues fast.
In this guide, you’ll learn step-by-step how to add an admin user directly through phpMyAdmin, even if you can’t log in the usual way. By the end, you’ll have the confidence to manage your WordPress users like a pro and keep your site running smoothly.
Keep reading—this simple trick could save you hours of frustration.

Credit: wpengine.com
Accessing Phpmyadmin
Accessing PhpMyAdmin is the first step to manage your WordPress database effectively. It lets you directly interact with your site’s data. You can use it to add an admin user or fix database issues.
PhpMyAdmin is usually available through your hosting provider. Knowing how to find and log in to it saves time and effort. Below are simple ways to access PhpMyAdmin.
Locating Phpmyadmin Login
PhpMyAdmin login pages often have a simple URL. It usually ends with “/phpmyadmin”. Try adding this to your website’s domain. For example, www.yoursite.com/phpmyadmin.
Some hosts use different paths. Check your hosting emails for the correct link. Search your hosting provider’s help section for PhpMyAdmin location details.
Using Hosting Control Panel
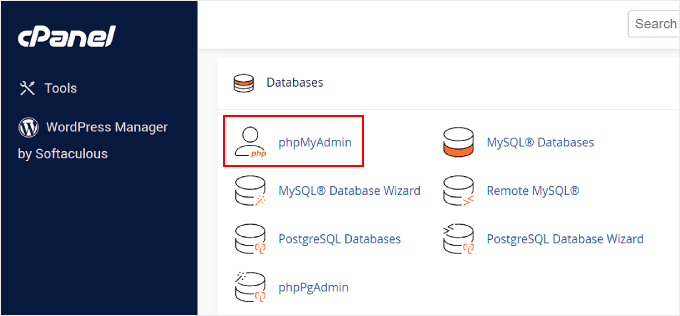
Most hosting services include PhpMyAdmin in their control panel. Log in to your hosting account first. Find the section named “Databases” or “Database Management.”
Click the PhpMyAdmin icon or link to open the tool. It will ask for your database username and password. These credentials are in your hosting account or WordPress config file.

Credit: www.wpbeginner.com
Navigating The WordPress Database
Working with the WordPress database is key to managing your site effectively. The database stores all your site’s data, including posts, settings, and users. Navigating it carefully helps you make changes without breaking your site. This section explains how to find the right database and locate the user table in phpMyAdmin.
Selecting The Right Database
First, log in to phpMyAdmin. You will see a list of databases on the left side. Each WordPress site uses one database. To find the correct one, check your site’s wp-config.php file. Look for the line with DB_NAME. This line shows your database name. Select this database in phpMyAdmin. This step ensures you work with the correct data.
Finding The Users Table
After selecting the database, look for tables starting with wp_. This prefix may be different if you changed it during setup. Find the table named wp_users. This table holds all user accounts for your WordPress site. Click on it to see the list of users. From here, you can add or edit admin users safely.
Adding A New Admin User
Adding a new admin user in WordPress through phpMyAdmin is a useful way to manage site access. This method helps when you cannot log in to your WordPress dashboard. You can manually create a new admin user directly in the database.
This process involves inserting user data and creating a secure password hash. Both steps are essential to ensure the new admin account works properly and stays safe from unauthorized access.
Inserting User Data
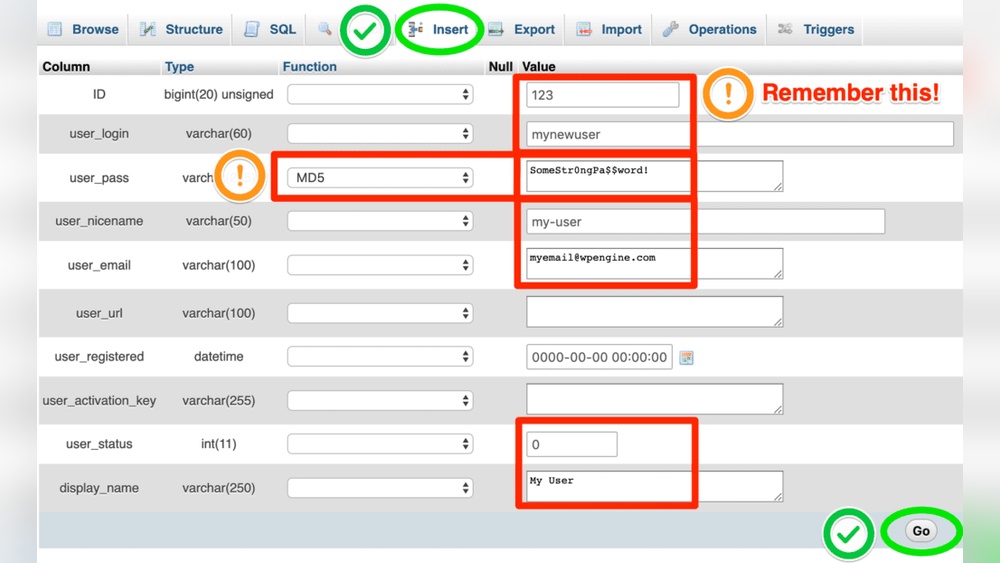
First, open phpMyAdmin and select your WordPress database. Find the table named wp_users. Click the Insert tab to add a new row.
Fill in the required fields:
user_login: Enter the username for the new admin.user_pass: This field will hold the password hash.user_nicename: A URL-friendly version of the username.user_email: The email address of the new admin.user_registered: Set the current date and time.user_status: Usually set to 0.
Save the changes. The new user now exists in the database but lacks admin rights.
Creating A Secure Password Hash
WordPress uses a special hash for passwords. You cannot enter plain text passwords here. Use an online tool or PHP function to create a hashed password.
Copy the generated hash and paste it into the user_pass field in phpMyAdmin.
This step ensures that the password is secure and compatible with WordPress login system.
Credit: www.wpbeginner.com
Assigning Admin Privileges
Assigning admin privileges in WordPress via phpMyAdmin requires careful steps. These steps ensure that the user gains full control over the site. Admin rights allow managing themes, plugins, users, and site settings.
Making a user an admin involves changing their role and capabilities in the database. This section explains how to edit user roles and update user capabilities directly using phpMyAdmin.
Editing User Roles
First, open phpMyAdmin and select your WordPress database. Find the table named wp_usermeta. This table stores user roles and meta information.
Locate the user’s ID in the user_id column. Look for the meta_key called wp_capabilities. This key defines the user’s role.
Edit the meta_value for this key. Replace it with: a:1:{s:13:"administrator";b:1;}. This change sets the role to administrator.
Save the changes. The user now has admin privileges on your WordPress site.
Updating User Capabilities
Admin privileges depend on capabilities assigned to a user. These capabilities control what the user can do.
In the wp_usermeta table, find the meta_key wp_user_level. Change its meta_value to 10. This number represents the highest user level.
Check for other meta_keys related to capabilities. Update values to reflect full admin rights if needed.
After updating, clear your site cache. This step ensures changes take effect immediately.
Verifying The New Admin Account
Verifying the new admin account is a crucial step after creating it in phpMyAdmin. This step confirms that the account works properly and has the right permissions. It helps avoid problems later with access or site management.
Testing the new account ensures you can manage your WordPress site smoothly. It also confirms that the user role is set to administrator. Without this check, you might face access issues or limited control over your site.
Logging Into WordPress Dashboard
Open your web browser and go to your WordPress login page. Enter the username and password of the new admin account you created. Click the login button.
Once logged in, check the top right corner for the admin username. Access the Dashboard menu to verify full admin capabilities. Try opening pages like Users or Settings. This confirms the new account has admin rights.
Troubleshooting Common Issues
If login fails, first check the username and password. Make sure there are no typos. Clear your browser cache and try again.
If you see a permissions error, return to phpMyAdmin. Confirm the user role is set to ‘administrator’ in the wp_usermeta table. Also, check that the user ID matches the meta key values.
Sometimes, plugin conflicts block admin access. Disable plugins temporarily using FTP or hosting control panel. Try logging in again after disabling plugins.
Security Tips For Phpmyadmin
PhpMyAdmin is a powerful tool for managing your WordPress database. Protecting it is crucial to keep your site safe. Follow these simple security tips to reduce risks and avoid data loss.
Protecting Access To Phpmyadmin
Limit who can open PhpMyAdmin. Use strong passwords for your database and PhpMyAdmin login. Change the default PhpMyAdmin URL to something unique. Use IP whitelisting to allow access only from specific addresses. Enable HTTPS to encrypt the data sent between your browser and the server. Avoid using public Wi-Fi when accessing PhpMyAdmin.
Backing Up WordPress Database
Regularly save copies of your WordPress database. Use plugins or manual methods to back up the database. Store backups in a safe, separate location. Test backups to ensure they work. Backups help restore your site after attacks or errors. Create a schedule for backups and stick to it.
Frequently Asked Questions
How Do I Add An Admin User In WordPress Via Phpmyadmin?
Access phpMyAdmin, select your WordPress database, and open the wp_users table. Insert a new user with a unique ID, username, and password (hashed). Then, add a matching entry in the wp_usermeta table with user ID and the admin role (wp_capabilities).
Can I Create A WordPress Admin Without Logging Into The Dashboard?
Yes, you can create an admin user using phpMyAdmin by adding records directly to the database tables. This method is useful if you lose dashboard access or forget your password. It requires basic knowledge of database management and WordPress table structure.
What Is The Role Value To Assign Admin Rights In Phpmyadmin?
In the wp_usermeta table, use the meta_key “wp_capabilities” and set meta_value to: a:1:{s:13:”administrator”;b:1;}. This value grants full admin privileges to the user. Ensure the meta_key prefix matches your WordPress table prefix.
How To Securely Add Admin User Via Phpmyadmin?
Always back up your database before making changes. Use strong, hashed passwords with the MD5 or PHP password hashing method. Avoid using default usernames like “admin” to prevent security risks. Verify changes by logging into WordPress after adding the user.
Conclusion
Adding an admin user through phpMyAdmin is simple and quick. This method helps you fix login issues or add new admins safely. Just follow the steps carefully to avoid errors. Always back up your database before making changes. With this guide, managing WordPress users becomes easier.
Keep your site secure by using strong passwords. Practice these steps as needed to control your site better.


