
Are you looking for an easy way to connect with your website visitors instantly? Adding Facebook Messenger to your WordPress site lets you chat with your audience in real time.
Imagine turning casual visitors into loyal customers by answering their questions right away. In this guide, you’ll discover simple steps to set up Facebook Messenger on your WordPress site—no tech skills needed. Keep reading, and you’ll learn how to boost your engagement and make your website more welcoming today.

Credit: www.youtube.com
Benefits Of Facebook Messenger On WordPress
Adding Facebook Messenger to your WordPress site brings many benefits. It helps you connect with visitors quickly. This connection can improve your website’s performance and user satisfaction.
Facebook Messenger creates a direct line of communication. Visitors can ask questions and get answers fast. This quick response builds trust and keeps visitors engaged longer.
Boosting Customer Engagement
Messenger lets you chat with visitors in real time. This instant reply makes users feel valued. Visitors are more likely to stay and explore your site. It also encourages them to return later. Engaged visitors often share your content with others.
Enhancing User Experience
Adding Messenger makes your site easier to use. Visitors get help without leaving the page. They can find information faster and without frustration. A simple chat option reduces confusion and improves satisfaction. This creates a smooth and friendly website experience.
Increasing Conversion Rates
Messenger helps turn visitors into customers. Quick answers remove doubts about products or services. Personalized chats guide visitors toward purchases. This leads to more sales and sign-ups. The ease of communication can boost your site’s success.
Credit: www.greengeeks.com
Preparing Your Facebook Page
Before adding Facebook Messenger to your WordPress site, you need to prepare your Facebook Page. This step is important. It ensures your Messenger works well and connects smoothly with your website. A properly set up Facebook Page helps visitors contact you easily. It also improves customer support and interaction.
Creating Or Accessing Your Facebook Page
First, check if you already have a Facebook Page for your business or brand. If yes, log in to your Facebook account and go to that Page. If not, create a new Facebook Page. Click on the “Create” button on the top right of Facebook. Choose “Page” and follow the instructions. Enter your business name, category, and details. Add a profile picture and cover photo that represent your brand. Complete your Page to make it look professional and trustworthy.
Setting Up Messenger Features
Go to your Facebook Page settings. Find the “Messaging” tab. Turn on the option to allow people to contact your Page privately. Customize your greeting message to welcome visitors. Enable instant replies to answer questions quickly. Check the “Show Messenger Greeting” option to attract users. Set up automated responses to save time. These features make your Messenger more helpful and engaging. They also improve visitor experience on your WordPress site.
Choosing The Right Plugin
Choosing the right plugin for Facebook Messenger on WordPress is important. It affects how well the chat works and how easy it is to use. The right plugin fits your website’s needs and helps visitors connect with you quickly. This section will help you understand popular options and what features to check before deciding.
Popular Messenger Plugins For WordPress
Several plugins bring Facebook Messenger to WordPress sites. The official Facebook Chat Plugin is common and easy to set up. It supports basic chat features directly from Facebook.
Another popular choice is WP Social Chat. It allows customization and shows a chat button on your site. Users can start chats without leaving the page.
Chaty is a plugin that supports multiple messaging platforms, including Facebook Messenger. It offers flexible design options and quick installation.
Comparing Features And Compatibility
Check if the plugin supports the latest WordPress version. Compatibility ensures smooth performance and fewer errors.
Look for features like chat customization, user tracking, and mobile friendliness. These improve user experience and engagement.
Consider how easy the plugin is to install and manage. A simple setup saves time and reduces technical problems.
Review plugin updates and support. Regular updates fix bugs and add new features. Good support helps solve issues fast.
Installing The Messenger Plugin
Installing the Messenger plugin on your WordPress site allows visitors to chat with you easily. This tool helps improve customer support and keeps users engaged. The process is simple and takes only a few minutes.
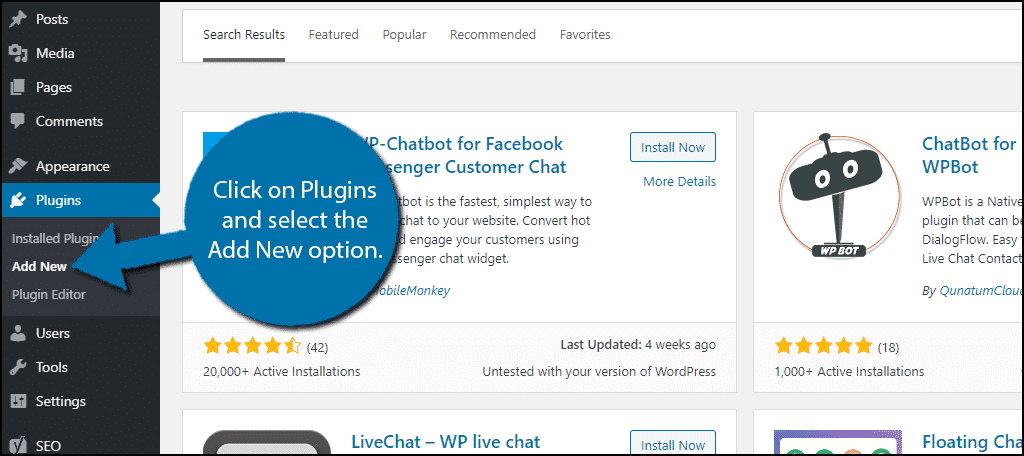
Step-by-step Installation Guide
Start by logging into your WordPress dashboard. Go to the “Plugins” section on the left menu. Click “Add New” and type “Facebook Messenger” in the search box. Find the official Messenger plugin and click “Install Now.” Wait for the installation to complete. Then click “Activate” to enable the plugin on your site.
Activating The Plugin
After activation, you will see a new Messenger menu in your dashboard. Click on it to open the settings page. Enter your Facebook Page ID to link the plugin with your page. Customize the chat appearance and greetings as you like. Save changes and check your website to see the Messenger chat box live.
Configuring Messenger Settings
Configuring Messenger settings is key to a smooth chat experience on your WordPress site. It helps you control how the chat looks and works. Proper settings make chatting easy and welcoming for your visitors.
Connecting To Your Facebook Page
Start by linking Messenger to your Facebook page. This connection lets you chat directly with your visitors. Go to the plugin settings and choose your Facebook page. Make sure you are an admin of that page. This step ensures messages reach you without delay.
Customizing Chat Appearance
Change the chat box look to match your site style. Pick colors that fit your brand. You can also adjust the chat button position on the screen. A neat, clear design invites visitors to start a chat. Keep it simple and friendly.
Setting Response Preferences
Set how quick you want to reply to messages. Enable automatic greetings to welcome visitors. You can also add quick reply buttons for common questions. This setup saves time and improves visitor engagement. Make your responses helpful and polite.
Adding Messenger Without A Plugin
Adding Facebook Messenger to your WordPress site without a plugin keeps your site fast and clean. It avoids extra software that might slow your site. You only need to work with simple code snippets from Facebook. This method suits those who want a direct and lightweight solution. It also gives more control over the chat’s look and behavior.
Using Facebook Page Plugin Code
Facebook offers a Page Plugin that shows your page and a chat button. You can copy this code directly from Facebook’s developer tools. Start by visiting the Facebook Page Plugin page. Enter your Facebook page URL and adjust the width and height. Then copy the generated code.
Paste this code into your WordPress site where you want the chat to appear. You can add it in a widget, page, or post using the Custom HTML block. This method shows a small chat icon linked to your page. Visitors click it to start messaging you.
Embedding Messenger Chat Code Manually
For a full Messenger chat experience, use Facebook’s customer chat code. Go to the Facebook Page settings and find the Messenger Platform section. Enable the customer chat and get the JavaScript code snippet.
Insert this code into your WordPress theme’s footer or header file. Use a child theme or a code snippet plugin to avoid losing changes after updates. This code shows a chat bubble on your site. Visitors can send messages without leaving your page.
This manual method is simple and keeps your website light. It works on desktop and mobile devices. No need for extra plugins or heavy scripts.
Testing Messenger On Your Site
Testing Facebook Messenger on your WordPress site is a key step. It ensures the chat works smoothly for visitors. Proper testing helps catch any problems early. This way, you keep your site user-friendly and responsive.
Try all chat features after installation. Check how fast messages send and receive. Test on different devices and browsers. This ensures consistent performance for all users.
Checking Chat Functionality
Start by opening your website. Look for the Messenger chat icon in the corner. Click it to open the chat window. Type a message to check if it sends correctly. Watch for quick replies from your Facebook page.
Test the chat on mobile phones and desktop computers. Make sure the chat window fits on smaller screens. Confirm notifications appear for new messages. Verify that chats stay active during navigation on the site.
Troubleshooting Common Issues
Sometimes, the Messenger plugin may not load. Refresh your page or clear the browser cache. Check your internet connection for stability. Review your Facebook Page settings to confirm chat is enabled.
Ensure the plugin is updated to the latest version. Look for conflicts with other plugins or themes. Disable other plugins one by one to find issues. Use the browser console to spot error messages.
If messages do not send, verify your Facebook Page ID is correct. Confirm your WordPress site URL matches the Facebook app domain. Contact support only after trying these steps.

Credit: smith.ai
Optimizing Messenger For Better Results
Optimizing Facebook Messenger on your WordPress site helps improve user experience. It allows faster replies and better customer support. Small changes in how you manage Messenger can lead to higher engagement and satisfaction. Let’s explore ways to make Messenger work best for your website visitors.
Timing Your Chat Availability
Set clear hours for when you are available to chat. Visitors appreciate knowing when to expect a reply. Use Messenger’s settings to show your active hours. This reduces frustration from delayed responses. If you cannot reply immediately, set your status to away.
Using Automated Responses
Automated replies keep conversations going even when you are offline. Create simple greetings and answers to common questions. This helps visitors feel heard and guided. Use Messenger’s built-in tools to set these responses. Keep messages friendly and clear for easy understanding.
Analyzing User Interactions
Track how visitors use Messenger on your site. Look at common questions and chat times. Use this data to improve your responses and availability. Facebook provides insights that show chat volume and user behavior. Adjust your Messenger setup based on these findings to serve visitors better.
Frequently Asked Questions
How Do I Add Facebook Messenger To WordPress?
To add Facebook Messenger, install a chat plugin like “WP Social Chat. ” Connect your Facebook page ID in plugin settings. Customize the chat widget, save changes, and it appears on your site instantly.
Can I Customize The Messenger Chat Widget On WordPress?
Yes, most plugins let you customize colors, greetings, and positioning. This enhances user experience and matches your site’s design. Simply adjust settings within the plugin dashboard.
Is Facebook Messenger Integration Free On WordPress?
Yes, basic Facebook Messenger plugins are usually free. They offer essential chat features without cost. Premium versions add advanced options, but free plugins suffice for most users.
Will Adding Messenger Improve My Website Engagement?
Yes, Facebook Messenger enables instant communication, boosting visitor interaction. Quick responses increase trust and can lead to higher conversions. It’s a valuable tool for customer support.
Conclusion
Adding Facebook Messenger to your WordPress site is simple and useful. Visitors can contact you quickly with just a click. This helps build trust and improve communication. Choose the right plugin and follow easy steps. Test the chat to ensure it works well.
Stay connected with your audience anytime. A small change that brings better user experience. Give it a try and see the difference on your site.


