
Are you looking to make your WordPress site more engaging and visually appealing? Adding an image hover effect is a simple way to grab your visitors’ attention and keep them exploring your content.
Imagine your images coming to life when someone moves their mouse over them—this small touch can make a big difference in how your site feels. You’ll discover easy steps to add eye-catching hover effects to your images, even if you’re not a coding expert.
Ready to transform your website and impress your visitors? Let’s dive in!

Credit: www.youtube.com
Choose The Right Image
Choosing the right image is important for a good hover effect. The image must catch attention and fit your website’s style. A clear, high-quality image helps users understand your message better.
Images that are too busy or blurry can distract visitors. Simple images with a clear subject work best. They make the hover effect look smooth and professional.
Use High-quality Images
High-resolution images look sharp on all screens. Blurry or pixelated pictures reduce trust in your site. Choose images that stay clear even when hovered or zoomed.
Pick Relevant Images
Images should match your content and theme. A relevant picture supports your message clearly. It helps visitors understand your topic faster.
Consider Image Size And Format
Use images that load quickly to avoid slow pages. Choose the right file format like JPEG or PNG. Keep file size small without losing quality.
Focus On Simple Compositions
Simple images with one main focus work best. They allow the hover effect to highlight the subject. Avoid cluttered pictures that confuse visitors.
Pick A Suitable Hover Effect
Choosing the right hover effect for your images can change how visitors see your website. The effect should match your site’s style and the message you want to send. Different effects create different moods and actions. Some are soft and subtle, while others catch the eye quickly. Knowing the options helps you pick the best one for your WordPress site.
Fade
The fade effect gently changes the image’s opacity on hover. It creates a smooth transition between the normal and hover state. This effect is simple and elegant. It works well for professional or minimalist websites. The fade effect draws attention without being too bold. It can also reveal text or icons softly over the image.
Zoom
The zoom effect makes the image grow slightly when hovered over. It gives a sense of depth and focus. This effect is dynamic but not overwhelming. Zoom works great for portfolios or product galleries. It invites users to look closer at the image details. The zoom effect adds energy and interest to your site.
Slide
The slide effect moves the image or an overlay from one side to another. It can slide text, colors, or shapes across the image. This effect adds motion and catches the eye quickly. Slide works well to highlight calls to action or extra info. It suits creative and modern website designs perfectly.
Overlay
The overlay effect places a colored layer over the image on hover. It often includes text or icons on the overlay. The overlay effect is versatile and easy to customize. It helps to show more information without leaving the page. Overlays improve readability and add a stylish touch to images.
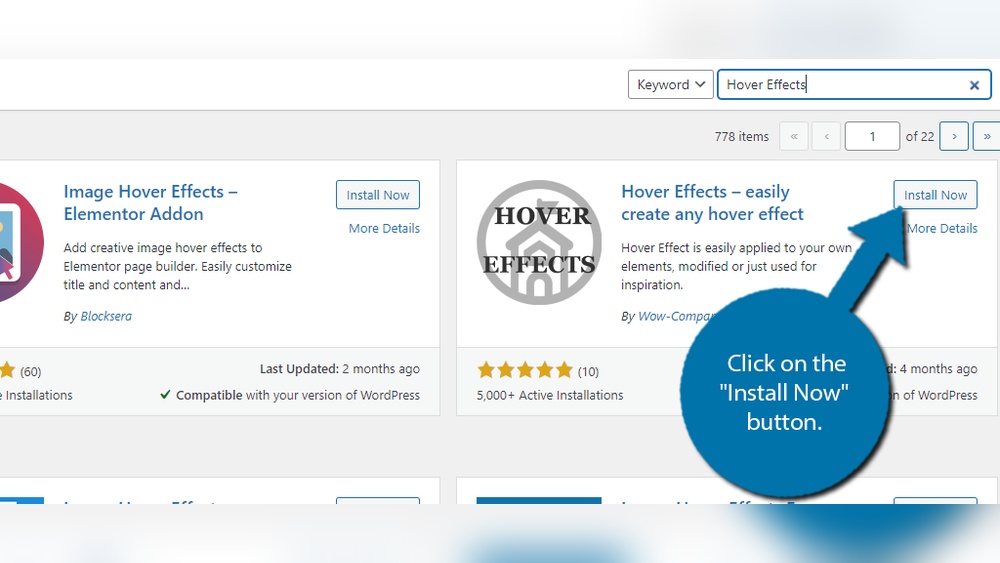
Use WordPress Plugins
Adding image hover effects can make your WordPress site more interactive. Plugins offer an easy way to add these effects without coding. They provide ready-made styles and simple settings to create attractive hovers.
Top Plugins For Image Hover
Several plugins specialize in image hover effects. “Image Hover Effects Ultimate” offers many styles and animations. “Hover Effects Pack” provides simple and clean hover designs. “WP Image Hover Effects” allows custom colors and animations. Choose a plugin that fits your style and needs.
Installation And Setup
Go to your WordPress dashboard and open Plugins. Click “Add New” and search for your chosen plugin. Click “Install Now” then “Activate” to enable it. Most plugins add a new menu or settings area. Follow the plugin instructions to link images with effects.
Customizing Effects
Open the plugin’s settings to customize your hover effects. Select the hover style from the available options. Adjust colors, animation speed, and text if supported. Preview your changes before saving to see how it looks. Use simple effects to keep your site fast and clean.

Credit: www.greengeeks.com
Add Hover Effects With Css
Adding hover effects to images can make your WordPress site more interactive and visually appealing. CSS hover effects allow you to change the look of an image when a visitor moves their mouse over it. This technique is simple and does not require extra plugins. You can create various effects, such as zoom, fade, or color change, using only CSS code.
Basic Css Hover Syntax
The basic syntax for a CSS hover effect uses the :hover pseudo-class. It targets an element when the mouse pointer is over it. For images, you select the image element and define the style changes inside the :hover block.
Example:
img:hover { opacity: 0.8; transform: scale(1.05); transition: 0.3s ease; }This code reduces the image opacity and slightly enlarges it on hover. The transition makes the effect smooth.
Creating Custom Effects
You can combine different CSS properties to make unique hover effects. Try changing colors, adding shadows, or rotating images. Small changes can create a big impact on user experience.
Example of a shadow and color filter effect:
img:hover { filter: brightness(80%); box-shadow: 0 4px 15px rgba(0, 0, 0, 0.3); transition: 0.4s ease; }Experiment with settings to find the best look for your website’s style.
Applying Css In WordPress
Adding CSS to WordPress is easy. You can place your hover code in the Customizer under “Additional CSS.” This method does not affect your theme files.
Alternatively, use a child theme’s stylesheet for custom CSS. This keeps your changes safe during theme updates.
For inline effects, add CSS classes directly to image blocks or in the HTML editor. This gives you more control over individual images.
Use Page Builders For Hover Effects
Page builders make adding image hover effects simple. They offer easy tools to create stunning visuals without coding. These builders come with drag-and-drop features. You can see your changes live. This helps make your website more interactive and fun for visitors.
Elementor
Elementor is a popular page builder for WordPress. It has built-in options for image hover effects. You can change image colors, add zoom effects, and more. Just select the image widget and go to the hover tab. Adjust settings like animation type and speed. Preview your effect instantly. No coding needed.
Beaver Builder
Beaver Builder also supports image hover effects. Its interface is clean and user-friendly. Drag an image module into your layout. Then, open the style settings to find hover options. Choose from fades, zooms, and overlays. You can customize colors and transitions easily. It works well for beginners.
Divi Builder
Divi Builder provides many hover effect choices. Use its visual editor to select an image. Click on the hover tab to explore effects. Apply filters, shadows, and animations on hover. Adjust the speed and direction of the effect. Divi makes it easy to create professional looks fast.
Credit: www.wpbeaverbuilder.com
Optimize Images For Performance
Optimizing images for performance improves site speed and user experience. Fast loading images keep visitors engaged. Slow images can make people leave your site quickly. Effective image optimization also helps your WordPress site rank better in search engines.
Focus on reducing image file sizes without losing quality. Use the right image formats. Load images only when needed on the page. These steps make your site faster and smoother.
Compression Tips
Compress images before uploading to WordPress. Use tools like TinyPNG or JPEG-Optimizer. They reduce file size without visible quality loss. Smaller files load faster on all devices. Avoid using very large images and compress them to balance quality and speed.
Choosing Image Formats
Select the best format for each image type. Use JPEG for photos with many colors. PNG suits images with transparency or simple graphics. WebP offers good quality with smaller file sizes. Choose formats supported by most browsers for wider compatibility.
Lazy Loading
Enable lazy loading to delay image loading until needed. This means images load only when visible on the screen. It saves bandwidth and speeds up initial page load. WordPress has built-in lazy loading support you can activate easily.
Test Hover Effects Across Devices
Testing hover effects on different devices ensures your images look great everywhere. Hover effects may work on desktop but behave differently on mobile. It is important to check how your effects respond across various devices. This step helps provide a smooth user experience to all visitors.
Mobile Responsiveness
Most mobile devices do not support hover effects the same way desktops do. Touchscreens do not have a cursor to trigger hover states. Test your hover effects on phones and tablets to see how they behave. Consider using tap or click events as an alternative. Make sure images remain clear and interactive without hover.
Browser Compatibility
Different browsers may display hover effects with slight variations. Test your hover effects on popular browsers like Chrome, Firefox, Safari, and Edge. Check if the effect triggers smoothly and looks consistent. Fix any glitches or style breaks found during testing. Cross-browser testing ensures all users see your site as intended.
Frequently Asked Questions
What Is An Image Hover Effect In WordPress?
An image hover effect triggers visual changes when users hover over images. It enhances user engagement and website interactivity in WordPress.
How Can I Add Image Hover Effects Without Coding?
Use WordPress plugins like Elementor or WP Image Hover. These tools offer easy drag-and-drop options for adding hover effects.
Are Image Hover Effects Seo-friendly?
Yes, image hover effects improve user experience and engagement. They don’t negatively impact SEO when used properly with optimized images.
Can Image Hover Effects Slow Down My Site?
If overused or heavy, hover effects may slow your site. Optimize images and use lightweight plugins to maintain fast loading speeds.
Conclusion
Adding image hover effects in WordPress is simple and effective. It makes your website more interactive and attractive. You can use plugins or custom code to create different effects. Test your changes on various devices to ensure they work well.
Small details like these keep visitors interested and improve user experience. Try adding hover effects today to give your site a fresh look. Keep exploring new styles to find what fits your brand best. Your website will stand out with just a few easy steps.


