Are you trying to point your GoDaddy domain to a different GoDaddy hosting account but don’t know where to start? You’re not alone.
Many people find this process confusing at first, but it’s simpler than it looks. By the end of this article, you’ll have clear, step-by-step instructions to make the switch quickly and without headaches. Keep reading, and you’ll have your domain working exactly where you want it in no time.
Preparing For Domain Redirection
Preparing for domain redirection is a crucial step before moving your GoDaddy domain to another hosting account. It ensures a smooth transition without losing important data or access. Taking time to prepare helps avoid common mistakes. Follow these simple steps to get ready.
Check Domain Ownership
Verify that you own the domain you want to redirect. Log in to your GoDaddy account and check the domain details. Confirm the domain is unlocked and eligible for changes. Make sure your contact information is up to date in the domain settings. This step prevents delays during redirection.
Backup Existing Website Data
Create a full backup of your current website files and databases. Use GoDaddy’s backup tools or download files manually via FTP. Saving your data protects your website content from accidental loss. Keep the backup in a safe place before starting the redirection process.

Credit: www.youtube.com
Accessing Godaddy Account
Accessing your GoDaddy account is the first step to manage your domain settings. You need to log in to your dashboard to start the redirection process. This section guides you through the simple steps to access your account and find your domains.
Follow these instructions carefully to reach the Domain Manager. It helps you control your domains and connect them to hosting accounts.
Login To Godaddy Dashboard
Open your web browser and go to the GoDaddy website. Click the “Sign In” button at the top right corner. Enter your username and password. Then, click “Sign In” again to access your dashboard. Make sure your login details are correct to avoid delays.
Navigate To Domain Manager
After logging in, look for the “My Products” section on your dashboard. Scroll down until you find the “Domains” area. Click on “Manage All” next to Domains. This opens the Domain Manager, where you see all your registered domains. From here, you can select the domain you want to redirect.
Updating Dns Settings
Updating DNS settings is a key step in redirecting your GoDaddy domain to a different hosting account. This process tells the internet where to find your website. It involves changing the nameservers to point to the new hosting provider.
Making these changes correctly ensures your domain loads the right website. DNS updates usually take some time to spread across the internet. Patience is important during this phase.
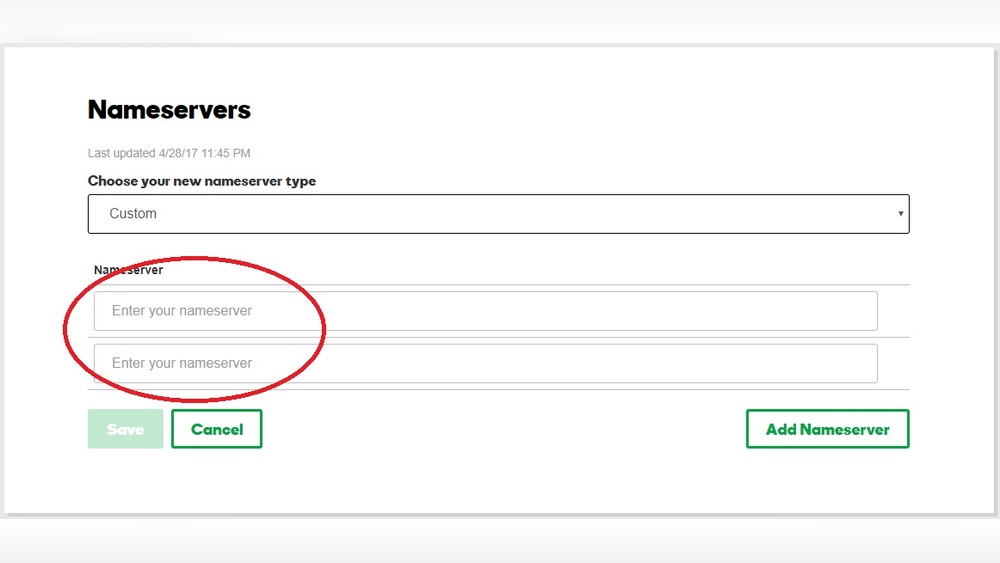
Locate Nameservers Section
First, log in to your GoDaddy account. Go to the Domain Manager. Find the domain you want to redirect. Click on the domain name to open its settings.
Look for the “Nameservers” option. It is often under the “DNS” or “Manage DNS” tab. This section shows the current nameservers linked to your domain.
Change Nameservers To New Hosting
Choose the option to edit or change nameservers. Enter the nameservers provided by your new hosting account. These usually look like ns1.newhost.com and ns2.newhost.com.
Ensure you type the nameservers correctly. Incorrect entries can cause your website to go offline. Replace all old nameservers with the new ones.
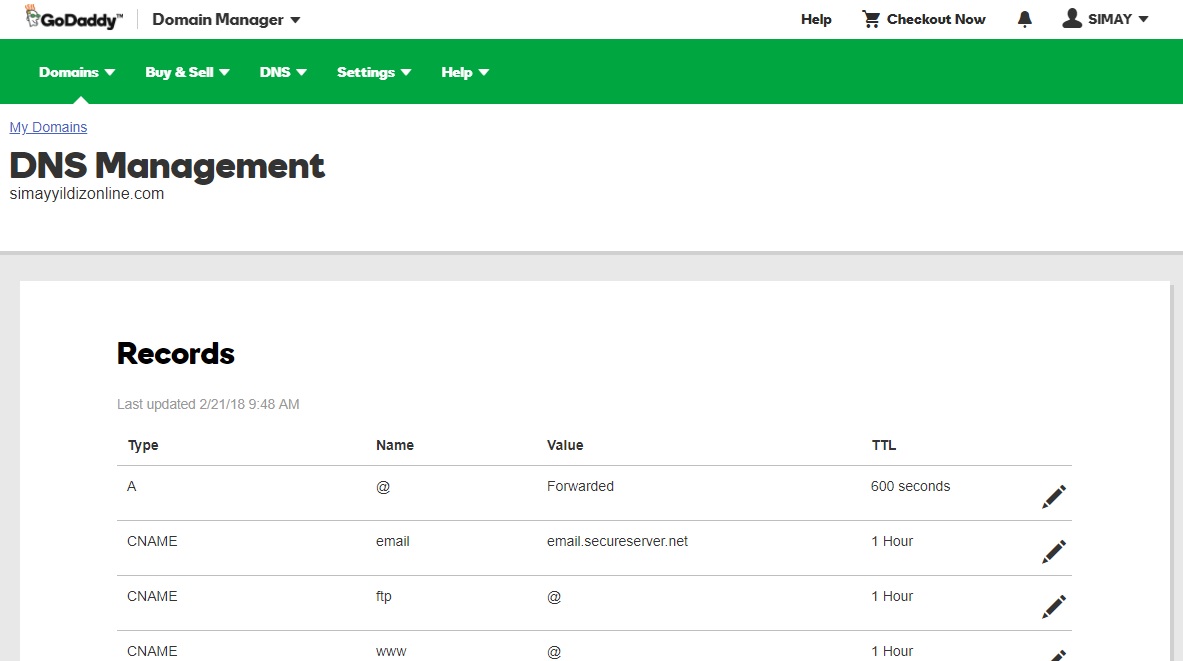
Save Dns Changes
After entering the new nameservers, save your changes. Confirm any prompts to apply the update. GoDaddy will begin processing the new DNS settings.
Remember, DNS propagation can take from a few minutes to 48 hours. During this time, your domain may load from either hosting server. Check back later to confirm the update is complete.
Credit: wphostingdiscount.com
Configuring Hosting Account
Configuring your hosting account is a key step in redirecting your GoDaddy domain. This process ensures your website runs smoothly on the new hosting. It involves adding your domain, uploading your website files, and checking settings. Each step must be done carefully to avoid downtime or errors.
Add Domain To New Hosting
Start by logging into your new GoDaddy hosting account. Find the section to add a new domain or site. Enter the domain name you want to redirect. Confirm the addition and wait for the system to process it. This links your domain with the new hosting space.
Set Up Website Files
Next, upload your website files to the new hosting account. Use an FTP client or the hosting file manager. Place files in the public_html or root directory. Make sure all files from the old hosting are copied correctly. This step moves your website content to the new server.
Verify Hosting Configuration
Finally, check your hosting settings to avoid errors. Confirm domain pointing and DNS records are correct. Test your website by visiting your domain in a browser. Look for any loading issues or broken links. Fix problems before completing the redirection process.
Using Domain Forwarding
Using domain forwarding is a simple way to redirect your GoDaddy domain to another hosting account. This method sends visitors from one domain to a different website address. It works well when you want to point your domain to a new site without changing DNS settings. Domain forwarding keeps your visitors moving smoothly to the right place.
Access Forwarding Settings
First, log in to your GoDaddy account. Go to the “My Products” page. Find your domain name and click “Manage.” Scroll down to the “Additional Settings” section. Here, select “Manage DNS” to open the DNS management page. Look for the “Forwarding” section at the bottom. Click “Add” next to “Domain.” This is where you start setting up forwarding.
Set Up Forwarding Url
Enter the website address you want your domain to forward to. Make sure to type the full URL, including “http://” or “https://.” Double-check the address to avoid errors. This URL is where visitors will land after the redirect. You can forward to any website, including another GoDaddy hosting site.
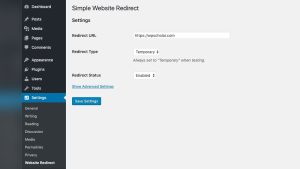
Choose Forwarding Type
Select the forwarding type that fits your needs. “Permanent (301)” tells browsers the move is permanent. It helps with search engine ranking. “Temporary (302)” means the redirect is short-term. Choose “Forward only” to send visitors without showing the new URL. Or pick “Forward with masking” to keep your domain name visible in the browser. Save your settings to activate forwarding.
Credit: www.godaddy.com
Testing Domain Redirection
Testing domain redirection is a crucial step after moving your GoDaddy domain to another hosting account. It ensures the domain points correctly to your new site. This process helps avoid downtime and visitor confusion.
Proper testing confirms that visitors see the right website. It also verifies that all settings work as intended. Use simple methods to check your redirection status.
Clear Browser Cache
Browsers save website data to load pages faster. This can show an old version of your site. Clear your browser cache before testing the redirection. This step forces the browser to load the latest content from the server. Use your browser settings to clear cached files and cookies.
Check Domain Propagation
Domain changes take time to spread across the internet. This is called domain propagation. It can take up to 48 hours for full updates. Use online tools to check if your domain points to the new host. These tools show if DNS changes have reached different servers worldwide.
Verify Website Accessibility
Visit your domain in multiple browsers and devices. Confirm the website loads properly and quickly. Test all pages and links to ensure they work. If issues appear, recheck DNS settings or contact GoDaddy support. Full accessibility means your redirection is successful.
Troubleshooting Common Issues
Troubleshooting issues while redirecting a GoDaddy domain can feel confusing. Many common problems are easy to fix with clear steps. Understanding these issues helps ensure your domain points correctly to the new hosting account. This section covers typical errors and how to solve them quickly.
Dns Propagation Delays
DNS changes take time to spread across the internet. This delay can last from a few minutes to 48 hours. During this time, your domain might not show the new hosting site. Patience is key here. Avoid making repeated changes, as this can slow propagation further.
Incorrect Nameserver Settings
Nameservers tell the internet where to find your website. Using wrong nameservers stops your domain from connecting to the hosting. Double-check that your domain points to the correct GoDaddy hosting nameservers. Update these settings in your GoDaddy account dashboard if needed.
Forwarding Not Working
Domain forwarding may fail if setup steps are missed. Confirm that you have enabled forwarding in your GoDaddy domain settings. Check the forwarding type—301 (permanent) or 302 (temporary)—matches your needs. Clear your browser cache to see changes. If issues persist, review the forwarding address for typos.
Frequently Asked Questions
How Do I Redirect A Godaddy Domain To Another Hosting?
Log in to your GoDaddy account, access DNS settings, and update the domain’s A record to the new hosting IP. This points your domain to the new GoDaddy hosting account quickly and efficiently.
Can I Redirect A Godaddy Domain Without Changing Nameservers?
Yes, by modifying the domain’s A record in DNS settings, you can redirect without changing nameservers. This keeps your DNS management intact while pointing to a different hosting.
How Long Does Godaddy Domain Redirection Take?
Domain redirection usually takes up to 24-48 hours due to DNS propagation. However, many changes reflect within a few hours, depending on your ISP and browser cache.
Is It Safe To Redirect Godaddy Domains Between Accounts?
Yes, it’s safe to redirect domains between GoDaddy hosting accounts. Ensure you update DNS records correctly to avoid downtime and verify changes after propagation completes.
Conclusion
Redirecting your GoDaddy domain to another hosting account is simple. Follow each step carefully to avoid mistakes. Double-check your settings to ensure the changes work correctly. Wait a few hours for the update to take effect. This process helps keep your website running smoothly on the right server.
Stay patient and review your domain status if needed. With clear instructions, you can manage your GoDaddy accounts confidently. Keep this guide handy for future reference.