
Are you tired of the same old fonts on your WordPress site? Adding custom fonts can make your website stand out and reflect your unique style.
But you might be wondering, how exactly do you add custom fonts to WordPress without breaking a sweat? You’ll discover simple, step-by-step methods to easily upload and use the fonts you love. By the end, your site will not only look more professional but also grab your visitors’ attention instantly.
Keep reading, and let’s transform your website’s look together!
Choosing The Right Fonts
Choosing the right fonts for your WordPress site shapes how visitors see your brand. Fonts affect readability and the overall feel of your website. Picking fonts that fit your style helps keep visitors engaged and makes your content clear.
Popular Font Types
Fonts come in many styles. Serif fonts have small lines on the ends of letters. They look classic and formal. Sans-serif fonts do not have these lines. They appear clean and modern. Script fonts mimic handwriting. These add a personal or artistic touch. Display fonts are bold and unique. Use them carefully for headlines or logos.
Matching Fonts To Your Brand
Your font should reflect your brand’s personality. A serious brand needs simple, easy-to-read fonts. Creative brands can use fun or unusual fonts. Think about your audience. Choose fonts that make your message clear. Avoid too many different fonts on one page. Two or three fonts are enough to keep your design neat.
Web-safe Vs Custom Fonts
Web-safe fonts work on most devices without extra setup. Examples include Arial, Times New Roman, and Verdana. Custom fonts are unique and can stand out more. They need extra steps to add to WordPress. Custom fonts may slow down your site if not optimized. Choose the right balance between uniqueness and speed for your site.
Credit: www.greengeeks.com
Preparing Your Fonts
Before adding custom fonts to WordPress, prepare your font files carefully. This step ensures smooth integration and better website performance. It also helps avoid common errors and legal problems.
Font Formats Supported By WordPress
WordPress supports several font formats for web use. The most common are TTF (TrueType Font), OTF (OpenType Font), WOFF (Web Open Font Format), and WOFF2. WOFF and WOFF2 are preferred for web because they load faster and use less data.
Ensure your font files are in one of these formats. Convert them if necessary. This guarantees compatibility with WordPress and all browsers.
Licensing And Permissions
Check the font license before using it on your website. Some fonts are free for personal use only. Others require a commercial license for websites. Using fonts without permission can cause legal issues.
Read the license terms carefully. Buy a license if needed. Respecting font licenses protects your site and supports font creators.
Optimizing Fonts For Web Use
Optimize fonts to improve your site’s loading speed. Use only the font styles and weights you need. Avoid loading extra styles that slow down your site.
Compress font files to reduce their size. Tools like Font Squirrel or Transfonter can help. Optimized fonts make your website faster and provide a better user experience.
Adding Fonts Via Theme Customizer
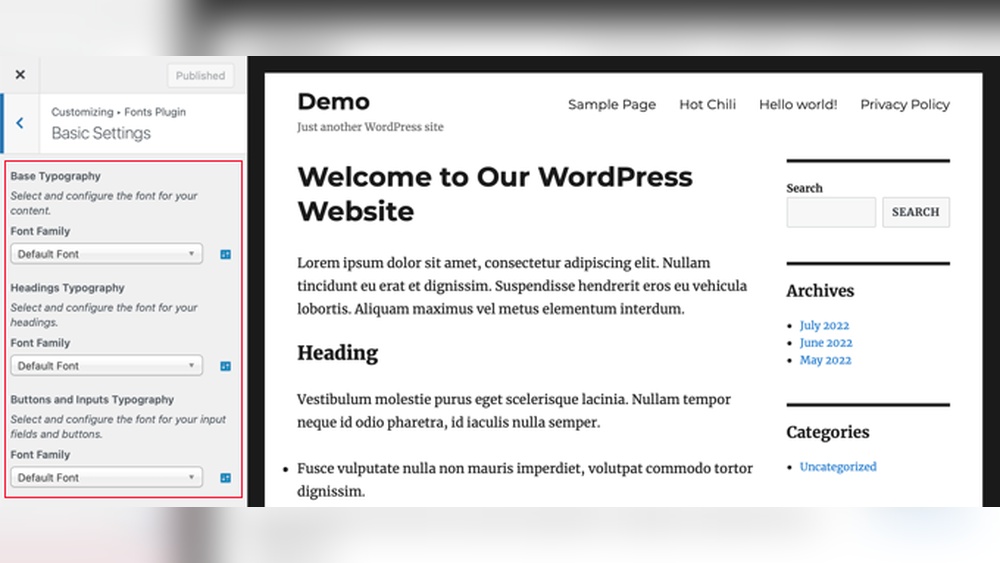
Adding fonts via the Theme Customizer is a simple way to change your website’s look. The Customizer lets you see changes live. You can pick fonts without touching code. This method is user-friendly, especially for beginners. It keeps your site design consistent and professional. Let’s explore how to use these built-in options and their limits.
Using Built-in Font Options
The Theme Customizer often includes several font choices. These fonts come from the theme’s design settings. You can select different fonts for headings and body text. Changing fonts here is quick and shows instantly on your site preview.
Most themes offer Google Fonts integrated directly in the Customizer. You can pick fonts by name and style. Adjust font size, weight, and sometimes color. It helps you match your brand style easily without extra tools.
Limitations Of Theme Customizer
Built-in font options are simple but limited. You cannot upload custom fonts directly here. The font choices depend on the theme developer. Some fonts you want may not be available in the list.
Advanced font settings like letter spacing or line height might be missing. Customizer changes affect the entire site, not individual pages. This method lacks flexibility for unique designs.
For more font control, other methods like plugins or custom CSS may be needed. Still, the Theme Customizer is a great start for basic font changes.
Credit: pixelgrade.com
Uploading Fonts Manually
Uploading fonts manually gives you full control over your website’s typography. It helps you use unique fonts that match your brand style. This method works well for custom fonts not available in font libraries.
Manual upload requires basic knowledge of WordPress file management and CSS. It involves three main steps: uploading font files, adding CSS rules, and enqueuing fonts in your theme.
Uploading Font Files To Your Server
Start by preparing your font files. Use formats like .woff or .woff2 for better browser support. Use an FTP client or the WordPress file manager to upload font files.
Create a folder named “fonts” in your active theme’s directory. Upload all font files into this folder. Keep the file names simple and consistent for easy reference later.
Adding Fonts With Css
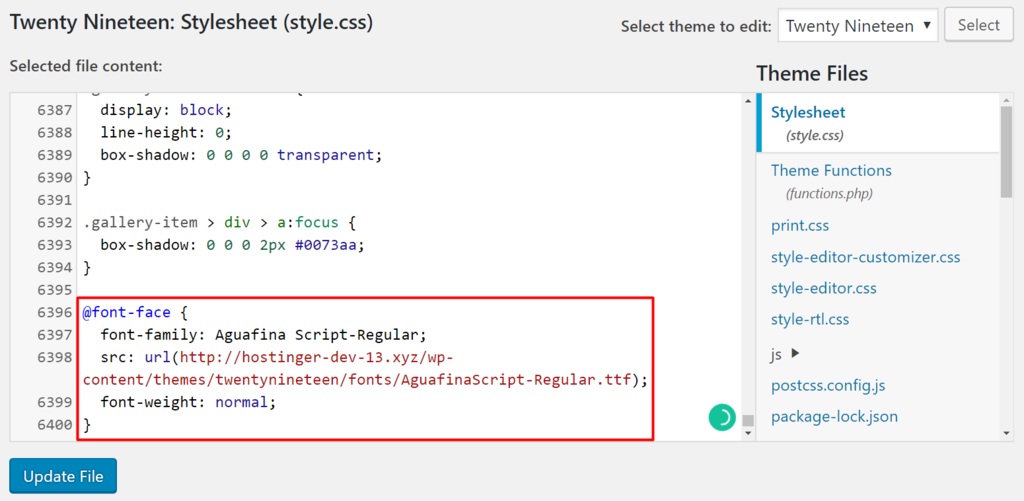
Next, define the font-face in your theme’s stylesheet (style.css). Use the @font-face rule to link your uploaded font files. This tells browsers where to find the fonts and how to use them.
Example:
@font-face { font-family: 'CustomFont'; src: url('fonts/customfont.woff2') format('woff2'), url('fonts/customfont.woff') format('woff'); font-weight: normal; font-style: normal; }After this, apply the font-family to elements using CSS selectors. For example, body { font-family: ‘CustomFont’, sans-serif; }
Enqueuing Fonts In Functions.php
To ensure your fonts load properly, enqueue your stylesheet in the functions.php file. This method is better than hardcoding CSS links.
Add a function to load your style.css like this:
function custom_fonts_enqueue() { wp_enqueue_style('custom-fonts', get_stylesheet_uri()); } add_action('wp_enqueue_scripts', 'custom_fonts_enqueue');This loads your styles with the font-face rules safely on all pages. It prevents conflicts and keeps your site fast.
Using Plugins To Add Fonts
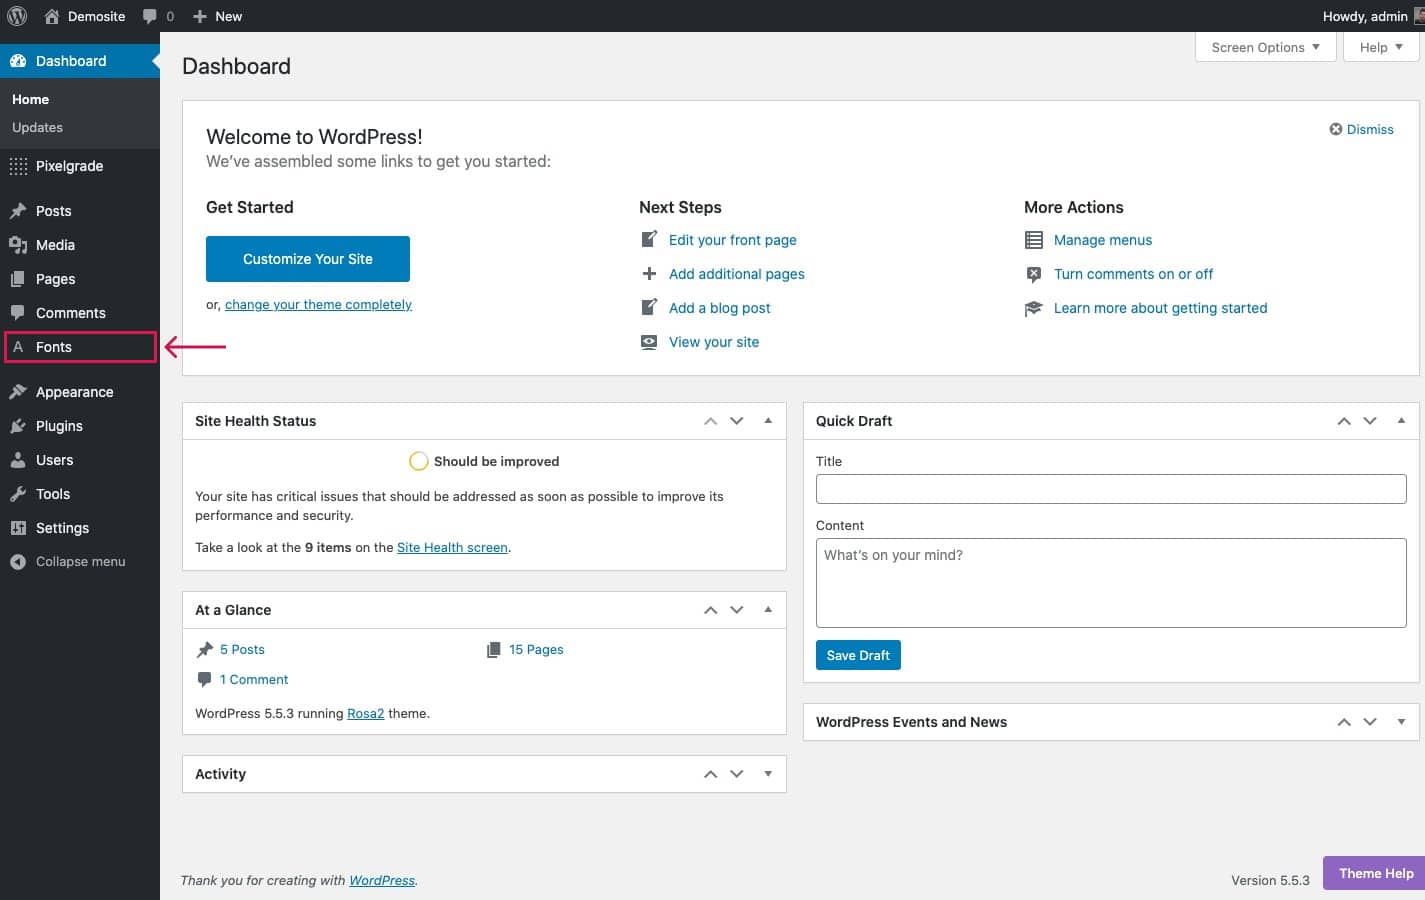
Using plugins is a simple way to add custom fonts to your WordPress site. Plugins let you upload and manage fonts without touching any code. This method saves time and avoids errors. Plus, it gives you control over font styles in different parts of your website.
Plugins often come with many font options and easy settings. You can preview fonts directly inside WordPress. This helps you pick the best font for your brand and content. Let’s explore the top plugins, how to set them up, and manage your fonts effectively.
Top Plugins For Custom Fonts
Several plugins make adding fonts easy. “Easy Google Fonts” offers a large selection of free Google fonts. “Use Any Font” allows you to upload custom fonts. “Custom Fonts” plugin integrates with many themes smoothly. Each plugin has its own features and benefits. Choose one that fits your needs and skill level.
Step-by-step Plugin Setup
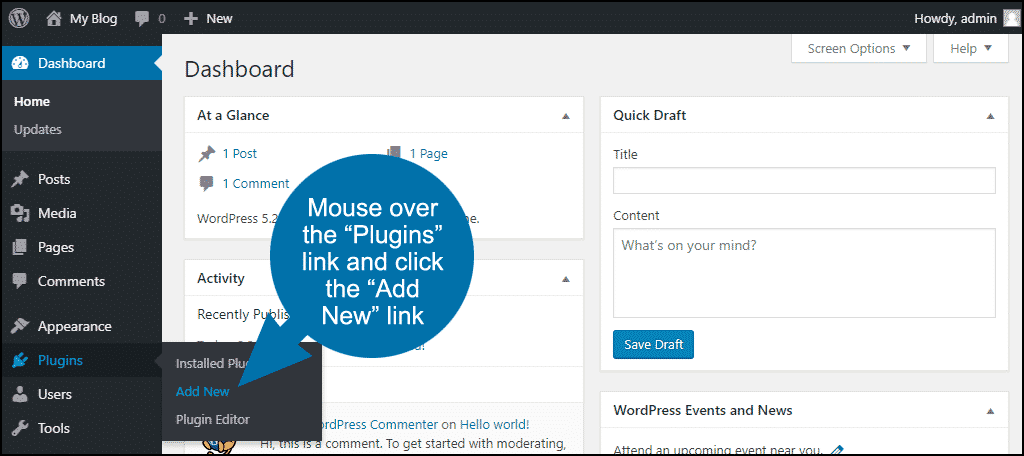
Start by installing your chosen plugin from the WordPress dashboard. Activate the plugin after installation. Follow the plugin’s instructions to upload or select fonts. Some plugins link directly to Google Fonts. Others ask you to upload font files like .ttf or .woff. Save your changes once fonts are added.
After setup, go to the plugin settings to assign fonts to headings or body text. Many plugins let you see a live preview before saving. This avoids guesswork and ensures the font fits your site’s style.
Managing Fonts With Plugins
Plugins make font management simple. You can edit font choices anytime from the WordPress admin. Change font size, style, or weight without coding. Most plugins keep fonts organized in one place.
Remove fonts you no longer use to keep your site fast. Regularly update the plugin for best performance and security. Managing fonts with plugins helps keep your website fresh and readable.
Credit: www.hostinger.com
Applying Fonts Across Your Site
Applying custom fonts across your WordPress site creates a consistent look. Fonts help shape your brand’s personality and improve readability. You can set different fonts for headings and body text. Also, you can customize fonts on specific pages to highlight important content. Combining Google Fonts with custom fonts gives you more style choices. Below are easy ways to apply fonts site-wide and on certain pages.
Targeting Headings And Body Text
Headings and body text need different fonts for better clarity. Headings should be bold and eye-catching. Body text must be simple and easy to read. Use CSS code or font plugins to apply fonts to these areas. For example, set font-family for
, , tags to style headings. Use the selector to change the font for all paragraph text. This creates a clear hierarchy and improves user experience.
tags to style headings. Use the selector to change the font for all paragraph text. This creates a clear hierarchy and improves user experience.
Customizing Fonts For Specific Pages
Custom fonts can highlight special pages, like your homepage or blog posts. Use page IDs or classes in CSS to target these pages. For instance, add CSS rules like .page-id-5 { font-family: 'YourCustomFont'; }. This changes fonts only on that page. It helps draw attention without affecting the whole site. You can also use page builders with font controls for easy customization.
Using Google Fonts With Custom Fonts
Google Fonts are free and easy to use alongside custom fonts. Start by loading Google Fonts in your theme’s header or via plugins. Then, add custom fonts using @font-face or plugin options. Use CSS to mix Google Fonts for headings and custom fonts for body text. This method combines style variety with good performance. It keeps your site fast and visually appealing.
Troubleshooting Font Issues
Adding custom fonts to WordPress can enhance your site’s look. Sometimes, fonts may not show correctly or cause slow loading. Troubleshooting font issues helps keep your website neat and fast. This section covers common font problems, how to fix errors, and ways to improve font speed.
Common Font Display Problems
Fonts may appear broken or different from what you expect. Some common issues include fonts not loading, text showing in default fonts, or strange characters. These problems happen due to incorrect font URLs, unsupported font formats, or conflicts with other plugins or themes.
Check if the font files are uploaded correctly. Make sure the font format matches the browser requirements. Also, verify that your CSS code properly calls the font family.
Fixing Font Loading Errors
Font loading errors often come from wrong file paths or server restrictions. Use the browser’s developer tools to find loading errors. Look for 404 errors or blocked font files.
Correct the font URL in your CSS or plugin settings. Ensure your server allows font file types like .woff or .ttf. Adding proper permissions can solve many loading problems.
Improving Font Performance
Custom fonts can slow down your site if not managed well. Use font formats optimized for web, such as WOFF2, for faster loading. Limit the number of font weights and styles to reduce file size.
Load fonts asynchronously to prevent blocking page display. You can also use a font hosting service to improve delivery speed. Optimizing fonts boosts your site’s speed and user experience.
Tips For Stunning Typography
Typography shapes how visitors see your website. Stunning typography grabs attention and improves user experience. It guides readers through your content smoothly. Follow these tips to create beautiful and clear text with custom fonts in WordPress.
Pairing Fonts Effectively
Choose fonts that complement each other. Combine a simple font with a decorative one. Limit your site to two or three fonts to keep it clean. Contrast helps highlight important text. Test font pairs on different screen sizes.
Maintaining Readability
Readability is key for good typography. Use clear fonts that are easy to read. Avoid fonts that look messy or too thin. Keep font sizes large enough for all users. Line spacing should be comfortable to avoid crowding.
Using Font Weight And Style
Font weight and style add variety without clutter. Use bold for headlines and light for body text. Italics can highlight but use sparingly. Avoid too many styles on one page. Consistency makes your text look professional and neat.
Frequently Asked Questions
How Do I Upload Custom Fonts To WordPress?
To upload custom fonts, use a plugin like “Use Any Font” or add font files via FTP. Then, link fonts in your theme’s CSS or use the plugin to apply them easily.
Can I Use Google Fonts As Custom Fonts In WordPress?
Yes, Google Fonts can be added as custom fonts. Use a plugin or add the font link in your theme’s header. php file to integrate them.
Do Custom Fonts Affect WordPress Website Speed?
Custom fonts can slightly impact speed. Optimize font files, use font-display swap, and limit font variants to reduce loading time and maintain performance.
Is Coding Required To Add Custom Fonts In WordPress?
Coding is optional. Plugins simplify font addition without coding, but manually adding fonts via CSS requires basic coding knowledge.
Conclusion
Adding custom fonts to your WordPress site is easier than it seems. Choose the right font files and follow simple steps. This change improves your site’s look and feel. Visitors notice clean, unique fonts quickly. Keep your font files organized for future use.
Test your site on different devices to ensure fonts show well. Custom fonts help your site stand out and feel professional. Try different styles but keep readability first. Enjoy a fresh, personalized website with just a few clicks.



