
Are you ready to launch your website but feeling stuck on how to connect your Namecheap domain to Hostinger? You’re not alone.
Many people find this technical step challenging, yet it’s crucial for your site to go live. Imagine having your domain set up seamlessly, paving the way for your online presence to thrive. This guide will walk you through each step, simplifying the process and empowering you to take control.
By the end, you’ll have the confidence and knowledge to point your domain correctly, ensuring your website’s success from the start. Stay with us as we unlock the secrets to a smooth domain connection.

Credit: www.youtube.com
Preparing Your Domain And Hosting
Before you point your Namecheap domain to Hostinger, prepare your domain and hosting. This involves a few key steps. These steps ensure a smooth transition. You will find this process easy with clear instructions.
Checking Domain Status
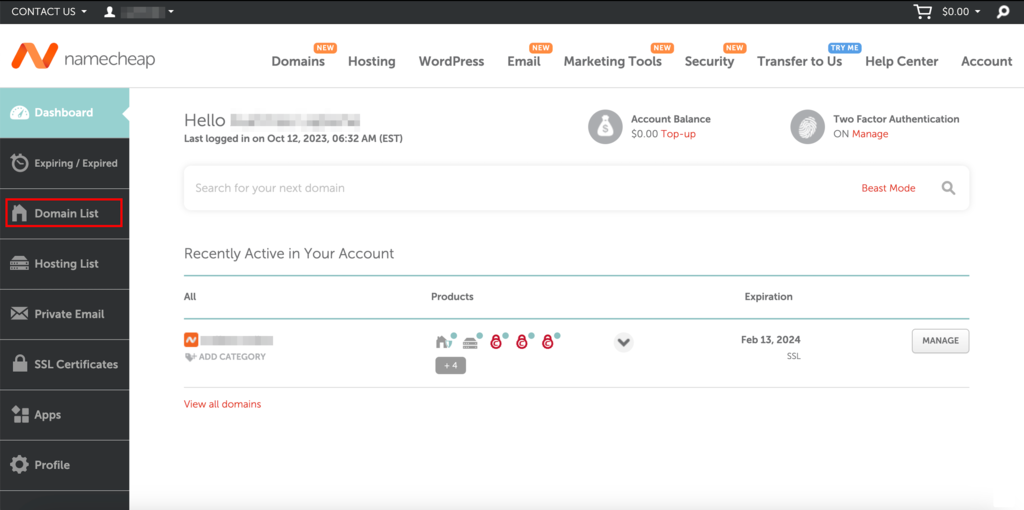
First, verify your domain is active. Log in to your Namecheap account. Check the domain list. Ensure the status shows “Active”. If not, renew your domain. An active domain is essential for redirection.
Accessing Hostinger Account
Next, access your Hostinger account. Visit the Hostinger website. Enter your credentials to log in. Once inside, navigate to the control panel. Here, you will find all necessary settings. Make sure you are familiar with the dashboard. This helps in managing your hosting tasks.
Credit: www.hostinger.com
Configuring Namecheap Domain Settings
Easily connect your Namecheap domain to Hostinger by adjusting DNS settings. Start by logging into your Namecheap account. Access the domain’s DNS settings and enter Hostinger’s nameservers. Save changes to ensure your domain points correctly.
Configuring Namecheap Domain Settings is a straightforward process that can transform your website’s accessibility and functionality. If you’ve ever found yourself scratching your head over technical jargon, you’re not alone. But don’t worry—this guide will walk you through the steps with ease. Whether you’re new to managing domains or looking to sharpen your skills, these steps will ensure your domain points to Hostinger without any hiccups.Accessing Domain Dashboard
First things first, you need to access your Namecheap domain dashboard. Logging in is as simple as entering your credentials on the Namecheap website. Once you’re in, you’ll find the dashboard where all your registered domains are listed. This is your control center. It’s fascinating how a few clicks can open a world of possibilities for your website. Have you ever wondered why the dashboard is designed the way it is? It’s crafted to provide maximum efficiency with minimal complexity. You’ll see your domains neatly organized, making it easy to select the one you want to configure.Modifying Dns Settings
Now comes the crucial part—modifying your DNS settings. This step is essential for directing your Namecheap domain to Hostinger. Locate the DNS settings option on your domain management page. It’s usually right there next to your domain details. You might be surprised at how simple this is. All you need to do is select the custom DNS option. Here, you’ll enter the nameservers provided by Hostinger. This step is pivotal because it ensures that your domain will point exactly where you want it to. Picture it like setting a destination in your GPS; you’re telling your domain where to go. What if you make a mistake? Don’t worry—it’s easily fixable, and the dashboard allows you to re-enter the correct information without hassle. Remember, each action you take here will directly impact how your website functions. So take your time and double-check your inputs. Feeling empowered yet? You’re now ready to bring your website to life by connecting your domain to Hostinger!Updating Dns Records
Pointing your Namecheap domain to Hostinger involves updating DNS records. Begin by accessing your Namecheap account and locating the domain settings. Navigate to DNS settings and input Hostinger’s nameservers to ensure proper domain routing.
Updating DNS records is a crucial step in ensuring your domain is correctly linked to your hosting service. If you’ve just purchased a domain from Namecheap and are hosting with Hostinger, you’ll need to update your DNS records to establish this connection. This process may seem technical, but with a clear guide, you can smoothly navigate through it.Changing Nameservers
Start by logging into your Namecheap account. Once you’re in, find the “Domain List” tab on your dashboard. Click on it to see your domains. Next, locate the domain you want to point to Hostinger and click on the “Manage” button next to it. Scroll down to the “Nameservers” section. Here, select “Custom DNS” from the dropdown menu. Input the nameservers provided by Hostinger. They usually look like ns1.hostinger.com and ns2.hostinger.com. After entering these, don’t forget to hit the save button. Have you ever wondered why this step is critical? Changing nameservers ensures that all traffic to your domain is directed to your Hostinger hosting account. It’s the first step in bridging the gap between your domain and your website.Adding A Records
In some cases, changing nameservers might not be enough. You might need to add A records to further establish a connection. This is common when you have a specific IP address for your hosting. Navigate back to your Namecheap dashboard and select the domain you’re working with. Under the “Advanced DNS” tab, you’ll see an option to add new records. Click on it to proceed. Choose “A Record” from the dropdown menu. In the “Host” field, enter “@” and in the “Value” field, enter the IP address provided by Hostinger. Save your changes once you’ve entered the correct information. Why is adding A records sometimes necessary? It allows for more precise routing of your domain’s traffic, particularly if your hosting setup requires an IP-specific configuration. Updating DNS records might feel a bit daunting initially. But with each step you take, you’re building a more reliable and efficient online presence. Are you ready to take control of your domain settings and ensure your website is perfectly aligned?Verifying Domain Connection
Pointing your Namecheap domain to Hostinger is a key step. It ensures your website goes live successfully. After updating your DNS settings, you must verify the connection. This step confirms your domain is correctly pointing to Hostinger. Let’s explore how to ensure everything is set up properly.
Checking Propagation Status
DNS changes can take time to propagate. Use online tools like DNS Checker. They help you check if your domain is pointing correctly. Enter your domain name and choose the DNS record type. The tool will show results from different locations worldwide. This helps you confirm if the changes have spread globally.
Testing Website Accessibility
Once propagation is confirmed, test your website. Open a web browser and enter your domain name. Your website should load without issues. If it doesn’t, clear your browser’s cache. You can also try accessing the site from a different device. This ensures the connection works correctly and your site is live.
Troubleshooting Common Issues
Learn how to point your Namecheap domain to Hostinger with easy steps. Update DNS settings in your Namecheap account. Ensure DNS propagation for seamless domain hosting.
Troubleshooting common issues when pointing your Namecheap domain to Hostinger can sometimes feel daunting, but with a little guidance, you can resolve them effectively. Let’s tackle some of the frequent obstacles you might encounter. Whether it’s DNS conflicts or propagation delays, understanding these challenges can save you time and frustration.Resolving Dns Conflicts
DNS conflicts can occur when your domain settings are not correctly aligned between Namecheap and Hostinger. This mismatch can prevent your website from appearing online. Start by double-checking that the Namecheap DNS settings match those provided by Hostinger. Incorrect entries could lead to conflicts. Consider creating a simple checklist to verify each setting. Have you inputted the correct nameservers? Are your DNS records accurately configured? Ensuring these align can clear up many issues.Handling Propagation Delays
Propagation delays are inevitable when pointing your domain to a new host. This delay can take up to 48 hours, leaving you waiting for your website to go live. During this period, your website might not be accessible globally. It’s a frustrating but normal part of the process. Have patience and use online tools to check your website’s status. These tools can show you where your site is accessible and where it’s still propagating. Are you tempted to make changes during this wait? Resist. Adjustments can further delay propagation. Troubleshooting requires patience and precision. Have you encountered any unexpected issues? Share your experiences and solutions; they might help someone else facing similar challenges.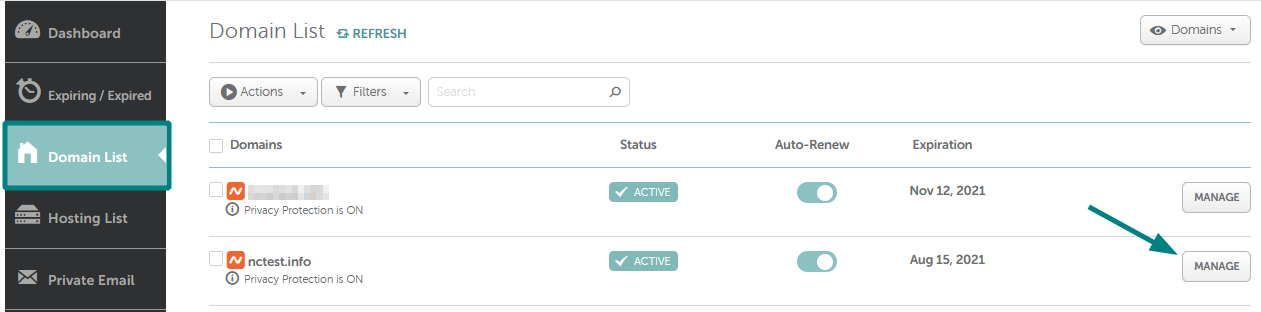
Credit: www.namecheap.com
Frequently Asked Questions
How Do I Transfer My Domain From Namecheap To Hostinger?
Unlock your domain at Namecheap and obtain the transfer code. Initiate the transfer at Hostinger using this code. Confirm the transfer via the email sent to you. Ensure your domain’s contact information is up-to-date. Await the transfer completion, which typically takes up to 7 days.
How To Connect Hostinger Domain With Namecheap Hosting?
Change the domain’s nameservers in Hostinger to those provided by Namecheap. Access Hostinger’s DNS settings, then update with Namecheap nameservers. After changes, allow up to 48 hours for DNS propagation. Visit Namecheap’s control panel to manage hosting settings and verify connectivity.
Ensure all configurations align with Namecheap’s hosting requirements.
How Do I Point My Domain To Another Hosting Provider?
Log into your domain registrar’s account. Update the DNS settings to point to your new hosting provider’s nameservers. Save changes and wait for the DNS propagation, which can take up to 48 hours. Ensure you have the correct nameserver information from your hosting provider.
Test your domain after propagation completes.
How Do I Transfer Domains Out Of Namecheap?
Unlock your domain in your Namecheap account. Obtain the EPP code. Initiate the transfer at your new registrar. Approve the transfer request via email. Ensure your WHOIS information is up-to-date.
Conclusion
Connecting your Namecheap domain to Hostinger is straightforward. Follow the steps carefully. Ensure all settings are correct. Check your DNS records. Wait for changes to propagate. Usually, it takes a few hours. Your website should be live soon. If issues arise, review settings again.
Seek help from support if needed. You’re now ready to manage your site. Enjoy building your online presence. With Hostinger, your domain is in good hands. Keep exploring other features. Grow your website efficiently.


