
Are you looking to expand your online presence without the hassle of managing multiple domains? Adding a subdomain to your Namecheap account might be just the solution you need.
Whether you’re launching a new blog, creating a separate section for your business, or simply organizing your web content better, subdomains can offer flexibility and enhance your site’s navigation. In this guide, you’ll discover a straightforward process to add a subdomain using Namecheap, empowering you to make the most of your digital space.
Dive in to unlock the potential of subdomains and take control of your website’s structure with ease.
Accessing Your Namecheap Account
Accessing your Namecheap account is the first step to add a subdomain. It’s simple and quick. This process allows you to manage your domain settings. You can make changes anytime. Follow these steps to get started.
First, visit the Namecheap website. Enter the URL in your browser’s address bar. This takes you to the homepage. Look for the login button. It’s usually at the top right corner.
Logging In
Click on the login button. A new page opens. Enter your username and password. These were created during registration. Check the box to stay logged in. This option saves time later.
Finding Your Domain
After logging in, you see your dashboard. This area displays all your domains. Look for the domain you want to add a subdomain to. Click on its name. This takes you to the domain management page.
Navigating To The Domain Management Area
In the domain management area, find the list of features. Search for the ‘Subdomain’ option. This area lets you add, edit, or delete subdomains. Click on it to proceed.
Confirming Access
Ensure you’re on the right page. Double-check the domain name. Verify that you have access to make changes. Only authorized users can add or modify subdomains. This step is crucial for security.

Credit: thomasgauvin.com
Navigating To Domain List
Navigating to the Domain List in Namecheap is essential for managing subdomains. This step helps you access the domain settings. The process is straightforward, even for beginners. Follow these simple steps to reach the Domain List. This guide will make the task easier.
First, log into your Namecheap account. Enter your username and password. Click on the “Sign In” button. This takes you to your account dashboard. Ensure your credentials are correct.
Locating The Domain List
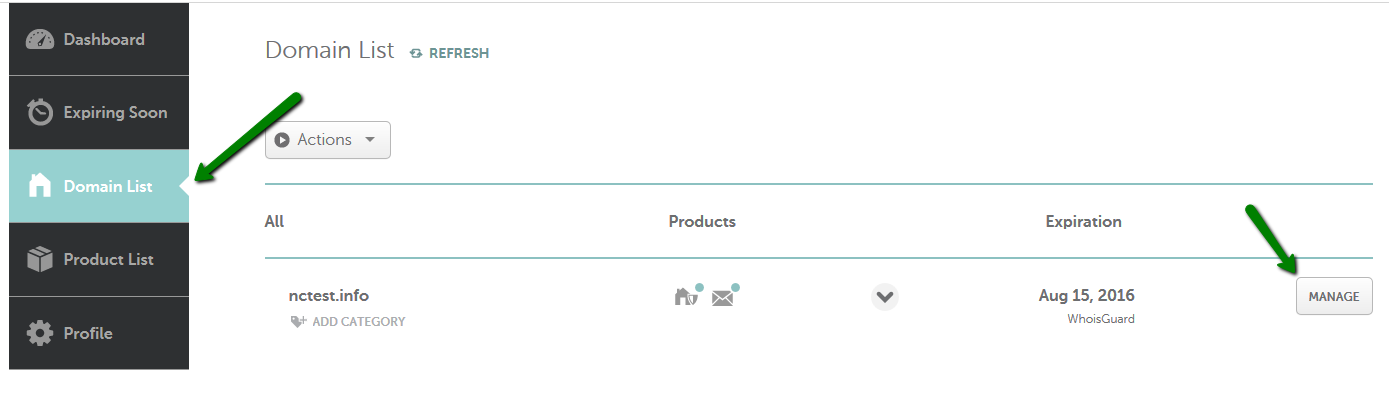
Find the “Domain List” option on the dashboard. It’s usually on the left side. Click on it to open the domain management page. You will see all your registered domains.
Selecting The Right Domain
Look through the list for the desired domain. Click on the domain name. This action opens the domain settings page. Now you are ready to add a subdomain.
Selecting The Domain
Adding a subdomain in Namecheap involves navigating to the Domain List, selecting the domain, and accessing the Advanced DNS. Enter the subdomain name in the Host field, then specify the destination URL. Save changes to finalize the setup.
Selecting the right domain for your subdomain is a pivotal step in optimizing your website’s performance. This decision can impact your site’s visibility, user experience, and even your brand image. It’s not just about picking a name; it’s about choosing a path for your online presence. Think of your domain as your digital address — it should be easy to find, memorable, and aligned with your brand. What will your domain say about you? ###Understanding Your Domain’s Potential
Your domain is more than just a name; it holds the power to attract and engage. Consider how your domain reflects your brand identity and the message you want to convey. When selecting a domain for your subdomain, ensure it resonates with your audience. Is it catchy and easy to remember? These factors play a crucial role in driving traffic to your site. ###Assessing Domain Availability
Before settling on a domain, verify its availability. You wouldn’t want to invest time in a name that’s already taken. Use tools like Namecheap’s domain search to check if your desired domain is free. This step ensures you don’t encounter any legal issues and helps maintain your brand’s uniqueness. Have you checked your domain’s availability yet? ###Considering Seo And Keywords
Your domain can significantly impact your site’s SEO. Incorporate relevant keywords that align with your content and target audience. This strategy boosts your visibility in search results, driving organic traffic to your site. Are there keywords that define your business? Integrating them into your domain could enhance your site’s searchability. ###Evaluating Brand Consistency
Consistency across your digital assets strengthens your brand’s image. Ensure your domain complements your existing domains and aligns with your branding strategy. This cohesion fosters trust and recognition among your audience. Is your domain consistent with your brand ethos? ###Planning For Future Growth
Select a domain that accommodates your future expansion plans. As your business grows, your domain should still fit comfortably within your larger brand strategy. Think about scalability — will your domain still be relevant in five years? Choosing a flexible domain today can save you from costly changes down the line. ###Reflecting On Personal Experience
I once chose a domain that seemed perfect at the moment but didn’t consider future growth. As my business evolved, the name felt limiting, prompting a costly rebrand. Learn from my experience; think long-term when selecting your domain. Are you envisioning where your business will be in the future?Entering The Advanced Dns Settings
Entering the Advanced DNS Settings in Namecheap is a crucial step. It allows you to manage your domain’s DNS records. This is where you can add a subdomain to your existing domain. With a few clicks, you can set up your subdomain for various uses. These settings help in directing traffic to specific parts of your website. Understanding these settings ensures your website runs smoothly.
Accessing Your Domain List
Log in to your Namecheap account first. Go to your dashboard and locate the Domain List section. This is where all your purchased domains are listed. Find the domain you want to modify. Click on the Manage button next to it.
Navigating To Advanced Dns
After clicking Manage, you’ll see several tabs. Look for the Advanced DNS tab. Click on it to enter the settings page. This section lets you view and edit DNS records. Here, you can manage how your domain functions.
Adding A New Record
Scroll down to find the Host Records section. Click on the Add New Record button. Choose the record type you need. For subdomains, select CNAME Record or A Record. Enter the subdomain name and its value.
After entering the necessary details, look for the Save button. Click it to save your changes. Wait for the confirmation message. This ensures your settings are updated successfully. Refresh the page to check the changes.
Creating A New Subdomain Record
Easily add a subdomain in Namecheap with a few clicks. Access the dashboard, select ‘Domain List,’ and find ‘Advanced DNS. ‘ Follow prompts to enter your new subdomain details. Save changes to complete the process.
Creating a subdomain can significantly enhance your website’s organization and functionality. Whether you want to separate sections of your site or host different services, Namecheap makes it easy to add a subdomain. This section will guide you through the process of creating a new subdomain record, ensuring you know precisely how to set it up for your needs. ###Choosing Record Type
The first step in creating a subdomain is choosing the correct record type. You’ll typically opt for an “A Record”, which connects your subdomain to an IP address. This is ideal if you’re hosting on a server with a static IP. Alternatively, a “CNAME Record” might be suitable if you want to point your subdomain to another domain name. Why is this choice important? Each record type serves a specific purpose, and selecting the right one ensures your subdomain functions correctly. Consider what you want your subdomain to achieve and choose accordingly. ###Specifying Subdomain Name
Next, you’ll specify the subdomain name. Keep it simple and relevant to its purpose. For instance, if you’re setting up a blog, you might choose “blog.yourdomain.com”. The name should clearly indicate what users can expect, adding clarity to your site structure. Reflect on your user experience. What name best conveys the subdomain’s content? A well-chosen name helps visitors navigate your site effortlessly. ###Setting Ip Address Or Destination
Finally, you need to set the IP address or destination for your subdomain. Link it to your server’s IP if you chose an A Record. This connects your subdomain to your server’s location, making it accessible online. If using a CNAME Record, point it to the domain you want to redirect to. Accuracy is crucial here. Double-check your IP address or destination to avoid connectivity issues. This step ensures your subdomain points exactly where you want it, making it a seamless part of your digital ecosystem. Are there areas of your website that could benefit from better organization with subdomains? Adding them can streamline navigation and improve user experience, making your site more inviting and easy to use.Credit: help.mailgun.com
Saving Your Changes
After setting up a subdomain in Namecheap, saving changes is crucial. This final step ensures your configurations take effect. It’s a straightforward process. But missing it can cause issues. Let’s dive into how to save your changes effectively.
Double-check Your Entries
Before saving, review all entries carefully. Look for typos in domain names. Verify all settings match your intended configurations. This step prevents future issues. Taking a moment to check can save time later.
Locate The Save Button
Find the save button in the Namecheap dashboard. Usually, it’s at the bottom of the settings page. The button might say “Save Changes” or “Apply.” This ensures your new settings are stored.
Wait For Confirmation
After clicking save, watch for confirmation. Namecheap often shows a success message. This confirms your changes have been saved. If no message appears, try saving again.
Troubleshoot If Necessary
If changes don’t save, troubleshoot. Check your internet connection. Clear your browser cache. Sometimes, logging out and back in helps. If issues persist, contact Namecheap support.
Test Your Subdomain
Finally, test the new subdomain. Enter it in a browser. Ensure it directs to the correct page. If it works, your changes are successful. If not, revisit the settings and troubleshoot.
Verifying Subdomain Setup
After setting up a subdomain on Namecheap, verifying it is crucial. This step ensures your subdomain works correctly. It also confirms that your visitors can access it without issues. Proper verification helps avoid potential problems. Let’s explore the steps involved in verifying your subdomain setup.
Testing Subdomain Accessibility
First, try accessing your subdomain through a web browser. Enter the full URL of your subdomain in the address bar. Check if the webpage loads without errors. This confirms that your subdomain is reachable. Another method is to use online tools. These tools check if your subdomain resolves correctly. They provide quick feedback. Use multiple devices and networks to test accessibility. This ensures that all users can access your subdomain.
Troubleshooting Common Issues
Encountering problems is not uncommon. Sometimes, the subdomain might not work as expected. Check your DNS settings first. Ensure that the DNS records are correctly configured. Incorrect settings often cause accessibility issues. Another common issue is caching. Clear your browser’s cache. This helps load the most recent version of your subdomain. If problems persist, contact Namecheap support. They can provide specific guidance for your situation. Proper troubleshooting can resolve most issues quickly.
Credit: www.namecheap.com
Customizing Subdomain Settings
Discover the ease of adding a subdomain with Namecheap. Adjust settings to match your needs effortlessly. Enhance your online presence by creating organized and specific subdomains for different purposes.
Customizing subdomain settings can be an exciting journey, especially if you’re looking to fine-tune your website’s performance and accessibility. You’ve already taken the first step by creating a subdomain on Namecheap. Now, it’s time to dig deeper and personalize it to suit your specific needs. This part of the process might seem daunting, but with a little guidance, you’ll find it’s simpler than you think. ###Adjusting Dns Records
DNS records act like the internet’s phone book. They ensure that users who type your subdomain’s URL are directed to the right place. To adjust DNS records on Namecheap, access your account dashboard and navigate to the ‘Domain List’. Click on ‘Manage’ next to your domain. Here, you’ll find the ‘Advanced DNS’ tab, which allows you to add or modify DNS records. Whether you need an A record pointing to an IP address or a CNAME pointing to another domain, this is your control center. Ever wondered how your favorite sites load so quickly? Efficient DNS management is often the unsung hero. ###Managing Subdomain Features
After setting up DNS, it’s essential to tailor the subdomain’s features to match your goals. Namecheap offers several options, from enabling SSL to setting up email forwards, which can enhance your subdomain’s functionality. Visit the ‘Dashboard’ and select the subdomain you wish to manage. Consider enabling SSL for secure connections, a crucial step if you’re handling sensitive data. You can also set up redirects or customize error pages to improve user experience. How can you ensure that your subdomain reflects your brand’s personality? By thoughtfully managing these features, you’re one step closer to achieving that. Have you ever tweaked subdomain settings and noticed a boost in site engagement? It’s the small adjustments that often make the biggest difference. As you refine your subdomain, keep an eye on performance and user feedback. Your digital space should evolve as your needs and technologies change.Frequently Asked Questions
How Do I Add A Subdomain In Namecheap?
Log into Namecheap, go to “Domain List,” select your domain, and click “Manage. ” In “Advanced DNS,” add a new record with your subdomain details. Save changes to complete the setup.
Why Are Subdomains Bad For Seo?
Subdomains can dilute domain authority, impacting SEO rankings. Search engines treat them as separate sites, complicating link equity. Managing multiple subdomains often leads to inconsistent content strategies. Consolidating content on one domain improves SEO by strengthening authority and simplifying management.
How Do I Connect My Subdomain To Hosting?
Log into your hosting account. Find DNS settings and add a new record for your subdomain. Point it to your server’s IP address. Save changes and wait for DNS propagation, which can take up to 48 hours. Ensure your hosting plan supports subdomains.
How Many Subdomains Can A Domain Have?
A domain can have countless subdomains. It’s limited only by server capacity and DNS management. Typically, one domain can manage thousands, but performance and organization should be considered. Proper DNS setup ensures functionality and reliability for all subdomains.
Conclusion
Adding a subdomain on Namecheap is simple and straightforward. First, log into your account. Then, navigate to the “Domain List” section. Click on “Manage” next to your domain. Find the “Advanced DNS” tab. Add your subdomain in the “Host Records” section.
Remember to save changes. This process enhances your website’s organization. Subdomains help separate different site sections. This improves user experience and site management. Follow these steps to create a seamless online presence. Happy organizing!


