
Setting up your online store is an exciting journey, and connecting your Namecheap domain to Shopify is a crucial step. You want your brand to stand out, and a custom domain helps you do just that.
Imagine the sense of pride and professionalism you’ll feel when customers visit your store at your unique web address. But perhaps you’re wondering, “How do I make this happen without technical stress? ” You’re in the right place. This guide is designed just for you—clear, simple, and straight to the point.
Discover the satisfaction of seeing your domain live and functional on Shopify, and unlock the potential of your business. Dive in to learn how to effortlessly link your Namecheap domain to Shopify.
Domain Setup Preparation
Preparing your domain for a seamless connection to Shopify is crucial. Proper setup ensures smooth website operations and enhances user experience. Let’s dive into the essential steps for your domain setup preparation. Simple steps. Big impact.
Choose Your Domain
Start by choosing the right domain for your Shopify store. A memorable domain makes your store easy to find. If you haven’t purchased a domain yet, visit Namecheap. Browse the options and select a domain that reflects your brand. Short and catchy works best. Once chosen, register your domain through Namecheap’s user-friendly platform.
Verify Domain Ownership
Next, verify that you own the domain you purchased. Log into your Namecheap account to access domain settings. Find the domain you want to link to Shopify. Ensure all details are accurate. Follow the instructions provided by Namecheap for domain verification. This step confirms you have control over the domain. Verification is essential for a secure connection to Shopify.
Credit: www.namecheap.com
Access Namecheap Dashboard
Easily link your Namecheap domain to Shopify by accessing your Namecheap dashboard. Navigate through straightforward steps to connect your domain. Enhance your online store’s identity with a seamless domain integration.
Accessing the Namecheap Dashboard is the first step in linking your domain to Shopify. This is where you’ll make all the necessary adjustments to ensure your domain smoothly connects to your Shopify store. It’s crucial to get this right, as it lays the foundation for your online presence.Login Process
To begin, you’ll need to log into your Namecheap account. Head over to the Namecheap website and click on the “Sign In” button at the top right corner. Enter your username and password—it’s a bit like unlocking the gateway to your domain management. If you don’t remember your credentials, take a moment to retrieve them. Namecheap provides easy options for password recovery. Once logged in, you’ll find yourself in the heart of your domain control, ready to navigate further.Navigate To Domain List
After logging in, your next destination is the Domain List. This is where all the magic happens. Look for the “Dashboard” tab on the left side of the screen; clicking it will reveal your Domain List. In the Domain List, you’ll see all your registered domains. It’s like a treasure chest of potential online ventures waiting to be unlocked. Select the domain you want to link to Shopify. Have you ever wondered how many domains people often neglect because they don’t know where to find them? By accessing this list, you ensure that your domain is actively utilized for your business. Taking these steps not only empowers you to manage your domains effectively but also sets the stage for a successful Shopify integration. What insights have you gained by navigating the Domain List? Share your experiences, and let’s make sure every domain finds its purpose.Configure Dns Settings
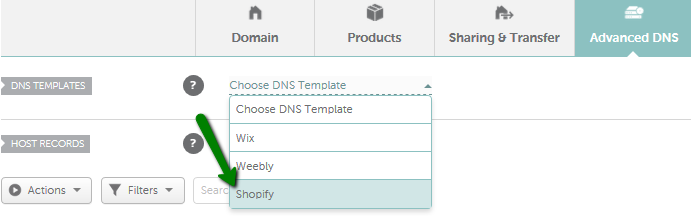
To link your Namecheap domain to Shopify, you must configure DNS settings. This step ensures your domain points to your Shopify store. It involves adjusting the DNS records within your Namecheap account. Understanding and modifying these settings can seem complex. But with a clear guide, it becomes manageable. Follow the steps below to ensure your domain connects seamlessly.
Understand Dns Records
DNS records are essential for your domain’s connection to Shopify. They direct internet traffic to your store. The main records you need are A Record and CNAME Record. These control where your domain points. Understanding these records is crucial. It helps in configuring your domain correctly.
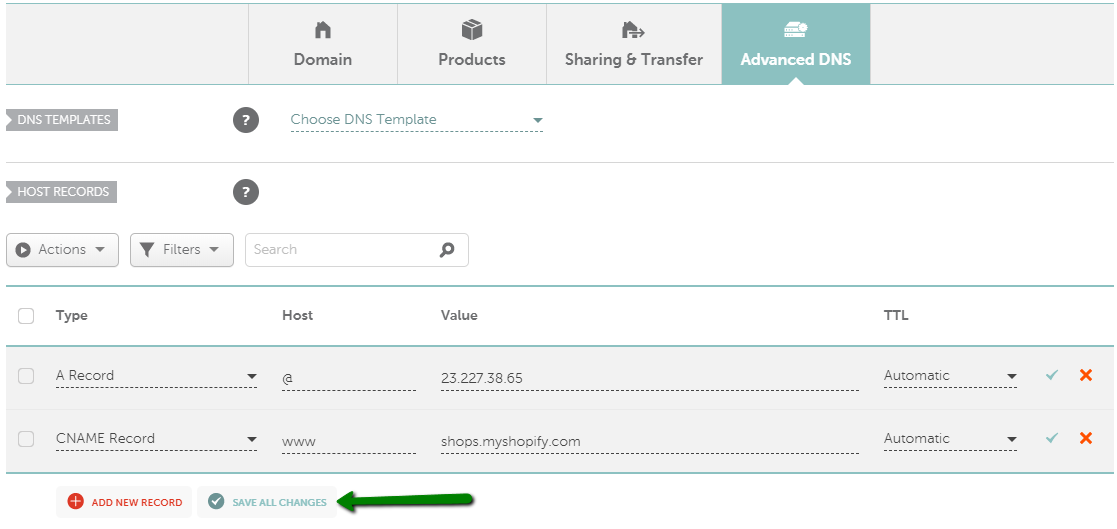
Modify A Record
The A Record points your domain to Shopify’s IP address. Start by logging into your Namecheap account. Navigate to the domain list. Choose the domain you want to modify. Find the DNS settings section. Locate the A Record. You may need to edit it. Change the value to Shopify’s IP address. Save your changes to update the record.
Add Cname Record
The CNAME Record connects your subdomain to Shopify. Access the DNS settings in your Namecheap account. Look for the CNAME Record section. If it doesn’t exist, add a new record. Set the host to ‘www’. In the value field, enter Shopify’s domain name. This directs your subdomain to Shopify. Save the new CNAME Record. Your domain should now point correctly to Shopify.
Credit: www.namecheap.com
Shopify Domain Integration
Integrating your Namecheap domain with Shopify can significantly enhance your online presence and streamline your e-commerce operations. Whether you’re a seasoned entrepreneur or just starting out, connecting your domain to Shopify is a straightforward process that opens doors to a more professional brand identity. Imagine the confidence your customers will feel when they see your custom domain instead of a generic Shopify URL. Let’s dive into how you can achieve seamless Shopify domain integration.
Access Shopify Admin
First, you need to access your Shopify admin. This is where all the magic happens. Log into your Shopify account using your credentials. Once you’re in, navigate to the bottom left corner where you’ll find the Settings icon. Click on it, and from the menu, select Domains. Here, you’ll see options related to domain management. Do you remember the thrill of opening a new gift? Accessing the Shopify admin feels just like that, as you’re about to enhance your store.
Add Third-party Domain
Now, it’s time to add your Namecheap domain. Click on the Connect existing domain option. You’ll be prompted to enter the domain you want to link. Type your Namecheap domain into the field provided. Shopify will guide you through the verification process. It’s like having a trusty friend guiding you through a new city; the steps are clear and reassuring.
Once you’ve entered your domain, follow the instructions to update your DNS settings on Namecheap. This involves adding Shopify’s IP addresses to your domain’s DNS settings. It might sound technical, but it’s straightforward once you follow the steps. You’ll be given IP addresses that you need to insert, and voila, your domain starts pointing to your Shopify store.
Have you ever wondered how professional businesses manage their domains effortlessly? This integration is part of the secret sauce. With your domain linked to Shopify, you’ll not only boost your brand’s credibility but also improve SEO. Customers are more likely to trust a URL that aligns with your brand name. So, are you ready to take this exciting step toward professionalizing your online store?
Verify Domain Connection
Connecting your Namecheap domain to Shopify enhances your online presence. Start by logging into your Namecheap account and access the domain list. Modify DNS settings to point to Shopify’s servers. Follow Shopify’s instructions to complete the setup. This seamless process ensures your domain directs visitors to your Shopify store efficiently.
Linking your Namecheap domain to Shopify is a crucial step in setting up your online store. But how do you know if the domain connection is successful? The key is verifying your domain’s connection to Shopify. This ensures that your customers can find your store seamlessly. It also prevents potential headaches down the road. So, how do you check if everything is connected properly? Let’s explore some actionable steps.Check Shopify Domain Status
To begin, log into your Shopify admin panel. Navigate to the “Domains” section under “Settings.” Here, you’ll see a list of domains associated with your store. Look for your Namecheap domain. It should display a status that confirms it’s connected. If you see a “Connected” status, you’re in good shape. It means your domain is correctly linked to Shopify. However, if you spot a “Not Connected” status, you might need to revisit your domain settings.Troubleshoot Connection Issues
What if your domain isn’t showing as connected? Don’t worry. It’s often a simple fix. First, check the DNS settings on Namecheap. Ensure the CNAME and A records point to Shopify. These records are crucial for directing traffic to your store. If everything seems correct but the issue persists, consider clearing your browser cache. Sometimes, old data can interfere with current settings. Lastly, reach out to Shopify support if you’re stuck. They can offer insights specific to your setup. Remember, domain connection issues are common, but they’re usually fixable with a few tweaks. Have you ever faced a domain connection problem that seemed impossible to resolve? How did you overcome it? Let these questions guide you to a smoother domain connection experience.Domain Security Measures
Securing your domain is crucial for your online store’s safety. It protects your data and your customers’ information. When linking a Namecheap domain to Shopify, consider essential security measures. These steps will safeguard your domain and enhance customer trust.
Enable Ssl Certificate
An SSL Certificate encrypts the data on your website. It ensures that information exchanged between your site and visitors remains private. Shopify provides a free SSL Certificate for all domains. Make sure to activate it for your Namecheap domain. This action will display a padlock in the browser, indicating a secure connection. Customers feel safer when browsing your store.
Monitor Domain Security
Regularly check your domain’s security status. Watch for any suspicious activities or unauthorized changes. Namecheap offers tools to help monitor your domain. Use these tools to review access logs and detect any issues. Staying vigilant can prevent potential security breaches. Protect your domain from hackers and unwanted access.
Post-setup Activities
Linking your Namecheap domain to Shopify is a straightforward task. First, access your Namecheap account and locate the DNS settings. Then, adjust the CNAME and A Record to point to Shopify’s servers. This ensures your domain directs visitors to your Shopify store seamlessly.
After you’ve linked your Namecheap domain to Shopify, the process doesn’t end there. Post-setup activities are crucial to ensure everything runs smoothly. These tasks help you confirm that your domain connection is correct and that your online store is ready for visitors. When I first linked my domain to Shopify, I discovered that a little extra effort in post-setup activities saved me from potential issues. This section will walk you through the essential steps to take after the initial setup. ###Test Domain Functionality
Testing your domain functionality is a vital step. Open your browser and type in your new domain name to see if it directs correctly to your Shopify store. If the page loads without errors, you’re on the right track. But, if it doesn’t, double-check your DNS settings and ensure there are no typos. Consider asking a friend to test the domain from their device as well. Sometimes, different browsers or devices might display issues you haven’t noticed. ###Update Domain Information
Updating your domain information is another important task. Log into your Namecheap account and verify that your contact details are current. Accurate information is crucial for domain management and renewal notices. Incorrect details can lead to missed communications or even loss of your domain. Reflect on how much effort you put into choosing your domain name. It’s worth the few extra minutes to ensure everything is up-to-date. Have you ever had to deal with outdated information causing a headache? Updating your domain info now can save you from that hassle later. By focusing on these post-setup activities, you ensure a seamless and professional experience for your customers. What other steps have you found helpful after setting up a domain?
Credit: help.shopify.com
Frequently Asked Questions
How To Link Namecheap Domain With Shopify?
To link your Namecheap domain with Shopify, update DNS settings in Namecheap. Set CNAME to “shops. myshopify. com” and point A record to Shopify’s IP address. Confirm connection in Shopify admin. This process ensures your domain directs visitors to your Shopify store seamlessly.
How Do I Connect My Domain To Shopify?
Log in to Shopify. Go to “Domains” under “Settings”. Click “Connect existing domain”. Enter your domain, then follow the instructions to update DNS settings with your domain provider. Confirm connection on Shopify.
Is Namecheap Compatible With Shopify?
Yes, Namecheap is compatible with Shopify. You can use Namecheap to register a domain and connect it to your Shopify store seamlessly. This allows you to manage your online store efficiently with a personalized domain name.
How Do I Verify Domain Ownership On Shopify Namecheap?
Verify domain ownership by adding a DNS TXT record in Namecheap. Access your Namecheap account, locate the domain, and edit DNS settings. Input the provided verification code from Shopify as a TXT record. Save changes, then confirm verification in Shopify.
This process ensures seamless domain integration.
Conclusion
Connecting your Namecheap domain to Shopify is simple. Follow the steps carefully. Double-check your settings to ensure smooth integration. This helps your online store look professional. A custom domain builds trust with customers. It also improves brand identity. If problems arise, seek help from Shopify support.
They offer great guidance. Your online presence matters. Invest time in setting it up correctly. This effort enhances your business growth. Keep learning and adapting. It’s key to success in e-commerce. Stay updated with the latest tips and best practices.
Happy selling!


