
Imagine the peace of mind knowing your website is secure from prying eyes. You can achieve this with an SSL certificate from Namecheap.
Not only does it protect sensitive information, but it also builds trust with your visitors and boosts your site’s credibility. Are you unsure how to activate your SSL certificate and fortify your digital space? You’re in the right place. This guide will walk you through the simple steps to secure your site effortlessly.
Let’s get started and unlock the full potential of your online presence with Namecheap SSL activation.
Credit: www.namecheap.com
Why Ssl Certificates Matter
In today’s digital world, securing your website is crucial. SSL certificates provide that essential layer of security. They encrypt data exchanged between a server and a user. This ensures sensitive information remains private. Without SSL, data can be intercepted by malicious actors. Let’s explore why SSL certificates matter.
SSL certificates protect user information. They encrypt details like passwords and credit card numbers. This prevents unauthorized access. Visitors trust sites with SSL because they see the padlock icon. It assures them their data is safe.
Boosting Seo With Ssl
Search engines prioritize secure websites. Google ranks sites with SSL higher. SSL certificates improve your site’s visibility. More visibility means more traffic. More traffic can lead to more sales.
Building Trust And Credibility
SSL certificates boost user confidence. Visitors trust a site that values security. Trust leads to customer loyalty. Loyal customers return and recommend your site. This grows your business reputation.
Enhancing Conversion Rates
Secure sites encourage transactions. Users feel safe sharing their details. Higher trust leads to higher conversion rates. A secure site can increase sales. SSL certificates are essential for e-commerce success.

Credit: www.youtube.com
Choosing The Right Ssl Certificate
Activating an SSL certificate with Namecheap ensures a secure website. Choose the right type to protect data and build trust. Follow easy steps on Namecheap to activate and keep your site safe.
Choosing the right SSL certificate is a crucial step in securing your website and building trust with your visitors. With multiple options available, it’s essential to understand which type best suits your needs. This decision can impact your site’s performance and user experience, so let’s break down the choices and factors to consider.Types Of Ssl Certificates
SSL certificates come in various types, each designed for different purposes and levels of security. Domain Validation (DV) certificates are the most basic and are great for small websites or blogs. They’re easy to get and show users that your site is protected. Organization Validation (OV) certificates provide a higher level of security by verifying your organization’s identity. These are suitable for businesses looking to assure customers of their legitimacy. Extended Validation (EV) certificates offer the highest level of security and trust. They require a more rigorous validation process and are perfect for e-commerce sites where customer trust is paramount.Factors To Consider
When choosing an SSL certificate, think about the size and scope of your website. If you run a personal blog, a DV certificate might be sufficient. However, if you’re handling sensitive customer information, an EV certificate is a wise investment. Consider your budget. While EV certificates offer the most assurance, they also come at a higher cost. Balancing cost with the level of security needed is key. Lastly, reflect on your brand image. A green address bar from an EV certificate can enhance your site’s credibility. How do you want your visitors to perceive your site? By understanding these types and factors, you can make an informed decision. This ensures your website is not only secure but also trusted by your audience. Have you assessed your needs and priorities yet?Purchasing Ssl From Namecheap
Activating SSL with Namecheap is straightforward. Purchase your SSL certificate, then access your Namecheap account. Follow the activation steps, including verifying domain ownership, to secure your website quickly.
Purchasing SSL from Namecheap is a straightforward process that ensures your website’s data is encrypted and secure. Whether you’re running a blog or an e-commerce site, SSL is essential. It not only protects your visitors’ information but also boosts your site’s credibility and search engine ranking. Let’s dive into how you can easily purchase SSL from Namecheap. ###Navigating Namecheap’s Ssl Options
When you’re ready to buy SSL from Namecheap, start by visiting their SSL certificates page. You’ll find a variety of options tailored to different needs. Whether you need a single-domain SSL or a wildcard for multiple subdomains, Namecheap has you covered. Consider what suits your website best. If you run a single blog, a domain-validated SSL might be sufficient. For multiple sites, a multi-domain SSL could be more cost-effective. Each option comes with detailed information, helping you make an informed decision. Pay attention to the features and the price to ensure it aligns with your budget and security requirements. ###Adding Ssl To Your Cart
Once you’ve decided on the right SSL certificate, it’s time to add it to your cart. Click the ‘Buy Now’ button next to your chosen SSL option. You will be prompted to create or log into your Namecheap account. This ensures your purchase is securely linked to your account, making future renewals straightforward. Review your order in the cart. You might notice optional add-ons like extra validation levels. Decide if these are necessary for your site. Proceed to checkout when you’re satisfied with your cart. Double-check your billing details and payment method. It’s crucial to ensure everything is correct to avoid any delays in activating your SSL. After completing your purchase, Namecheap will guide you through the SSL activation process. This is where your SSL becomes live, securing your site and giving you peace of mind. Have you thought about the impact of SSL on your site’s credibility? Investing in SSL not only secures your data but also builds trust with your audience.Activating Ssl Certificate
Activating an SSL certificate with Namecheap is a straightforward process. SSL certificates secure your website, protecting visitor information. A secure website builds trust and boosts search engine rankings. Follow these steps to activate your SSL certificate efficiently.
Accessing Your Namecheap Account
Start by logging into your Namecheap account. Enter your username and password. Once logged in, you’ll see your dashboard. This is the control center for your domain and hosting services.
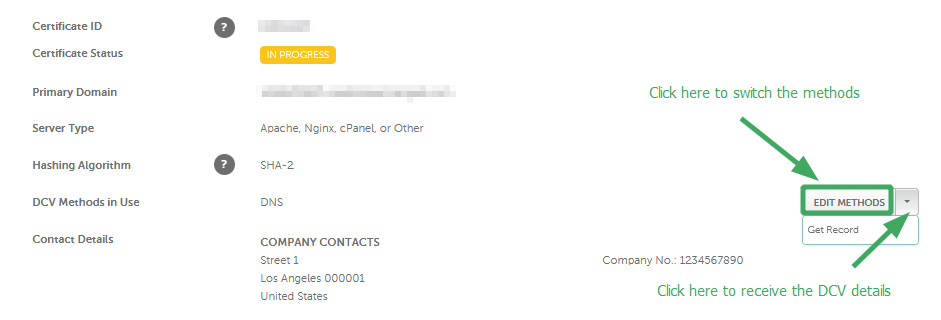
Locating Ssl In Your Dashboard
Find the “SSL Certificates” section in your dashboard. Click to open it. This section shows all purchased SSL certificates. Select the certificate you wish to activate. This action will begin the activation process.
Generating Csr Code
Generating a CSR code is essential for activating an SSL certificate. It acts like an application to request your SSL certificate. By creating a CSR, you provide critical information needed for authentication. Let’s explore what a CSR is and how to generate one.
What Is Csr?
A CSR, or Certificate Signing Request, is a block of encoded text. It contains information about your website. Details include your domain name, organization, and location. The CSR also includes your public key. This key is used to encrypt data. Generating a CSR is the first step in securing your site with SSL.
Steps To Generate Csr
Generating a CSR is straightforward. Follow these steps to create your CSR code:
First, access your server control panel. Locate the SSL/TLS section. Choose the option to generate a CSR.
Next, fill in the required fields. Enter your domain name and organization details. Be precise with your information.
Then, select your key size. A key size of 2048 is standard for SSL.
After entering all details, submit the form. Your CSR will be generated. Save the CSR file for later use.
Finally, use the CSR code to request your SSL certificate. Submit it to your SSL provider, like Namecheap.
These steps ensure a secure SSL activation process.
Installing Ssl Certificate
Installing an SSL certificate on your Namecheap-hosted website is essential. It ensures secure data transmission between your server and visitors. This process boosts trust and enhances your site’s credibility. Follow these steps to install your SSL certificate effectively.
Uploading To Your Web Server
Begin by downloading the SSL certificate files from Namecheap. Access your web server using FTP or cPanel. Locate the directory where your website files reside. Upload the certificate files to this directory. Ensure each file is correctly placed for proper installation.
Verifying Installation
After uploading, confirm the installation is successful. Use online SSL checker tools for verification. Enter your website URL in the tool. The tool scans your server for the SSL certificate. A successful scan indicates proper installation. Rectify any errors found during the scan.
Troubleshooting Common Issues
Activating SSL on Namecheap can be tricky. Begin by purchasing an SSL certificate. Then, follow Namecheap’s step-by-step guide to install and activate it on your website.
Activating an SSL certificate on Namecheap should be a straightforward task. However, like any technical process, it can sometimes present challenges. If you run into issues, don’t worry—you’re not alone. Let’s dive into some common problems you might face and how to address them. Understanding these will help you secure your website efficiently. ###Ssl Activation Errors
SSL activation errors can be frustrating. You might see messages indicating a failed activation. This usually happens due to incorrect CSR (Certificate Signing Request) information. Double-check that your domain name matches exactly what you entered during the CSR generation. Sometimes, the error is due to an incomplete setup on your hosting server. Ensure that your hosting environment is correctly configured to support SSL. If you’re unsure, reach out to your hosting provider for assistance. They can guide you through the necessary adjustments. Have you ever overlooked a minor detail, only to have it cause a major issue? It’s a common experience, and often it’s the small things like DNS settings or file permissions that trip us up. Ensure these are correct to avoid activation errors. ###Certificate Mismatch Problems
Certificate mismatch issues occur when the SSL certificate does not match the domain it’s intended for. This can happen if you’ve recently changed your domain or subdomain settings. Make sure the SSL certificate is assigned to the correct domain. Check that your server configuration files are pointing to the right certificate. This is particularly important if you have multiple domains on the same server. A simple oversight here can lead to security warnings for your visitors. Have you ever sent a message to the wrong person because of a mix-up in your contacts? That’s what a certificate mismatch feels like for your website. Ensuring your server’s configuration points to the right certificate is key to preventing this. Remember, troubleshooting is about patience and precision. Have you considered reaching out to Namecheap support? They can provide specific guidance if these solutions don’t work for you. Don’t hesitate to seek help; your website’s security is worth the effort.Ssl Renewal Process
Renewing your SSL certificate is crucial for uninterrupted website security. The renewal process ensures continuous encryption and trust for your users. It’s essential to understand how to renew your SSL certificate with Namecheap.
Renewing Before Expiry
Renew your SSL certificate before it expires to maintain security. Namecheap recommends starting the renewal process a month before expiration. This allows time for any unexpected issues during renewal. Begin by logging into your Namecheap account and navigating to the ‘SSL Certificates’ section. Here, you’ll find your certificates listed. Select the one you wish to renew. Follow the guided steps on-screen to complete the process.
Handling Renewal Complications
Sometimes, complications arise during renewal. Common issues include mismatched information or incorrect CSR details. Double-check all information before submitting your renewal request. Contact Namecheap support if problems persist. They offer support to guide you through any technical hurdles. Ensure your website remains secure by resolving renewal issues promptly.

Credit: www.youtube.com
Frequently Asked Questions
How To Enable Ssl On Namecheap?
Log into your Namecheap account and access the “SSL Certificates” section. Purchase and activate an SSL certificate. Follow the installation instructions provided by Namecheap to enable SSL on your domain. Ensure your website is properly configured to use HTTPS for secure connections.
How Do I Activate Ssl?
To activate SSL, purchase an SSL certificate from a trusted provider. Install it on your server using your hosting provider’s guidelines. Ensure your website redirects HTTP traffic to HTTPS for secure connections.
How To Renew Ssl In Namecheap?
Log in to your Namecheap account. Navigate to the “SSL Certificates” section. Select the certificate for renewal. Follow the on-screen instructions to complete the renewal process. Ensure payment is completed and verify SSL installation on your server.
How To Activate Ssl On Cpanel?
Log in to cPanel and navigate to “SSL/TLS”. Select “Manage SSL Sites” and choose your domain. Install the SSL certificate by pasting the certificate, key, and CA bundle. Click “Install Certificate” to activate SSL. Ensure your website is accessible via HTTPS for secure connections.
Conclusion
Activating SSL with Namecheap is simple and effective. Protect your website and boost visitor trust. Follow the steps carefully to ensure success. You secure data and enhance user experience. SSL is crucial for safety online. A secure site builds confidence.
Namecheap makes it easy to activate SSL. Your website deserves protection. Take action today for peace of mind. It’s a straightforward process worth doing. Embrace the security offered by SSL. Your visitors will appreciate it. Make your online presence secure and trustworthy.


