
Are you looking to expand your website’s functionality without the hassle of purchasing a new domain? Creating a subdomain can be the perfect solution.
With Namecheap, the process is straightforward, and you’ll have your subdomain up and running in no time. Imagine having a dedicated space for your blog, online store, or support page, all neatly organized under your existing domain. It’s like adding new rooms to your virtual home, allowing you to tailor your web presence to better meet your needs and those of your visitors.
In this guide, you’ll discover just how easy it is to set up a subdomain using Namecheap. We’ll walk you through each step, ensuring you feel confident and empowered to take your website to the next level. No technical jargon, no complicated processes—just simple, clear instructions tailored for you. Ready to learn how you can leverage subdomains to enhance your site? Let’s dive in and explore the seamless process with Namecheap.
What Is A Subdomain?
A subdomain is an extension of your main domain. It acts as a separate section of your website. Imagine a branch growing from the main trunk. It helps organize different parts of your site. This can be useful for different purposes.
Subdomains can be created easily. They don’t need new domain names. They use your existing domain’s name. It’s like adding a room to your house without building a new home.
Subdomain Vs. Domain
A domain is the main address of your website. It’s what people type in their browsers. For example, example.com is a domain. A subdomain is a part of this domain. It appears before the main domain name. Like blog.example.com or shop.example.com.
Domains represent the whole website. Subdomains focus on specific sections. They give users a clear path to different areas. It’s important to know the difference. It helps in organizing your content effectively.
Common Uses For Subdomains
Businesses often use subdomains for different functions. One common use is creating a blog section. This keeps content separate from the main site. Another use is for online stores. They allow customers to shop easily.
Subdomains can host forums or communities. They provide a dedicated space for discussions. They are also useful for testing new features. Developers use them to test without affecting the main site. Subdomains make managing websites easier.
Benefits Of Using Subdomains
Creating a subdomain with Namecheap offers organizational benefits. It helps separate website content, improving site management. Subdomains can enhance SEO by targeting specific keywords, boosting visibility.
Creating subdomains can open new doors for organizing your website and optimizing its performance. Whether you’re running a blog, an e-commerce site, or a personal portfolio, subdomains offer unique benefits that can help enhance your online presence. Let’s explore why using subdomains could be a game-changer for your website.Organizing Website Content
Subdomains are a powerful tool for keeping your website content organized. Imagine having different branches of your business or diverse topics under one main domain. You can create distinct sections like blog.yourwebsite.com or shop.yourwebsite.com. This separation makes it easier for visitors to find relevant content. It also allows you to manage each section independently, providing a more streamlined experience for your audience. Consider how much easier it becomes to maintain a well-organized digital space with subdomains.Improving Seo
Subdomains can significantly boost your SEO efforts. Search engines treat subdomains as separate entities, which means you can target specific keywords for each. This approach allows you to tailor content to niche markets or audiences, enhancing your site’s visibility. When you focus on targeted SEO strategies for each subdomain, it can lead to improved rankings. For example, if you have a tech blog, using a subdomain like tech.yourwebsite.com helps search engines recognize the specific content theme. Are you ready to see how subdomains can elevate your search engine rankings? Using subdomains effectively can transform how you manage and promote your website. By organizing content and improving SEO, you create a more efficient and engaging online experience for your visitors. Have you considered how subdomains might benefit your digital strategy?Preparing To Create A Subdomain
Learn to create a subdomain with Namecheap easily. Follow simple steps for setting up a subdomain. Manage your website more effectively by organizing content under a separate subdomain.
Creating a subdomain on Namecheap is a straightforward process, but preparing for it can make the journey smoother. Whether you’re launching a new blog, setting up an online store, or creating a dedicated section for customer support, a subdomain can be a game-changer. Before you dive in, there are a few essential steps to ensure you’re on the right track.Checking Domain Availability
Before you can create a subdomain, make sure your primary domain is active and available on Namecheap. Log into your Namecheap account and head over to your domain list. Confirm that your desired domain is listed and active. If your domain isn’t available, you might need to renew it or troubleshoot any issues. It’s like ensuring your car is road-ready before a trip; you wouldn’t want to get stuck halfway. Consider why you need a subdomain. Is it for a new project or a specific audience? This clarity will guide your decisions and make the process more efficient.Understanding Dns Settings
To create a subdomain, you must understand your domain’s DNS settings. DNS, or Domain Name System, translates domain names to IP addresses. It’s crucial for ensuring your subdomain points to the right server. Navigate to the DNS settings in your Namecheap account. You’ll see records like A, CNAME, and MX—think of them as coordinates guiding internet traffic. If DNS settings sound complex, don’t worry. Many resources and tutorials are available, and Namecheap’s support team is just a click away. They helped me once when I accidentally misconfigured my blog’s subdomain, and their guidance was invaluable. Is there a specific area you need help with? Jot down questions or uncertainties. Addressing them early saves time and potential headaches later. Preparing to create a subdomain might seem meticulous, but these steps are necessary. They ensure everything runs smoothly, and your new subdomain enhances your web presence effectively. What do you want your subdomain to achieve? Keep this goal in mind as you continue the setup process.Creating A Subdomain On Namecheap
Create a subdomain on Namecheap by accessing your domain management panel. Navigate to the “Advanced DNS” tab and add a new record. This process helps organize your website by sectioning content under unique URLs.
Creating a subdomain on Namecheap is easy and straightforward. Subdomains help organize your website content. They can also improve user navigation. This guide walks you through the process. With clear steps, you will create a subdomain quickly.Accessing Your Namecheap Account
First, access your Namecheap account. Visit the Namecheap website. Click the “Sign In” button at the top-right corner. Enter your username and password. If forgotten, click “Forgot Password” to reset. Once logged in, you will see your account dashboard.Navigating To Domain Management
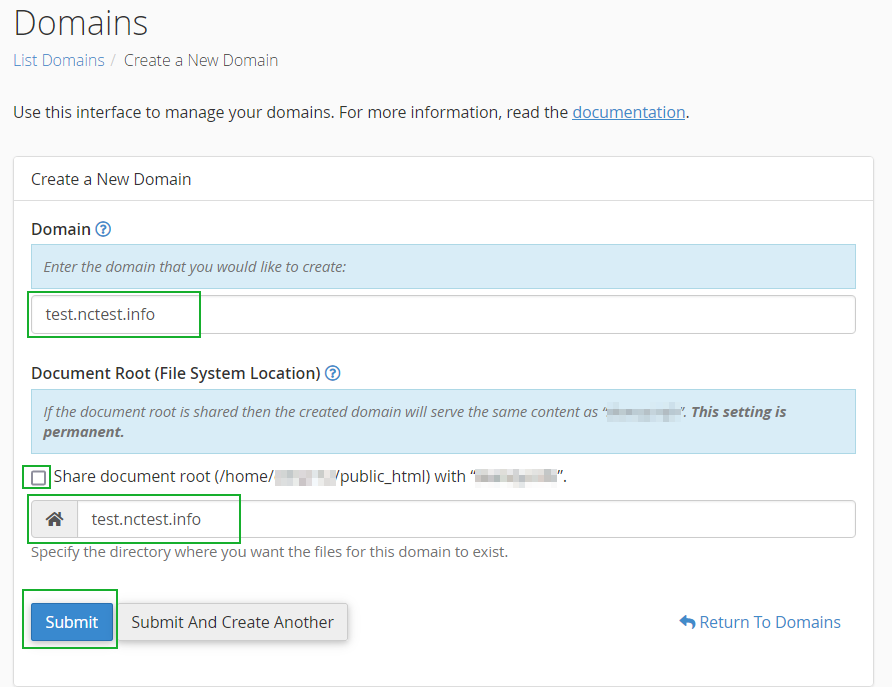
Next, navigate to Domain Management. On your dashboard, locate the “Domain List” section. This shows all your registered domains. Click on the domain you want to manage. You will see several options for domain settings. Look for the “Advanced DNS” tab. Click it to enter the DNS settings page. Here, you manage DNS records and create subdomains. Creating a subdomain involves adding a new record. Click “Add New Record” on the DNS page. Choose “CNAME Record” from the dropdown menu. Enter your desired subdomain name. For example, “blog” if you want blog.yourdomain.com. In the “Target” field, add your main domain. Save your changes to finalize the subdomain creation. Your subdomain is now ready to use.Configuring Dns Settings
Creating a subdomain on Namecheap involves configuring DNS settings. This step is crucial for directing traffic correctly. Proper configuration ensures your subdomain functions smoothly. Follow the steps carefully to avoid issues. Let’s dive into setting up DNS records and testing them.
Setting Up Dns Records
Log into your Namecheap account. Navigate to the Domain List section. Click “Manage” next to your domain. Go to the “Advanced DNS” tab. Here, you can add new records. For a subdomain, add an “A” or “CNAME” record. An “A” record points to an IP address. A “CNAME” record points to another domain. Enter your subdomain name in the “Host” field. Fill the “Value” field with the target destination. Save your changes to apply the new settings.
Testing Subdomain Functionality
After configuring DNS, test your subdomain. Open a web browser. Type your subdomain URL in the address bar. Press enter. The page should load without errors. If it doesn’t, recheck your DNS settings. Sometimes DNS changes take time. Wait a few hours and test again. Ensure your server is set up to handle subdomains. Troubleshoot any issues promptly for smooth operations.

Credit: www.youtube.com
Troubleshooting Common Issues
Creating a subdomain with Namecheap is generally straightforward. Yet, users may face a few challenges. Understanding these common issues and their solutions can make the process smoother. Let’s dive into troubleshooting some frequent problems.
Resolving Dns Propagation Delays
After setting up a subdomain, DNS propagation may take time. This delay can last up to 48 hours. To check if it’s a propagation issue, use online DNS lookup tools. These tools help confirm if your subdomain settings have spread globally. Patience is essential as the changes may not be instant. If the delay persists, clear your browser’s cache. This ensures it fetches the latest DNS records. Restarting your router can also help. It might force a fresh DNS lookup.
Fixing Incorrect Dns Records
Incorrect DNS records often cause subdomain issues. Verify that you’ve entered the right details in Namecheap’s DNS settings. Ensure the subdomain points to the correct IP address or server. A typo can lead to errors, so double-check every entry. Use Namecheap’s DNS management tools for accuracy. If unsure about settings, consult Namecheap’s support documentation. They provide detailed guides to correct DNS configurations. Correcting these details often resolves most issues.
Tips For Managing Subdomains
Create a subdomain in Namecheap by accessing your domain list and selecting ‘Manage’. Find the ‘Advanced DNS’ tab. Click ‘Add New Record’, then choose ‘CNAME Record’ or ‘A Record’. Enter your desired subdomain name and IP address or domain. Save changes to finalize.
Creating a subdomain on Namecheap is a straightforward process. But managing subdomains effectively requires careful attention. Subdomains help organize your website and improve user experience. Proper management ensures they run smoothly and securely. Here are some tips to help you manage your subdomains efficiently.Regular Monitoring
Regularly check your subdomains for performance issues. Slow loading times or errors can frustrate users. Use tools to monitor uptime and speed. Regular checks help identify and fix issues early. Keeping your subdomains healthy enhances user satisfaction.Security Best Practices
Security is crucial for subdomains. Protect them from threats with strong passwords. Use SSL certificates to encrypt data. Regularly update software and plugins. Conduct security audits to find vulnerabilities. A secure subdomain protects user data and builds trust.
Credit: hostadvice.com
Credit: www.namecheap.com
Frequently Asked Questions
How Do I Create A Subdomain In Namecheap?
Log in to your Namecheap account. Go to “Domain List” and click “Manage” next to your domain. Select “Advanced DNS,” click “Add New Record,” choose “A Record,” and enter your subdomain details. Save changes to create your subdomain.
How Do I Create My Own Subdomain?
Log into your hosting account, access the domain management section, and select “Create Subdomain. ” Enter your desired name and link it to a directory. Save the changes to activate your subdomain.
Why Are Subdomains Bad For Seo?
Subdomains can dilute SEO efforts by splitting authority and backlinks between domains. Search engines treat subdomains separately, impacting ranking. This may lead to reduced visibility and lower organic traffic. Consolidating content under one domain helps improve SEO performance and domain authority.
Is Creating Subdomains Free?
Creating subdomains is usually free with most hosting providers. Check your hosting plan details for confirmation. Subdomains enhance website organization and can boost SEO. They don’t typically incur extra costs but verify with your host.
Conclusion
Creating a subdomain on Namecheap is simple and efficient. It helps organize your website better. You can direct users to specific sections easily. Following the steps carefully ensures success. Remember to check your settings after creation. This avoids potential issues later.
Subdomains enhance website navigation. They offer a professional touch without much effort. A well-structured site improves user experience. This leads to more satisfied visitors. Take time to explore this feature. It might be just what your site needs. Keep learning and experimenting with Namecheap’s tools.
Your website will benefit greatly.


