
You’re ready to switch web hosts, but there’s one critical task that has you worried: transferring your email. It’s understandable—emails are the lifeline of your communication, housing everything from important client exchanges to personal notes.
You might be wondering: Will I lose important messages? What if something goes wrong? Fear not, because we’re here to guide you through a seamless transition. Imagine the peace of mind knowing every email is safe, secure, and exactly where it should be.
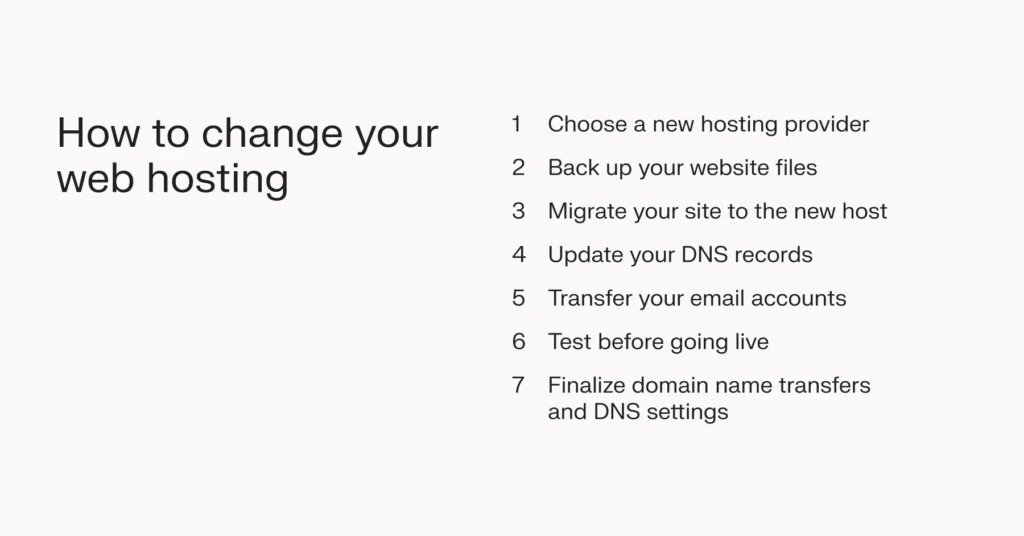
We’ll break down the entire process into simple, manageable steps. With this guide, you’ll feel empowered and confident to tackle the transfer without a hitch. Dive in, and let’s ensure your emails make the move as smoothly as possible.
Choosing A New Web Host
Finding the right web host is important. Check the features they offer. Does it support email transfer? This is crucial. Look for reliable customer support. You might need help. Compare their pricing plans. See if it fits your budget. Read reviews from other users. Real experiences matter. Ensure they have good uptime. You want your site always active. Security is key too. Protect your data. Some hosts offer free migrations. This can save time. Always check the terms before signing up. Choose wisely for a smooth transfer.
Credit: www.liquidweb.com
Preparing For Email Transfer
Backing up emails is very important. It keeps your data safe. Use an email client to save emails. Options like Outlook or Thunderbird are helpful. You can also use a cloud service. Google Drive or Dropbox are good choices. Always check your backup. Make sure all emails are there. This step protects your information.
Domain verification is necessary. You must prove you own it. This step is crucial for email transfer. Use DNS records for verification. Add a TXT record to your DNS settings. Your domain provider will guide you. Check the changes after adding the record. It usually takes some time. Be patient during this process.
Setting Up Email Accounts
First, log into your new hosting account. Find the email settings section. Click to create new email accounts. Use the same names as your old host. This keeps things simple. Choose strong passwords for safety. Make sure each email account is active. Verify all accounts after setup.
Open your email client. Go to account settings. Enter your new server details. Use the new host’s incoming and outgoing server info. Adjust port numbers if needed. Test sending and receiving emails. Check that everything works. Keep your old settings handy, just in case. Repeat for every email account.

Credit: www.youtube.com
Migrating Email Data
IMAP is a tool for moving emails. It lets you copy emails from one server to another. First, set up your old email in an email client. Then, add your new email account in the same client. Drag and drop emails from the old account to the new one. This copies them. Make sure all emails move over. Check your new email to see if they are there. This is a simple way to move emails.
Contacts and calendars need special care. Export contacts as a file. This file is called a CSV file. Import this file into the new email account. For calendars, export them as ICS files. Import these ICS files into the new calendar. This keeps your dates safe. Always check if everything is moved. This ensures nothing is missing.
Updating Dns Records
MX records direct email to the correct server. It’s like an address for your email. Each domain has its own MX record. This record tells where emails should go. Changing these records is important. You must do it carefully. Make sure to enter the right information.
Sometimes, mistakes happen. These mistakes can lead to lost emails. Always double-check your entries. After changes, email may not work right away. It takes time. This is normal. Be patient. Wait for changes to update.
DNS changes don’t happen instantly. The process is called propagation. It can take hours or even a day. During this time, email might not arrive. This is expected. Plan ahead. Inform others about possible delays.
Check DNS regularly after making changes. Ensure everything works well. Use tools online to verify your settings. This can help catch errors early. Always stay calm during this period.
Testing Email Functionality
Sending test emails is important. It checks if everything works. Create a test email. Send it to another account. Wait for the email to arrive. Receiving emails is crucial too. Ask a friend to send you a test email. Check if it appears in your inbox. If it doesn’t, there might be a problem.
Look for missing emails. Check your inbox and folders. Sometimes emails get lost. Verify the contact list. Make sure all contacts are there. You don’t want to lose important emails. Ensure data is complete. Missing data can cause problems. Fix any issues you find.
Troubleshooting Common Issues
Email delivery issues can be very frustrating. Sometimes, emails don’t reach the inbox. Check spam filters first. Filters can block emails without warning. Review the email server settings too. Mistakes there can cause delivery failures. Always verify the email address. A typo can prevent delivery. Keep your email software updated. Updates fix bugs that affect delivery. Avoid sending large attachments. Big files can stop emails from sending.
Configuration errors disrupt email flow. Begin by checking server configurations. Ensure settings match the new host. Wrong settings can lead to errors. DNS records are crucial. Check them for accuracy. Incorrect records block email transfer. Verify the port settings. Wrong ports can stop emails. Don’t forget authentication protocols. They secure email transfer. Wrong protocols can cause errors.

Credit: ferdy.com
Frequently Asked Questions
How Do I Move Emails From One Hosting To Another?
To move emails, first backup your emails using an email client. Then, set up your new hosting and import the backup. Update DNS settings to direct emails to the new host. Verify the emails are correctly transferred to the new hosting.
Will I Lose My Emails If I Change Hosting?
You might lose emails if they are stored on the old server. Backup your emails before changing hosting to prevent data loss. Ensure your new hosting provider supports your email setup to maintain access to your emails. Always consult with both hosting providers for a smooth transition.
How Do I Transfer My Email Address To Another Provider?
Choose a new email provider and create an account. Update MX records in your domain settings. Export emails from the old provider. Import them into the new account. Inform contacts of your new email address. Ensure the new setup works properly.
How Do I Transfer Everything To A New Email Address?
To transfer everything to a new email, update account settings, forward emails, and notify contacts. Export/import data using email provider tools. Check spam folders for missed messages.
Conclusion
Switching web hosts can be straightforward. Transferring email is crucial. First, check your new host’s email settings. Next, back up your emails. Use a reliable tool for this. Set up email accounts on the new host. Use the same names for easy transition.
Transfer backed-up emails to new accounts. Test new email settings to ensure functionality. Keep old host active until all emails work smoothly. This ensures no email loss. Stay calm, plan well, and the process becomes simple. Your emails will move safely.
Enjoy your new hosting experience!


