Are you ready to elevate your programming skills and showcase your work to the world? Hosting a web service in Visual Studio is your gateway to doing just that.
Imagine the satisfaction of watching your application go live, accessible to users anywhere, anytime. Whether you’re a seasoned developer or just starting out, learning how to host a web service is a crucial skill that can open doors to new opportunities.
In this guide, you’ll discover straightforward steps to take your project from code to the cloud. So, let’s dive in and transform your hard work into a live web service. Ready to make your mark? Keep reading!
Credit: www.youtube.com
Setting Up Visual Studio Environment
Visual Studio is a tool for coding. First, download the installer from the official website. Then, run the installer on your computer. Choose the workloads you need. For web services, select ASP.NET and web development. Follow the prompts to finish installation. Make sure your computer meets the system requirements. This ensures smooth operation.
Open Visual Studio after installation. Click on File then New Project. Choose the project template you need. For web services, select ASP.NET Core Web Application. Name your project and choose a location to save it. Click Create to set up the project. Next, configure the framework version. This is important for compatibility.
Some tools help in coding. Visual Studio has many extensions. Open the Extensions menu to explore. Search for extensions like Entity Framework for database work. NuGet Package Manager helps manage libraries. Install these tools to make coding easier. Keep extensions updated for best performance.
Creating A Web Service Project
Open Visual Studio. Click on File and select New Project. Choose ASP.NET Web Application. This is the template for web services. Click OK to proceed. Ensure the project name is clear. Use simple names that explain the purpose. This helps in organizing.
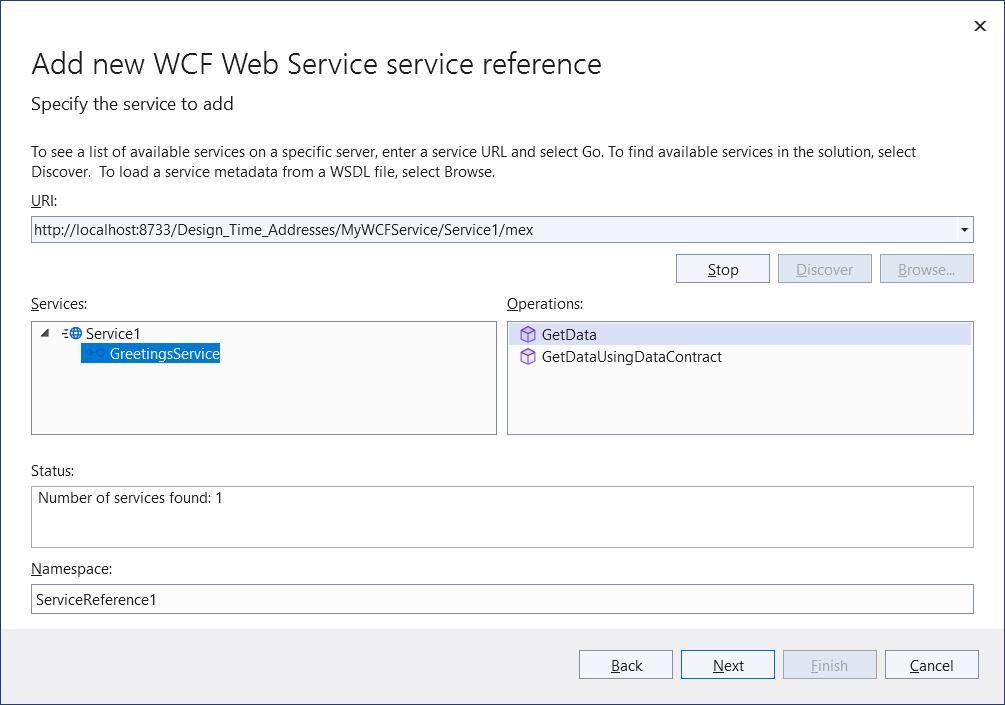
Service contracts define the operations. Use [ServiceContract] attribute. Each operation needs [OperationContract] attribute. These attributes are important. They declare the service’s methods. This step makes your service understandable to others.
Implement logic inside service methods. Add code in the methods. This code performs the operations. Keep the logic simple. Aim for clarity. Check for errors before saving. Debug to find mistakes. This ensures your service works well.
Building And Testing The Web Service
First, open your project in Visual Studio. Make sure all files are saved. Click on the Build menu. Then, select Build Solution. This step will compile your code. Watch for errors in the Error List window. Fix any errors you find. Now, your project is ready for the next steps.
Use the Debug menu to start debugging. Click Start Debugging. The service runs in a debug mode. Set breakpoints by clicking on the left margin of your code. This helps you stop the program at key points. Check the Locals window to see variable values. Use Step Over and Step Into to move through the code.
Open the Test Explorer window. Click on Run All to execute all tests. Check the results carefully. Tests that pass will show a green check. Failing tests display a red cross. Review the code if any test fails. Make necessary changes and run tests again. Ensure all tests pass before moving forward.
Deploying The Web Service
Start by installing Visual Studio on your computer. Ensure you have the necessary development tools. These tools will help in hosting your web service. Next, select the project type you want to deploy. Choose a web service project. Set the appropriate settings for your environment. Use the configuration manager to tweak settings. Make sure your server is ready to host the service.
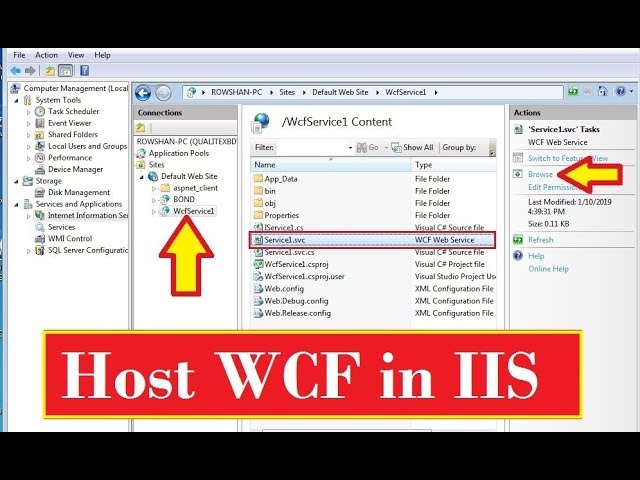
Open your project in Visual Studio. Click on Build then Publish. Choose the option to publish to IIS. Set the target location for the files. Input the server details. Ensure the deployment mode is set to release. This ensures the best performance. Click on Publish to start the process. Wait for the process to complete. Check the IIS to confirm the service is running.
Access the IIS manager on your server. Navigate to your web service. Open the authentication settings. Ensure anonymous access is enabled. This allows users to access the service remotely. Set the permissions for users. Make sure the firewall allows incoming traffic. Check the port settings. Ensure the correct port is open for your service. Test the service by accessing it from a remote device.
Managing And Maintaining The Service
Hosting a web service in Visual Studio involves careful management and maintenance. Set up your server environment efficiently. Regularly update security patches and monitor performance to ensure smooth operation.
Monitoring Performance
Monitoring is crucial for web services. Always check the performance of your service. Use tools to track how fast it runs. Look for any slowdowns or errors. Fix problems quickly to keep users happy. Regular checks help keep the service running smoothly.
Handling Updates And Patches
Updates are vital for a web service. They fix bugs and add new features. Patches help with security and reliability. Schedule updates regularly. Always test them before applying. This ensures the service stays stable. Backup data before big updates. This way, you can restore if something goes wrong.
Security Best Practices
Security keeps your web service safe. Use strong passwords for all accounts. Regularly change them. Always encrypt sensitive data. Limit user access to important parts. Use firewalls to block unwanted visitors. Regularly check for vulnerabilities. Address them quickly to prevent breaches.
Credit: learn.microsoft.com

Credit: www.youtube.com
Frequently Asked Questions
How To Run A Web Service In Visual Studio?
Open Visual Studio. Create a new project and select “ASP. NET Web Application”. Choose “Web API” template. Build the solution. Press F5 or click “Start” to run the web service. The browser will open with the service’s URL.
How To Host A Web Service?
Choose a reliable hosting provider and select a suitable plan. Deploy your web service files using FTP. Ensure your domain points to your server’s IP address. Configure server settings for optimal performance and security. Regularly update and maintain the server to ensure smooth operation.
How To Deploy A Website Using Visual Studio?
Deploy a website using Visual Studio by publishing the project. Choose “Build” menu, click “Publish”. Configure settings, select a hosting method, and proceed. Ensure you have the right credentials for your server or hosting platform. Test the deployment to confirm successful upload and functionality.
How To Publish A Web Service In Visual Studio 2019?
Open Visual Studio 2019. Select your project, click ‘Build’ then ‘Publish’. Choose the target, configure settings, and publish.
Conclusion
Hosting a web service in Visual Studio is straightforward. Follow these steps to succeed. First, set up your project. Next, configure service settings. Ensure compatibility with client systems. Test thoroughly to avoid errors. Deployment is the final step. Check your service is live and functioning.
Regular updates keep it secure and efficient. Troubleshoot issues promptly to maintain service quality. Now you can host web services easily. Visual Studio simplifies this task. With practice, you’ll gain confidence. Enjoy creating reliable web services that meet user needs.
Your skills will grow with each project. Keep learning and improving.