Are you ready to take control of your online presence by hosting your own files? If you’re looking to share files seamlessly or manage a website, learning how to host files on a web server using Apache is a skill you won’t want to miss.
Picture this: you have the power to manage, upload, and share files directly from your own server, giving you ultimate freedom and flexibility. By the end of this article, you’ll have a clear, step-by-step guide that makes hosting files on Apache as easy as clicking a button.
Don’t let the technical jargon intimidate you; you’re about to unlock the secrets of efficient file hosting. Ready to enhance your digital toolbox? Keep reading to discover how you can start hosting like a pro today!
Setting Up Apache
Apache is a popular web server. To install it, type sudo apt-get install apache2 in the terminal. This command works for most Linux systems. Wait for the installation to complete. Check if Apache is running. Type systemctl status apache2. It should show active and running. If it is not active, start it by typing sudo systemctl start apache2. Make sure you have administrator rights. Without it, the installation won’t work.
Apache needs basic settings. Open the apache2.conf file. This file is in the /etc/apache2/ directory. Look for the ServerName directive. Set it to your domain name or IP address. Change the DocumentRoot. This is the folder where your files are stored. Use the sudo nano command to edit files. Save changes and restart Apache. Type sudo systemctl restart apache2. Now your server is ready to host files.
Preparing Files For Hosting
A tidy file structure is important. It helps find files fast. Start by creating a main folder. Name it something like “website_files”. Inside, make folders for different file types. For example, “images” for pictures. Or “scripts” for code files. This keeps everything neat and easy to manage.
Setting file permissions is crucial. It controls who can see or change files. Use commands like chmod on your server. Set permissions to 644 for files. This allows reading by everyone. But only the owner can change them. For folders, use 755. This lets everyone enter the folder. But only the owner can change its contents.
Configuring Virtual Hosts
Apache allows hosting many sites on one server. These are called Virtual Hosts. Each site has its own settings. This helps manage sites easily. Each host can have different domains. It makes the server act like many servers. Developers find this very useful. It saves resources and time.
First, open the Apache configuration folder. Create a new file for each site. Use the “.conf” extension for these files. Define the server name and document root. The server name is your domain. The document root is where your files are. Save the file and exit. Enable the site using a2ensite command. Restart Apache to apply changes. Check if your site works in the browser.

Credit: www.youtube.com
Uploading Files To Server
FTP clients help to upload files easily. They connect your computer to the server. FileZilla is a popular FTP client. It is free and easy to use. First, open the FTP client on your computer. Enter the server address. Then, enter your username and password. Click “Connect”. Now, you can see your server files. Drag and drop files from your computer to the server. This way, files get uploaded quickly.
The command line is another method to upload files. It uses simple commands. First, open the terminal on your computer. Type `scp` followed by the file name. Next, type the server address. Then enter your username. It looks like this: `scp myfile.txt username@server.com:/path/`. Press enter. Type your password when asked. The file starts uploading. It’s a fast and direct way to upload files.
Testing Your Setup
Visit your browser to check access to your files. Type in the server’s IP address. Then add the file path. Press enter to see if the file shows up. This step is important. It helps to ensure your setup is correct. If the file appears, your setup is successful. If not, you may need to troubleshoot.
Accessing Files Via Browser
Sometimes files might not be visible. Check the file permissions first. Ensure the files have read permissions. This lets the browser access them. Next, verify the file path. Make sure it is typed correctly. A wrong path leads to errors. Also, check if Apache is running. If it’s not, files won’t show up.
Troubleshooting Common Issues
Errors can occur while accessing files. Check if Apache is configured properly. Ensure the firewall settings allow connections. Also, verify the DNS settings. They should point to the correct IP address. Sometimes, restarting Apache fixes issues. Check the server logs for error messages. Logs can help identify the problem.
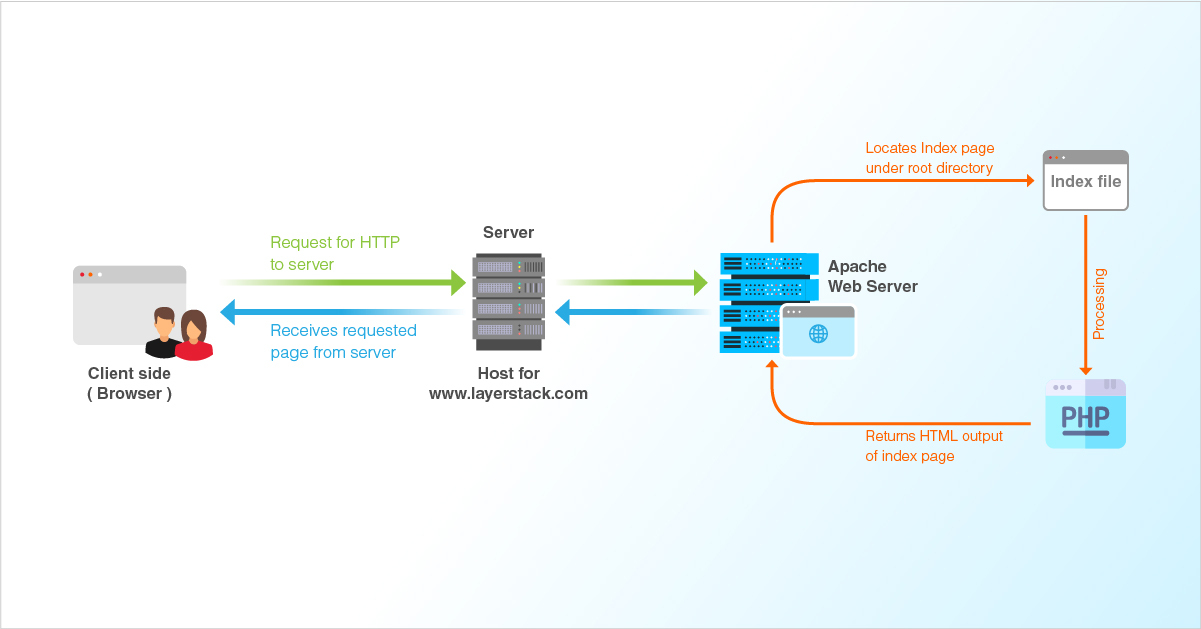
Credit: www.layerstack.com
Securing Your Web Server
SSL certificates keep your website safe. They encrypt data between the server and users. This means hackers can’t see or change information. Websites with SSL show a lock icon in the browser. This icon tells users the site is secure. Get an SSL from a trusted provider. Install it on your Apache server. Follow the steps on the provider’s website. Make sure to renew the certificate every year.
Firewalls protect your server from bad guys. They block unwanted connections. Only allow trusted IP addresses to access your server. Set rules to limit access to important files. Keep your firewall rules updated. Check them often for safety. Use simple commands to set these rules. Apache has many guides to help. Follow the instructions carefully. Your server stays safe with good rules.
Optimizing Performance
Caching speeds up file loading. It saves files for later use. This reduces server load. To enable caching, use Apache modules. These modules store files. They help speed up websites. Faster sites mean happy users. Cache settings can be adjusted. Adjusting improves performance. Use Expires headers. They tell browsers when to refresh. This keeps files current. But avoids unnecessary reloads. It’s important to balance freshness and speed. Good caching improves website speed. It also reduces server strain.
Load balancing distributes traffic. It uses multiple servers. This avoids overload on one server. Spreading traffic keeps sites running smooth. Use Apache Load Balancer. It shares user requests. This improves server response. Websites stay fast and reliable. Balancing helps handle more users. This is important for busy sites. It stops delays and crashes. Load balancing ensures stable performance. It’s vital for large websites. It keeps visitors happy. Happy visitors return more often.
Credit: www.loggly.com
Managing Updates And Maintenance
Keeping your server updated is very important. Regular updates help fix bugs. They also improve security and performance. It’s good to check for new updates often. Use a schedule that suits your needs. Update your software and plugins regularly. This keeps everything running smoothly. Always back up data before updating. This prevents loss during updates.
Monitoring server health is crucial. Check the server’s performance regularly. Look at CPU and memory usage. They tell you how the server is doing. Watch out for any unusual activity. This could mean a problem is coming. Use tools to track server health. They help find issues early. Keeping an eye on server health avoids downtime. It also ensures reliable service for users.
Frequently Asked Questions
How To Host An Apache Web Server?
Install Apache on your server using a package manager or download it from the official website. Configure necessary settings in the “httpd. conf” file. Start the Apache service using the command line. Ensure your firewall allows traffic on port 80.
Test by accessing your server’s IP address in a browser.
How Do I Upload Files To An Apache Server?
Use an FTP client to upload files to your Apache server. Connect using server credentials, drag files to the desired directory. Ensure permissions are set correctly for access. Alternatively, use command-line tools like SCP or Rsync for secure file transfer.
How To Create A Virtual Host In Apache Web Server?
To create a virtual host in Apache, edit the httpd.conf file. Add a new directive. Specify the domain and document root. Save changes and restart Apache. This configuration allows hosting multiple websites on a single server efficiently.
How Do I Send Files To A Web Server?
Use FTP clients like FileZilla to connect to your web server. Upload files by dragging them into the server directory. Ensure correct permissions for files and directories. You can also use SSH for secure file transfers. Check server settings and credentials for successful uploads.
Conclusion
Hosting files on an Apache web server is straightforward. Start by installing Apache. Next, configure your server settings. Upload your files using a secure method. Test your setup to ensure everything works. Regular maintenance keeps your server efficient. Always back up your files.
This prevents data loss. Explore more features as you grow comfortable. Apache offers flexibility and power for hosting. With practice, you’ll manage your web server confidently. Keep learning and experimenting. This boosts your web skills over time. Hosting files can be simple with the right steps.
Enjoy the process and happy hosting!