
Are you looking to give your WordPress site a personal touch with custom CSS? Adding custom styles to your X WordPress Theme can elevate your website’s design and functionality, making it truly unique.
Imagine having the power to tweak elements to match your brand’s identity perfectly. With the right guidance, you can achieve this without the headache of complicated coding. In this guide, you’ll discover straightforward steps to seamlessly integrate your CSS file into your X WordPress Theme.
Whether you’re a beginner or a seasoned WordPress user, this process can transform your site with minimal effort. Curious to see how you can enhance your website’s appeal effortlessly? Read on to find out how simple it can be.
Importance Of Custom Css
Custom CSS lets you change the look of your website. You can make your site unique and fit your style. It helps in creating a consistent brand image. Users will notice a professional design that stands out. Custom CSS is a useful tool for personalizing your site. It allows you to control the layout and colors. This makes your website more appealing to visitors.
Using custom CSS can also improve the user experience. It helps in making the site more interactive and engaging. Adjusting styles can make your site easier to navigate. Visitors will find it enjoyable to explore your content. Custom CSS is a simple way to enhance your WordPress theme.

Credit: www.bluehost.com
Locating Theme Files
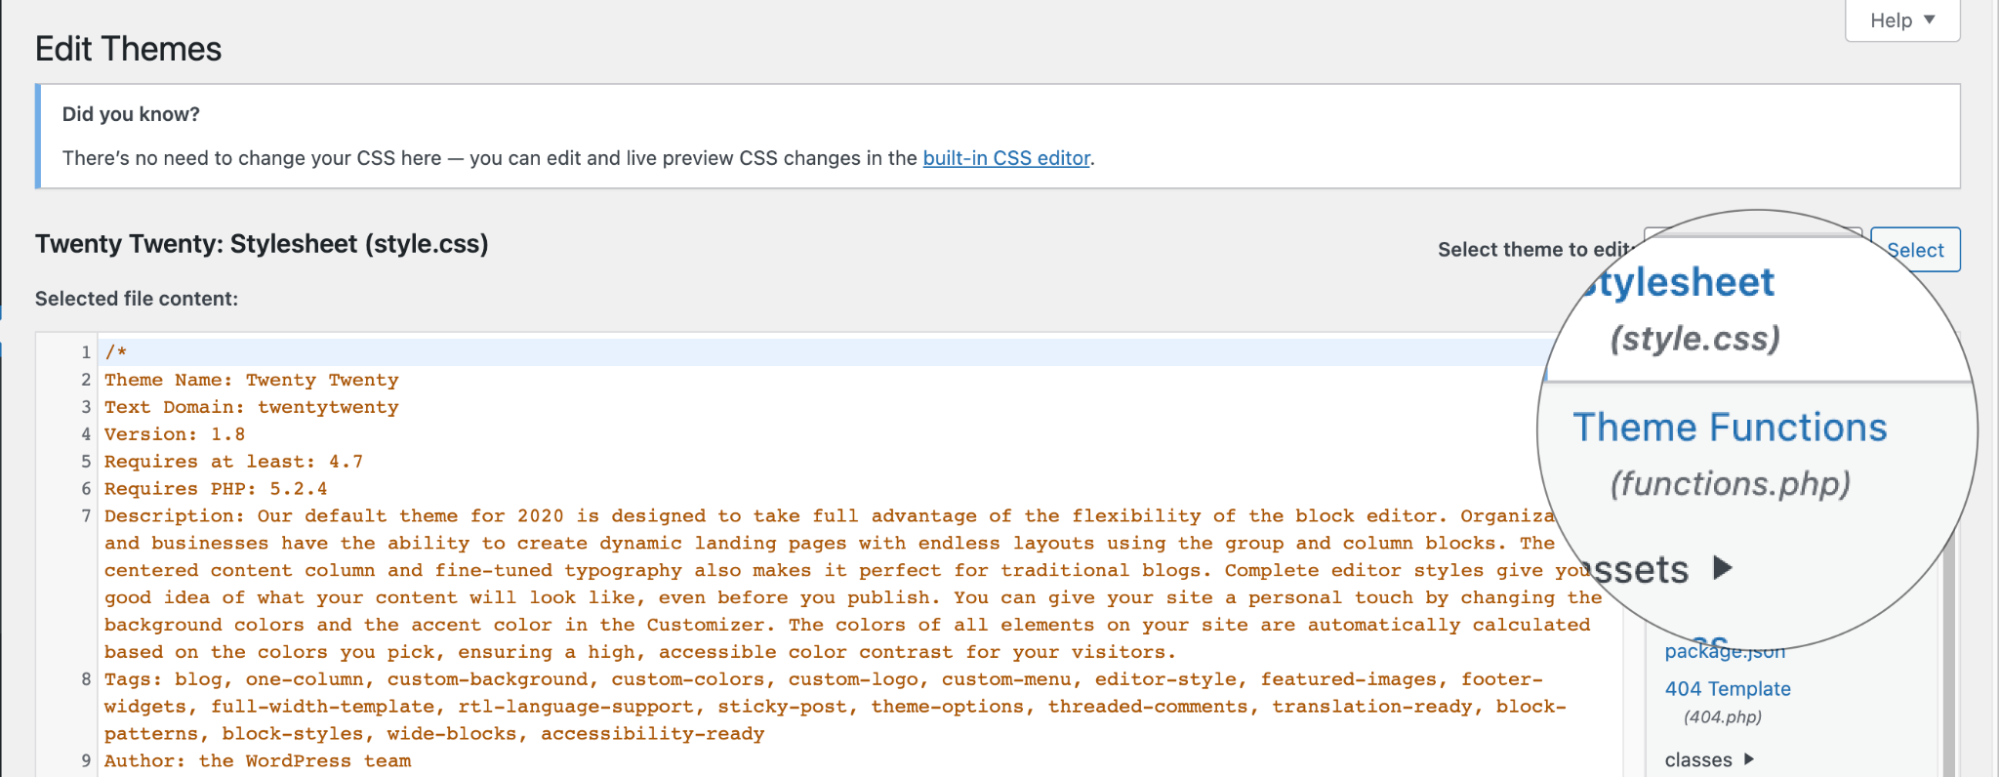
Log into the WordPress dashboard. Use your username and password. Look for the main menu on the left side. Find the Appearance option. Click on it. It will open a new menu. Choose Theme Editor from this menu.
Once in the Theme Editor, view files of your theme. A list will appear on the right side. Click on style.css to open it. This file contains the main styles. To add custom styles, create a new CSS file. Name it custom.css and upload it to your theme directory. Link this file in the header file.
Creating A Custom Css File
Choose a simple name for your CSS file. This helps in remembering it. The name should be clear and related to its use. Use lowercase letters. Avoid spaces; use dashes instead. For example, use custom-style.css. This makes it easy to find. It also helps in avoiding errors. Do not use special characters. They can cause problems. Following these rules makes your work easier.
A code editor helps you write CSS. It is like a special notebook. Editors like Notepad++ and Sublime Text are popular. They make writing code easy. These editors have features to help. They can suggest code and find mistakes. You can see colors and styles while you type. This helps in understanding your CSS better. Choose an editor that you like. It should be easy to use. Try different ones to see which feels best.
Uploading The Css File
FTP clients help move files to your website. Install an FTP client like FileZilla. First, open the FTP client and connect to your website server. Enter your username and password. Navigate to the wp-content/themes/your-theme folder. Upload your custom CSS file here. Make sure the file is named correctly.
A plugin can also upload files. Install the WordPress File Manager Plugin. Open it from your WordPress dashboard. Find the wp-content/themes/your-theme folder. Click “Upload” and select your CSS file. Ensure the file uploads successfully. This method is simple and quick.
Enqueuing The Css File
Open the functions.php file in your theme folder. This file helps add new features to your theme. Find a safe spot in the code to add your CSS file. Make sure you don’t break existing code. Use the wp_enqueue_style function to add your CSS. This function is important for loading styles properly.
The function wp_enqueue_style has a special format. First, give your style a name. Then, tell where to find the CSS file. You can also add dependencies if needed. Lastly, add a version number. This helps with caching. This way, browsers know when the file changes. Remember, adding CSS this way keeps your site neat and organized. Make sure to check for errors. Errors can break your site.
Testing And Troubleshooting
Adding a custom CSS file enhances your WordPress site’s appearance. First, locate your theme’s directory. Next, upload the CSS file using FTP or the WordPress dashboard. Finally, enqueue the new file in your theme’s functions. php to apply styles.
Clearing Browser Cache
Browsers save old data to load pages faster. This is called cache. To see new changes, clear this cache. Go to your browser settings. Find the option for clearing cache. Click and confirm. After clearing, your browser shows the latest page updates.
Using Inspect Element
Inspect Element is a tool in browsers. It helps find and fix website problems. Right-click on a web page and select Inspect. A panel appears with codes. Look for the CSS section. Here, you can see if your custom CSS is working. Check for errors or changes. Adjust them as needed. Save your work and refresh the page. Inspect Element is great for quick checks.
Best Practices For Custom Css
Organizing your CSS is important. Group similar styles together. This makes finding them easy later. Use clear comments for sections. Comments help you remember what each part does. Keep your code tidy. Clean code is easier to read. Consistent formatting is key. Use the same style for everything. This helps others understand your work.
Conflicts can break your design. Use specific selectors for custom styles. The more specific, the better. This keeps theme styles from changing your work. Avoid using common class names. Common names can cause problems. Use unique names instead. Unique names prevent clashes. Test your styles on different devices. Styles can look different on phones and computers. Make sure everything works everywhere.
Credit: kb.hosting.com
Credit: theme.co
Frequently Asked Questions
How Do I Add A Css File To WordPress?
To add a CSS file, use the WordPress theme editor. Navigate to Appearance > Theme Editor. Locate your theme’s functions. php file. Add a function to enqueue your custom CSS file using wp_enqueue_style(). Save changes, and your custom CSS will be applied to your WordPress theme.
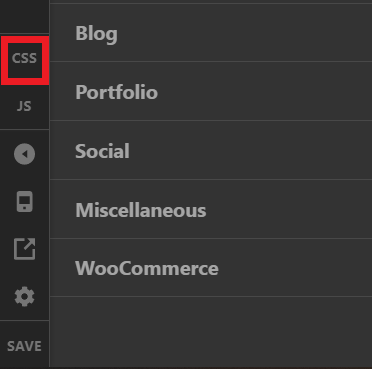
Can I Use A Plugin For Custom Css?
Yes, you can use a plugin for custom CSS. Popular plugins like Simple Custom CSS allow you to easily add CSS. Install the plugin, and add your custom CSS code directly through the plugin interface without modifying theme files.
What Is The Best Way To Add Css?
The best way to add CSS is using a child theme. Create a child theme and enqueue your CSS file in its functions. php. This ensures your changes aren’t overwritten during theme updates, keeping your customizations safe.
Why Use A Child Theme For Css?
Using a child theme for CSS prevents losing changes during updates. It allows safe customization without altering the parent theme files. This is the recommended approach for maintaining your custom styles efficiently.
Conclusion
Adding custom CSS to your WordPress theme is straightforward. It enhances your site’s look. Follow the steps to easily modify your design. Custom styles create a unique appearance. They make your site stand out. Ensure your changes align with your theme.
Keep your CSS organized. This avoids confusion later. Test changes thoroughly. This ensures compatibility across devices. Start small, then expand as needed. With practice, you’ll gain confidence. Your site will reflect your personal touch. Remember, small tweaks can make a big impact.
Embrace the creative process. Enjoy customizing your WordPress theme.


