You’ve secured your domain with Namecheap, a trusted provider known for its affordability and reliability. But what happens when you need to unlock your domain?
Whether you’re planning to transfer your domain to a different registrar or simply need to make some administrative changes, unlocking your domain is a crucial step. You might feel overwhelmed by the process, but don’t worry—it’s simpler than you think.
Imagine the freedom and ease of managing your domain without restrictions. By unlocking your domain, you gain full control, which is essential for any adjustments or transfers you might need. This article will guide you through the straightforward steps to unlock your domain with Namecheap, ensuring you can navigate the process with confidence and ease. Keep reading to discover how you can effortlessly take charge of your domain today.
Why Unlock Your Domain
Unlocking a domain at Namecheap allows for easy transfer to another registrar. Start by logging into your account, navigate to the Domain List, and disable the Registrar Lock. This process ensures seamless domain management and flexibility for future changes.
Unlocking your domain is an essential step in managing your online presence effectively. But why should you consider doing it? Whether you’re transferring your domain to a different registrar or simply updating its details, unlocking your domain with Namecheap offers you greater control and flexibility. By understanding the reasons behind unlocking, you can make more informed decisions about your domain management strategy.What Does Domain Locking Mean?
Domain locking is a security feature that prevents unauthorized changes to your domain settings. It ensures that your domain remains safe from any potential hijacking or accidental transfers. While this adds an extra layer of protection, it also means you need to unlock your domain when you want to make legitimate changes.Facilitating Domain Transfers
One of the main reasons to unlock your domain is to facilitate transfers. If you’re moving your domain to another registrar, unlocking is a crucial step. Imagine you found a registrar offering better pricing or features; you wouldn’t want a locked domain to prevent you from making that switch.Updating Domain Information
Unlocking your domain is also necessary when updating its details. Whether it’s changing your contact information or adjusting DNS settings, unlocking allows you to make these updates seamlessly. Keeping your domain information current is vital for security and communication purposes.Enhancing Domain Control
Unlocking your domain gives you enhanced control over it. This control means you can configure your domain settings to suit your needs. You have the freedom to optimize your online presence without unnecessary restrictions.Peace Of Mind
Unlocking your domain when necessary brings peace of mind. Knowing you have the flexibility to make changes as required ensures that you’re not caught off guard by any limitations. It empowers you to manage your domain proactively, ensuring it aligns with your goals.Is Your Domain Secure While Unlocked?
You might wonder if unlocking your domain compromises its security. Rest assured, while unlocking is necessary for changes, it doesn’t mean your domain is vulnerable. Always ensure you relock it once your tasks are completed to maintain security. Understanding the importance of unlocking your domain can significantly impact how you manage it. Have you ever faced challenges due to a locked domain? Share your experiences and insights in the comments below.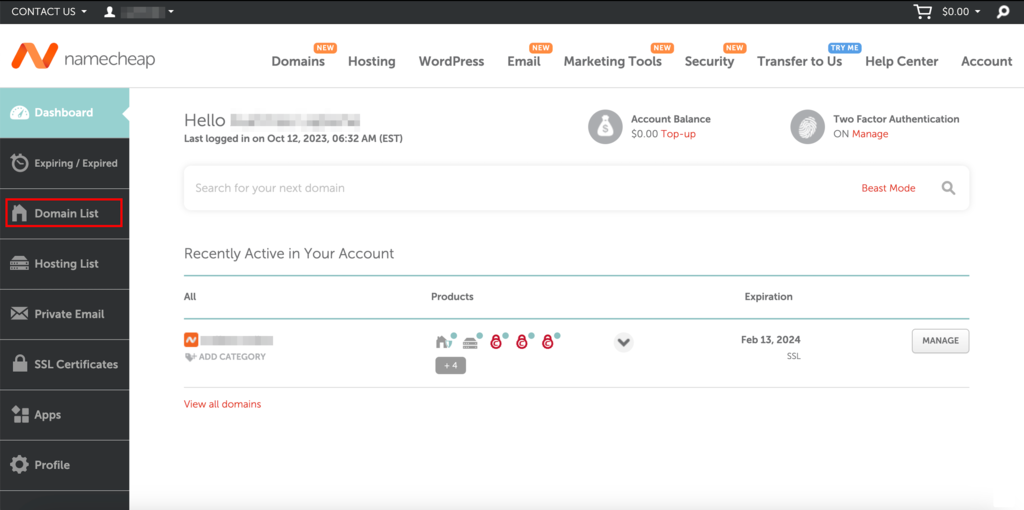
Credit: www.hostinger.com
Preparing For Domain Unlocking
Preparing for domain unlocking on Namecheap involves a few crucial steps. Ensuring a smooth process requires checking specific conditions. Understanding these steps can prevent unnecessary delays.
Check Domain Status
Start by verifying your domain’s current status. It should be active and not expired. Ensure there are no pending changes. Confirm that the domain is not locked. A locked domain cannot be transferred. You can check this in your Namecheap account dashboard. Look for the lock icon next to your domain name.
Review Transfer Requirements
Transferring domains requires meeting certain conditions. Your domain must be registered for at least 60 days. Verify your domain’s expiration date. Ensure contact information is up-to-date. Accurate details are crucial for successful transfer. Disable privacy protection services if enabled. This allows registrar access to domain details. Review any additional registrar-specific requirements.
Accessing Namecheap Account
Accessing your Namecheap account is the first step to manage your domain. Whether you’re updating settings or unlocking your domain, it all starts here. This process is simple, even for beginners.
Login Steps
Begin by opening your web browser. Go to Namecheap’s official website. On the homepage, look for the “Sign In” button. It’s usually at the top right corner. Click it to proceed. Enter your username and password. Ensure your details are correct. Press the “Sign In” button again. You’re now logged into your account.
Navigating The Dashboard
Once logged in, you’ll see the dashboard. It’s your control center. On the left side, you’ll notice a menu. This menu helps you find different sections easily. Look for the “Domain List” option. Click on it. Here, you will see all your registered domains. To manage a domain, click on the settings icon next to it.
Locating Domain Management
Managing your domain at Namecheap is a simple process. It starts with locating the Domain Management section. This area holds all the tools you need. You can manage, edit, or unlock your domain here. First, log into your Namecheap account. A dashboard welcomes you upon login. This dashboard is your control center. From here, you can access various features. One of them is Domain Management. Let’s explore how to find it.
Finding Domain List
To find your domains, click on the “Domain List” tab. This tab is on the left side of the dashboard. It displays all your registered domains. Each domain appears with essential details. You can see the domain name, status, and expiry date. Make sure to check these details carefully.
Selecting The Correct Domain
Now, select the domain you wish to manage. Look through the list of domains. Identify the domain you need. Click on it to proceed. This action opens the domain settings page. Here, you will find options to edit or unlock your domain. Verify you have selected the correct domain before making changes.
Unlocking The Domain
Unlocking your domain on Namecheap is a simple process. It allows you to transfer your domain to another provider or make specific changes. Follow these steps to ensure a smooth and secure unlocking experience. This guide will walk you through each step with ease.
Security Verification
Before unlocking your domain, verify your identity. Log into your Namecheap account using your credentials. Check your email for any verification codes. Enter the code on the Namecheap website. This step ensures your domain’s security.
Adjusting Domain Lock Settings
Access the dashboard in your Namecheap account. Find the “Domain List” tab on the left side. Click on it to see your domains. Choose the domain you want to unlock. Next, look for the “Manage” button next to your domain.
Scroll down to the “Sharing & Transfer” section. Locate the “Domain Lock” option. You will see a toggle switch. Switch it to the “Off” position to unlock the domain. Save the changes to finalize the process.
Verifying Unlock Status
Ensuring your domain is unlocked at Namecheap is crucial. This step confirms you’re ready to transfer or manage your domain. Verifying the unlock status involves a few simple actions. You need to check for confirmation emails and verify the domain’s status in your account. Let’s delve deeper into these processes.
Confirmation Email
After requesting to unlock your domain, check your email inbox. Namecheap sends a confirmation email to your registered address. This email confirms the unlock request was successful. Open the email and follow any instructions provided. If you don’t see it, check your spam or junk folder. Ensure your email settings allow messages from Namecheap.
Checking Domain Status
Log into your Namecheap account to verify the domain status. Go to the Domain List section in your dashboard. Locate the domain you requested to unlock. Check the status indicator next to it. It should show as unlocked or similar. If it still shows locked, repeat the unlock process. Double-check all steps to ensure they are completed correctly. A persistent locked status may require contacting Namecheap support.
Troubleshooting Common Issues
Unlocking your domain with Namecheap can sometimes present challenges. Various issues might arise during the process. These issues can disrupt your plans. Understanding these common problems can help. This section will guide you through troubleshooting steps.
Failed Unlock Attempts
Sometimes, the unlock process may not succeed. Ensure you’ve followed all steps. Double-check your account credentials. Incorrect details can lead to failure. Verify your domain’s current status. It should not be expired or suspended. These conditions prevent unlocking. Also, ensure you have enough account privileges.
Contacting Support
If problems persist, reach out to Namecheap support. They provide helpful solutions. You can contact them via live chat. This option offers quick responses. Alternatively, submit a support ticket. Explain your issue in detail. Attach relevant screenshots if needed. This helps support understand your problem better.

Credit: support.brightervision.com
Preparing For Domain Transfer
Unlocking your domain at Namecheap is simple. First, log into your Namecheap account. Then, navigate to the Domain List section. Find your domain and click “Manage”. Scroll to the “Sharing & Transfer” tab. Toggle the lock to off. Your domain is now ready for transfer.
Preparing to transfer your domain can seem like a daunting task, especially if you’re new to the process. However, with the right steps, it can be smooth and straightforward. One of the most important parts of this process is ensuring your domain is unlocked and ready to move, particularly when working with a provider like Namecheap. ###Generating Authorization Code
To transfer your domain, you’ll need an authorization code, often known as an EPP code. This code is essentially a key that allows you to initiate the transfer from Namecheap to another registrar. First, log into your Namecheap account and navigate to your domain list. Find the domain you wish to transfer and look for the ‘Manage’ button. Once there, locate the ‘Sharing & Transfer’ tab. Here, you can request the authorization code. Namecheap will send this code to the email address associated with your account. Think of the authorization code as your domain’s passport—it ensures the domain transfer is secure and confirms your ownership. Without it, the transfer process cannot begin. ###Timing Considerations
Timing plays a crucial role in domain transfers. Domains cannot be transferred within the first 60 days of registration or after a recent transfer. This waiting period is required by ICANN, the organization responsible for domain registration policies. Before initiating a transfer, double-check the domain’s registration date. This can save you from unnecessary delays. Additionally, consider the timing of your domain’s expiration. Initiating a transfer close to the expiration date can be risky, as the transfer might not complete before it expires. Have you ever tried to rush through an airport security line only to realize you missed a crucial step? The same can happen with domain transfers if you don’t plan your timing carefully. By paying attention to these details, you can ensure a smooth transition and avoid potential headaches. Remember, preparation is key when it comes to transferring your domain. Are there any specific challenges you anticipate facing during your domain transfer process? Let us know in the comments!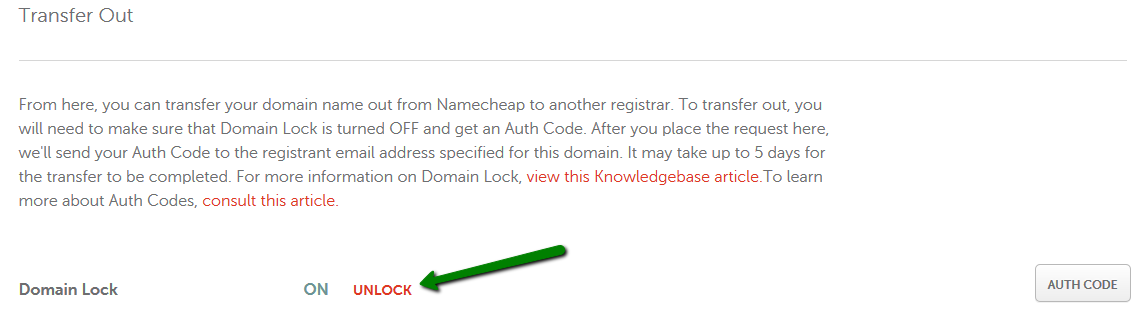
Credit: www.namecheap.com
Frequently Asked Questions
How To Unlock A Namecheap Domain?
Log in to your Namecheap account. Navigate to the Domain List. Click on Manage next to your domain. Find the Registrar Lock section and toggle it off. Confirm the changes to unlock your domain.
How To Unlock A Locked Domain?
Log in to your domain registrar account. Navigate to the domain management section. Locate and select your locked domain. Choose the option to unlock it. Save changes.
How Do I Remove A Domain Lock?
Log in to your domain registrar’s account. Navigate to the domain management section. Locate and disable the domain lock option. Confirm any prompts to save changes. Contact support if issues persist.
How To Disable Registrar Lock?
Log into your domain registrar account and locate the domain management section. Find the registrar lock option and disable it. Save changes to ensure the lock is turned off. Always check the registrar’s specific instructions, as steps may vary slightly depending on the provider.
Conclusion
Unlocking your domain with Namecheap is simple and straightforward. Follow the steps outlined, and you’ll have your domain ready for transfer in no time. Always ensure your domain meets the necessary criteria before proceeding. Keep your account details secure to avoid any issues.
Consult Namecheap’s support if you encounter any problems. This keeps your process smooth and stress-free. Now, manage your domain confidently and efficiently. With these tips, you’ll handle your domain transfers with ease. Enjoy your domain management journey with Namecheap!