Imagine you’re ready to move your domain from Namecheap to another provider. Whether it’s for better features, pricing, or support, transferring a domain can seem daunting.
But it doesn’t have to be. You’re about to discover a simple, step-by-step guide that will make this process seamless and stress-free. By the end of this article, you’ll know exactly what to do, avoiding common pitfalls and ensuring your domain lands safely at its new home.
Ready to take control and make the switch? Let’s dive in and get started!
Preparing For Domain Transfer
Transferring a domain from Namecheap involves several steps. Start by unlocking the domain and obtaining the authorization code. Ensure your WHOIS information is updated before initiating the transfer process to your new registrar.
Preparing for a domain transfer involves several important steps. These steps ensure a smooth transition from Namecheap to another registrar. Proper preparation prevents delays and keeps your website running without issues.Check Domain Eligibility
First, check if your domain is eligible for transfer. Your domain must be at least 60 days old. Newly registered domains are not eligible. Ensure there are no pending disputes or holds. The domain should be active and without restrictions.Unlock Your Domain
Next, unlock your domain. Domains are locked by default for security. Log into your Namecheap account. Find the domain settings and look for the lock status. Change the status to unlocked. This allows the transfer process to begin.Disable Domain Privacy
Lastly, disable domain privacy. Privacy settings hide your contact information. For a transfer, this information must be visible. Go to your domain settings. Find the privacy settings and switch them off. Make sure your contact information is accurate and up-to-date. These steps are essential for a successful domain transfer. Following them carefully ensures a smooth transition.
Credit: www.hostinger.com
Gather Necessary Information
Gather all necessary details before transferring a Namecheap domain. Check the domain’s eligibility and unlock it. Obtain the authorization code from Namecheap, ensuring a smooth transfer process.
Transferring your domain from Namecheap can feel like a daunting task. However, breaking it down into manageable steps makes it much simpler. The first and most crucial step is to gather all the necessary information. This ensures a smooth transition without hiccups. By taking the time to prepare, you’re setting yourself up for a seamless domain transfer experience. Let’s dive into the details of what you need to do. ###Locate The Epp/auth Code
The EPP/Auth Code acts as a password for your domain. It’s essential for transferring your domain to a new registrar. To find it, log into your Namecheap account and navigate to the “Domain List” section. Click on “Manage” next to the domain you wish to transfer. Here, you’ll find the “Auth Code” option. Select it, and Namecheap will email you the code. This code is your key, so keep it safe. Have you ever misplaced an important password? It’s frustrating, right? That’s why securing this code is vital. Without it, your transfer could hit an unexpected roadblock. ###Verify Contact Information
Ensuring your contact information is up to date is crucial. This information is what the new registrar will use to contact you. Double-check your email address, phone number, and mailing address. Head to the “Domain List” in your Namecheap account. Click on “Manage” for your selected domain, then scroll to the “Contact Information” section. Verify that all the details are correct and current. Imagine missing an important email because your address was outdated. Avoid this hassle by verifying your details now. It’s a small step that makes a big difference in the transfer process. Taking these steps prepares you for a successful domain transfer. You’ve got this. Ready to move on?Initiate Transfer Process
Start the Namecheap domain transfer by unlocking your domain and obtaining the EPP code. Ensure your contact information is up-to-date. Then initiate the transfer through your new registrar, entering the EPP code when prompted.
Transferring a domain from Namecheap might seem challenging. But it can be straightforward. The process begins with initiating the transfer. This involves choosing a new registrar and submitting a transfer request. These steps ensure a smooth transition.Choose A New Registrar
Selecting a new registrar is crucial. Research various registrars available. Consider their features, support, and pricing. Choose one that meets your needs. Compare their services with others. Ensure they offer what you require. This step sets the foundation for your transfer.Submit Transfer Request
Once you pick a registrar, start the transfer. Log in to your new registrar’s account. Look for the transfer domain option. Enter your Namecheap domain details. Follow the instructions provided. You might need an authorization code. Obtain this code from Namecheap. It confirms your transfer request. Ensure all information is correct. Double-check before submitting. This avoids any possible issues.
Credit: www.namecheap.com
Complete Transfer Steps
Transferring your Namecheap domain is simple. Unlock your domain, get an EPP code, and confirm your email. Select a new registrar, enter the EPP code, and finalize the transfer. Ensure domain privacy settings are off for smooth processing. Follow these steps to move your domain easily.
Transferring your Namecheap domain to another registrar might seem daunting, but breaking it down into clear steps can simplify the process. You don’t have to be a tech guru to manage this. With a few clicks and some patience, your domain can switch homes smoothly. Let’s dive into the complete transfer steps to ensure a seamless transition. ###Approve Transfer Via Email
Once you initiate the domain transfer, keep an eye on your inbox. Namecheap will send you a crucial email requiring your approval. This email contains a link you need to click to confirm the transfer. Imagine it as a virtual handshake, sealing the deal. Without this step, your domain will remain in limbo, unable to proceed. So, make sure to act promptly when that email arrives. ###Monitor Transfer Status
After approving the transfer, the waiting game begins. But don’t just sit back and relax. Check the transfer status regularly through your new registrar’s dashboard. It’s like tracking a package; you want to know where it is and when it will arrive. Most transfers complete within 5-7 days, but being proactive can help you spot any issues early. What if something goes wrong? Knowing the status allows you to troubleshoot quickly, avoiding any disruption to your online presence. Taking these steps can make domain transfer a breeze. Have you ever experienced a transfer delay? Share your story in the comments and let’s help each other navigate these digital waters!Post-transfer Actions
After transferring a Namecheap domain, update your contact information. Check the DNS settings. Ensure everything functions correctly.
After successfully transferring your Namecheap domain, some steps remain. Post-transfer actions ensure everything functions smoothly. Completing these steps optimizes your domain’s security and performance.Verify Domain Settings
Check your domain settings immediately. Ensure all information is accurate. Update contact details if necessary. Confirm nameservers point to the correct hosting provider. Review DNS settings carefully. Incorrect settings can lead to website downtime. Ensure your domain’s records are as intended.Reactivate Domain Privacy
Domain privacy protects personal information. It hides details from public databases. Namecheap transfers may disable this feature. Check if your domain privacy is active. Reactivate it if needed. Protect your personal information effectively. This step is crucial for online security.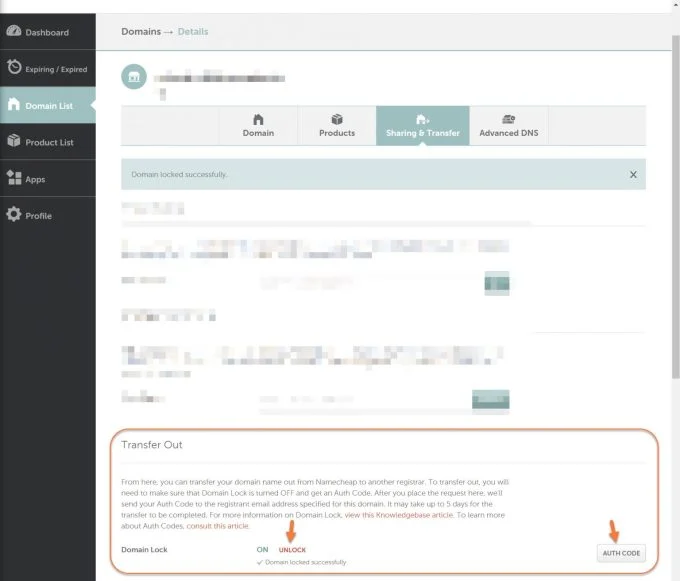
Credit: chemicloud.com
Frequently Asked Questions
How Do I Transfer A Domain To A New Owner?
To transfer a domain, unlock it, obtain the authorization code, and initiate the transfer with the new owner. Ensure the new owner’s contact details are up-to-date. Approve the transfer via email confirmation.
How Long Does It Take To Transfer A Domain Namecheap?
Domain transfers at NameCheap typically take 5 to 7 days to complete. Ensure all requirements are met, including unlocking the domain and obtaining the EPP code. This timeframe can vary based on registrar response times and domain status. Check the progress through your NameCheap account for updates.
Is Namecheap Domain Transfer Free?
NameCheap charges a fee for domain transfers. The fee includes a one-year renewal. Customers can check current rates on NameCheap’s website.
How Do I Transfer My Domain Name To Another Domain?
To transfer your domain, unlock it and get the authorization code from your current registrar. Initiate the transfer with the new registrar, providing the code. Confirm the transfer through email and wait for completion, typically within 5-7 days. Ensure the domain is eligible for transfer, meeting all requirements.
Conclusion
Transferring your Namecheap domain is simple and straightforward. Follow the steps carefully. Ensure all information is accurate. Double-check before you finalize. The process takes a few days. Patience is key. Enjoy a smoother management experience post-transfer. Keep your domain safe and secure.
Check your email for updates. Always protect your privacy and data. A successful transfer brings peace of mind. Continue exploring new possibilities online. Stay informed and proactive. Domains are valuable assets. Handle them with care. Happy transferring!