
Transferring a domain from one Namecheap account to another might seem like a daunting task, but don’t worry—you’re not alone, and it’s simpler than you might think. Whether you’re consolidating your domains or handing one over as part of a business deal, knowing how to smoothly navigate this process can save you time and headaches.
Imagine the satisfaction you’ll feel once your domain is securely transferred, ensuring your online presence remains uninterrupted. In this guide, we’ll walk you through the steps with ease, helping you avoid common pitfalls and ensuring a seamless transition. Get ready to empower your digital journey and keep your web assets under control.
Dive in to discover how straightforward transferring a domain can be with Namecheap!

Credit: www.youtube.com
Preparation For Transfer
Transferring a domain between Namecheap accounts involves a few important steps. Proper preparation ensures a smooth transition without any hiccups. This process is straightforward, but careful planning is essential. Start by understanding the requirements and gathering necessary information.
Check Domain Eligibility
Ensure your domain is eligible for transfer. Domains must be active and not locked. Confirm it’s not expired or suspended. Verify the domain is at least 60 days old. This is a standard requirement for most registrars. Check the domain’s status in your Namecheap dashboard. Make sure there are no pending changes or disputes.
Gather Necessary Information
Accurate information is crucial for a successful transfer. Gather the current account username and password. You will need access to both accounts. Ensure you have the domain’s authorization code. This code is essential for transferring domains. Double-check the contact information for both accounts. Correct details prevent complications during the transfer.
Initiate Domain Transfer
Transferring a domain within Namecheap is a straightforward process. It involves a few steps to ensure the domain moves securely from one account to another. This process is essential for domain management and helps keep your digital assets organized. Let’s dive into the steps required to initiate a domain transfer.
Log Into Namecheap Account
First, access your Namecheap account using your credentials. Ensure you have the correct login details. This step is crucial for security purposes. If you face any issues, use the ‘Forgot Password’ option. This ensures you can regain access to your account swiftly. Once logged in, you’ll be ready to proceed with the domain transfer.
Access Domain List
After logging in, navigate to the dashboard. Here, you will find the domain list section. Click on ‘Domain List’ to view all domains registered under your account. This section provides a comprehensive view of your domains. It helps you identify the specific domain you want to transfer. Select the domain to begin the transfer process.
Unlock Domain
Transferring domains between Namecheap accounts involves unlocking the domain first. Access the domain management section and locate the ‘Transfer’ option. Confirm the transfer with the recipient, ensuring both parties have the necessary account details ready for a seamless process.
Unlocking your domain is a crucial step when transferring it from one Namecheap account to another. It’s like unfastening the padlock on a treasure chest, allowing you to move your domain smoothly and securely. Without unlocking, the domain remains tethered to its current account, making the transfer process impossible. Have you ever wondered why domains need unlocking? It’s a security measure to prevent unauthorized transfers. Now, let’s dive into the specifics of how you can unlock your domain and ensure a seamless transfer experience. ###Disable Domain Lock
The first step in unlocking your domain is disabling the domain lock. Namecheap automatically locks domains to protect them from unauthorized changes. You’ll need to log into your Namecheap account and navigate to the domain list. Once there, select the domain you wish to transfer. Look for the domain lock option, usually found under the domain settings. Simply toggle the lock off. This action is straightforward yet crucial for enabling the transfer process. ###Verify Unlock Status
After disabling the domain lock, it’s essential to verify that your domain is indeed unlocked. Why is this step necessary? It ensures that there are no hiccups in the transfer process later on. Return to your domain list and check the status of your domain. It should indicate ‘Unlocked.’ This confirmation is your green light to proceed with the transfer. If it still shows ‘Locked,’ retry disabling the lock. Unlocking your domain is a small but vital step. It ensures that your domain can transition to the new account without any barriers. Have you ever missed a crucial step in a process and had to start over? Verifying the unlock status prevents such setbacks, saving you time and effort. By actively participating in these steps, you’re taking control of your domain’s destiny. Are you ready to move forward with your domain transfer?Obtain Epp Code
Transferring a domain between Namecheap accounts requires obtaining the EPP code. This unique code ensures the domain transfer process proceeds smoothly and securely. Access the EPP code through your Namecheap account settings before initiating the transfer.
Transferring a domain from one Namecheap account to another involves a few essential steps, one of which is obtaining the EPP code. This code is critical because it acts as a security measure, ensuring that only authorized users can initiate the transfer. Understanding how to retrieve this code can make the process smoother and help avoid potential pitfalls. But what exactly is an EPP code, and how do you get it? Let’s delve into the steps. ###Request Epp Code
To start, you need to log into your Namecheap account. Once you’re in, navigate to the “Domain List” section. Here, you’ll find all the domains registered under your account. Click on the domain you wish to transfer. Look for an option labeled “Get EPP code” or “Auth Code.” This is usually found under the “Sharing & Transfer” or “Advanced Options” tab. Click it, and you’re one step closer to transferring your domain. What if you can’t find the option? Sometimes, your domain might be locked. Ensure it’s unlocked by checking the domain settings. Unlocking it will often reveal the EPP code request option. ###Check Email For Code
After requesting the EPP code, check your registered email. Namecheap will send the code to the email associated with your account. This is a security measure to prevent unauthorized transfers. The email should arrive within a few minutes. If it doesn’t, check your spam or junk folder. Emails sometimes get misdirected, especially if they’re from automated systems. Once you have the EPP code, you’re ready to proceed with the domain transfer. Keep it safe and secure. It’s the key to your domain’s transfer process. Have you ever had to request an EPP code before? How was your experience? Sharing insights can help others who are navigating the process for the first time.Transfer To New Account
Transferring a domain between Namecheap accounts can seem complex. But it’s straightforward if you follow the steps. This process ensures your domain remains secure. It’s important to handle the transfer carefully. A smooth transition keeps your website running without issues.
Log Into New Namecheap Account
Start by accessing the new Namecheap account. Ensure you have the correct login details. Navigate to the account dashboard. Here, you’ll manage the domain transfer. This is where you’ll accept incoming transfers.
Enter Epp Code
Find the EPP code for your domain. This code is crucial for security. You’ll need to enter it in the new account. Locate the transfer section in your dashboard. Input the EPP code accurately. This step verifies your authority to transfer the domain.
Credit: www.namecheap.com
Accept Transfer Request
Transferring a domain within Namecheap requires careful steps. Accepting the transfer request is crucial. This step finalizes the movement of your domain. Ensuring everything is accurate is key. Below are detailed steps to help you.
Receive Transfer Email
After the transfer initiation, an email will arrive. This email confirms the transfer request. It includes vital information about the domain. It is sent to the account holder’s email. Check your inbox for this important email. Sometimes, it might land in the spam folder.
Confirm Transfer Acceptance
Read the email carefully. It provides instructions for confirming the transfer. Follow the given link to the Namecheap portal. Log in using your account credentials. Review the transfer details displayed. Ensure all information is correct before proceeding. Click the confirmation button to accept the transfer. This action completes the transfer process. Your domain moves to the new account successfully.
Verify Domain Transfer
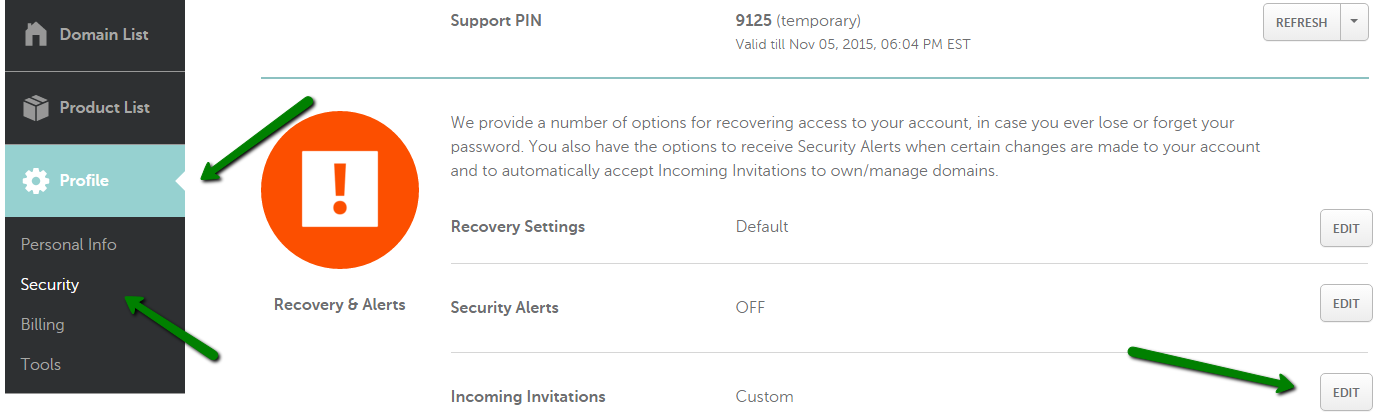
Transferring a domain between Namecheap accounts requires careful verification. This ensures a smooth transition. Before completing the transfer, confirm all details. Verify the domain status and ownership. This prevents unexpected issues. Below, we break down the steps.
Check Domain Status
First, ensure the domain is in good standing. Check if it is unlocked. A locked domain cannot be transferred. Log into your Namecheap account. Go to the Domain List. Look for the padlock icon. If locked, click to unlock it. Make sure the domain has no pending issues. Renew it if expired.
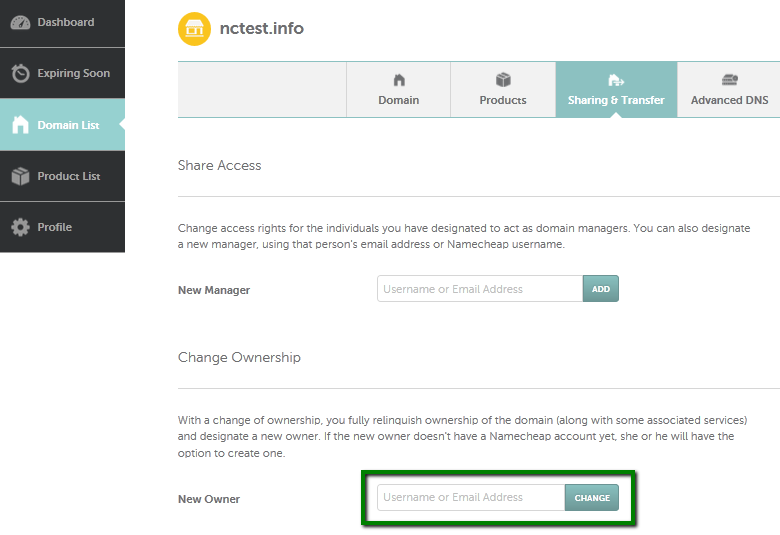
Confirm Ownership Transfer
Next, verify ownership details. Ensure WHOIS information is accurate. Update contact details if needed. Confirm the domain is under your control. This is crucial for a successful transfer. Once confirmed, proceed to the transfer process. Be prepared to approve transfer emails. They confirm you authorize the move.
Credit: www.namecheap.com
Troubleshooting Common Issues
Transferring a domain between Namecheap accounts can sometimes face hiccups. You might encounter issues that halt the process unexpectedly. These problems can cause frustration and delay your plans. Understanding these common issues helps in resolving them swiftly.
Let’s explore some frequent challenges. Discover effective solutions for a smooth transfer.
Resolving Epp Code Errors
EPP codes are essential for domain transfers. Incorrect codes can block the transfer. Double-check the code’s accuracy from your current registrar. Ensure there are no spaces before or after the code. If errors persist, contact Namecheap support for assistance.
Support can verify if the code is correct. This step helps in clearing any confusion with EPP codes.
Handling Transfer Delays
Transfer delays might occur due to pending status. Verify if your domain is unlocked for transfer. Domains must be unlocked to proceed. Check if your email associated with the domain is correct. Email verification is crucial for transfer approval.
Sometimes, delays arise from outdated contact info. Update your contact information promptly. This ensures you receive important notifications.
Frequently Asked Questions
Can I Transfer A Domain From One Namecheap Account To Another?
Yes, you can transfer a domain between Namecheap accounts. Initiate the transfer from your account’s Domain List. Follow the on-screen instructions to complete the process. Ensure both accounts are active and the domain isn’t locked or expired. Contact Namecheap support for assistance if needed.
How Do I Transfer A Domain From One Account To Another?
To transfer a domain, unlock it and obtain the authorization code. Initiate the transfer with the new registrar. Approve the transfer via email confirmation. Ensure both accounts are active and compatible. The process typically completes within five to seven days.
Is Namecheap Domain Transfer Free?
Namecheap charges a small fee for domain transfers. The fee includes a one-year renewal. Check their website for current pricing.
How Long Does It Take To Transfer A Domain Namecheap?
Domain transfers to Namecheap typically take 5 to 7 days. Ensure the domain is unlocked and you have the transfer authorization code. Monitor your email for any required approvals during the process. Once completed, check your Namecheap account for confirmation of the successful transfer.
Conclusion
Transferring a domain between Namecheap accounts is straightforward. Follow the steps carefully. Double-check each detail. Ensure both accounts have required information. Confirm email addresses are correct. Keep your domain safe and secure. Avoid unnecessary delays by verifying all inputs. Namecheap offers great support if needed.
Successful transfers rely on accurate information. Regularly check your domain status. Stay patient during the process. Enjoy managing your domain with ease. Remember, careful planning saves time. Happy transferring!
