Are you eager to showcase your web project to the world but unsure how to get started with hosting? Discovering how to host your web page on an EC2 instance might be the perfect solution for you.
This guide will empower you with the knowledge to effortlessly set up your web page using Amazon’s reliable cloud services. Imagine the satisfaction of seeing your work live, accessible, and ready for visitors. You don’t need to be a tech wizard to make this happen.
With clear, step-by-step instructions, you’ll gain the confidence to navigate the process smoothly. Stick with us to unlock the secrets of hosting on EC2 and watch your web presence unfold with ease.
Setting Up Aws Account
Creating an AWS account is the first step. Visit the AWS homepage and click on “Create an AWS Account”. Fill in your email and password. Choose a secure password. You will need it later. Enter your credit card information. AWS needs this for billing. Select the basic support plan. It’s free for beginners. Check your email for a confirmation link. Click on it to verify your account. Now, your AWS account is ready. You can start using it.
Launching Ec2 Instance
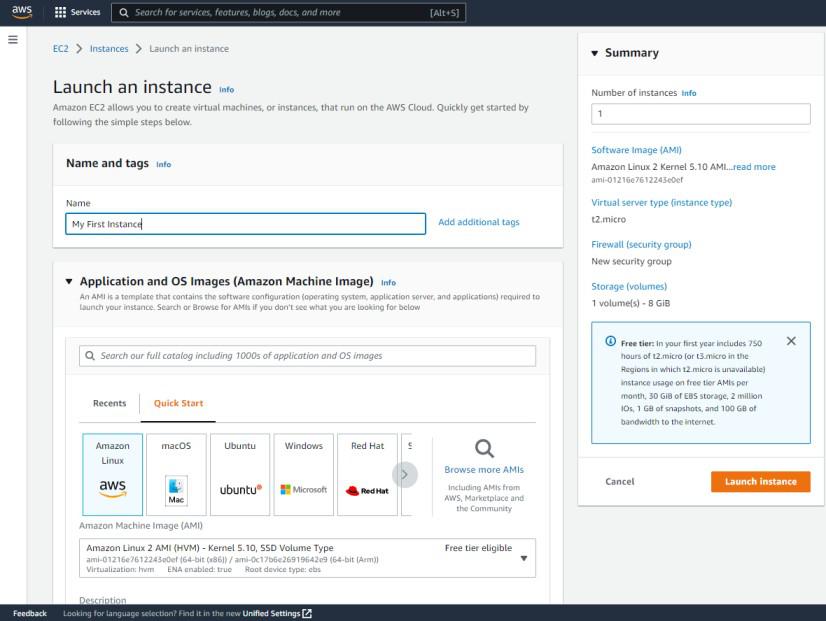
Choose the Amazon Machine Image (AMI) that suits your needs. Ubuntu is popular for its user-friendly interface. Amazon Linux is efficient for server tasks. Windows Server is also available for users who prefer Windows systems. Each AMI has different features. Pick based on your project requirements.
Select the instance type based on your needs. T2.micro is free-tier eligible. It’s good for small tasks. For heavier tasks, choose larger instances. Decide network settings and storage options. Set the number of instances you need. Review settings before proceeding.
Security groups control traffic to your instance. Allow only necessary ports. Port 80 is for web traffic. Port 22 is for SSH access. Set rules to protect your server. Restrict access to trusted IPs only. Always check your security settings. Ensure your instance is safe.
Connecting To Ec2 Instance
First, open a terminal on your computer. You will use SSH to access your EC2 instance. Find the public IP address of your instance. You can see it on your AWS console. In the terminal, type ssh -i "your-key.pem" ec2-user@your-public-ip. This command will connect you to the instance. Ensure your key file has the right permissions. The command chmod 400 your-key.pem makes it secure.
Key pairs are like passwords. They help keep your instance safe. You need a key pair to connect. AWS gives you a key pair when you create an instance. Save your key file safely. You cannot download it again. Use this key file with SSH to connect. Always check your key file permissions. Ensure no one else can read it.

Credit: runcloud.io
Installing Web Server
First, connect to your EC2 instance using SSH. Next, update the package lists with sudo apt update. Install Apache by typing sudo apt install apache2. After installation, check its status with systemctl status apache2. Ensure Apache is active and running. If not, start it using sudo systemctl start apache2. To enable it on boot, use sudo systemctl enable apache2. Now, your web server is ready.
First, SSH into your EC2 instance. Update packages using sudo apt update. Install Nginx with sudo apt install nginx. Check its status using systemctl status nginx. Make sure Nginx is running. Start it with sudo systemctl start nginx if needed. Enable it on boot with sudo systemctl enable nginx. Your web server is now set up.
Deploying Web Page
First, ensure your files are ready. Connect to your EC2 instance using SSH. Use the secure copy command to transfer files. This command is simple and fast. Your files will move from your computer to the server. Check file paths carefully. Mistakes can cause errors. Ensure your files go into the right directory. This step is crucial.
After uploading, it’s time to test. Open a web browser on your computer. Type in the EC2 instance’s public IP address. Press enter and watch. Your web page should load now. If not, check your security settings. Firewalls can block access sometimes. Ensure HTTP traffic is allowed. Adjust settings if needed.
Domain Configuration
First, you need an Elastic IP. It helps your domain stay the same. Go to the AWS EC2 console. Click on “Elastic IPs” in the left menu. Choose “Allocate Elastic IP address.” Select your network and confirm. You now have an Elastic IP.
Next, link it to your instance. Select your Elastic IP. Click on “Actions”. Choose “Associate Elastic IP address.” Pick your EC2 instance from the list. Save the changes. Your Elastic IP is now set up.
Open your domain registrar’s website. Go to the DNS settings. Find the “A Record” option. Enter your Elastic IP here. Save the changes. Wait for it to update. It can take a few hours. Your domain now points to your EC2.
Check by entering your domain in a browser. It should load the website. If not, wait a bit longer. Sometimes it takes time. Your DNS is now set up.
Ensuring Security
Hosting a web page on an EC2 instance requires attention to security. Secure your instance by configuring firewalls and updating software regularly. Use strong passwords and enable encryption to protect data.
Firewall Configuration
Setting up a firewall keeps your data safe. First, log into your EC2 instance. Use the security groups to control access. Allow only specific IP addresses to enter. This way, strangers cannot see your data. Always update the rules. Keep track of who can access your web page. A strong firewall stops bad guys from entering. Your data stays safe and sound.
Ssl Certificate Installation
An SSL certificate makes your site secure. It encrypts the data flow. This keeps information private. Begin by buying an SSL certificate. Many providers sell them online. Next, install it on your EC2 instance. Follow the steps your provider gives. Test your website after installing the SSL. The padlock sign shows it is secure. Users trust sites with SSL. It protects both users and data.

Credit: www.youtube.com
Monitoring And Maintenance
Alerts tell you when things go wrong. They are important for your website. If the server gets too hot, you know. When the site is slow, an alert helps you fix it. Use tools like Amazon CloudWatch. It helps set up alerts. Alerts keep your website healthy. Stay informed and act fast. This way, users stay happy.
Backups save your work. They keep copies of your website. If something breaks, you can restore it. Always have a plan for backups. Use Amazon S3 for storing backups. It is safe and easy. Set a schedule for regular backups. This protects your data. Never lose your site again. Backups are like a safety net. They help in bad times.
Credit: www.geeksforgeeks.org
Frequently Asked Questions
Can I Host A Website On Aws Ec2?
Yes, you can host a website on AWS EC2. Launch an EC2 instance, install your web server, and upload files. Configure security settings and DNS for accessibility. AWS provides scalability, reliability, and flexibility for your website hosting needs.
How To Host A Dynamic Website On Aws Ec2?
Launch an EC2 instance on AWS. Install required software like Apache or Nginx. Upload your website files via SSH. Configure security groups to allow HTTP/HTTPS traffic. Test your site using the public IP address. Ensure regular backups and updates for security.
How To Deploy A Web Application In Aws Ec2?
To deploy a web application on AWS EC2, first launch an EC2 instance. Install necessary software like Apache or Nginx. Upload your application files using SCP or SFTP. Configure security groups to allow traffic. Start the web server. Test your application using the public IP address.
Can I Host A Website On Aws For Free?
Yes, you can host a website on AWS for free using the AWS Free Tier. It includes services like EC2, S3, and RDS with limited usage for 12 months. Check AWS’s official website for specific terms and conditions.
Conclusion
Hosting a web page on an EC2 instance is manageable. Start by launching your instance. Choose the right configuration. Install necessary software. Upload your files securely. Test your setup. Ensure everything runs smoothly. Monitor performance regularly. Adjust settings if needed.
Make security a priority. Protect your data from threats. Backup your files often. Keep learning new tips. Stay updated with AWS features. Hosting can be simple with practice. Follow these steps carefully. Create a reliable online presence. Your web page deserves a strong foundation.
Make it accessible to your audience. Enjoy the process. It’s rewarding.