
Are you ready to take your web app to the next level? Hosting your application on AWS EC2 can open up a world of possibilities, giving you the power, flexibility, and scalability your project needs.
But if you’re new to cloud computing, this might seem like a daunting task. Don’t worry; you’re not alone. In this guide, you’ll discover how straightforward it can be to set up and manage your web app on AWS EC2.
Imagine the peace of mind you’ll have, knowing your app is running smoothly on one of the most reliable platforms available. You’ll learn step-by-step how to get started, from launching an instance to deploying your app. Stick with us, and by the end of this article, you’ll have all the knowledge you need to successfully host your web app on AWS EC2. Let’s dive in and transform your web hosting capabilities!
Credit: medium.com
Setting Up Aws Account
Begin by visiting the AWS website. Find the sign-up button. Click it. Fill in your details. Use your email. Create a strong password. Keep it safe. Agree to the terms. Enter payment details. AWS needs this for billing. Don’t worry, there’s a free tier. You won’t be charged immediately. Complete the setup. Verify your email. Your account is ready.
Log in to the AWS console. Use your email and password. The console is a dashboard. It shows all AWS services. Find the search bar. Use it to find EC2. Click on EC2. This opens the EC2 dashboard. Explore the tabs. Learn the names. Instances, volumes, and security groups. These help manage your app. Take your time. Familiarize yourself. It gets easier.

Credit: dataengineeracademy.com
Launching Ec2 Instance
Select an instance that matches your needs. Smaller apps can use the t2.micro instance. It is free for beginners. Bigger apps need bigger instances. Check the cost before choosing.
Security groups act like a firewall. They protect your instance. Open ports that your app needs. Port 80 is for web traffic. Port 22 is for SSH access. Close unused ports for safety.
Use an SSH client to connect to your instance. You need a key pair to login. Keep your key safe. Type the correct IP address. You can now manage your server.
Deploying Your Web App
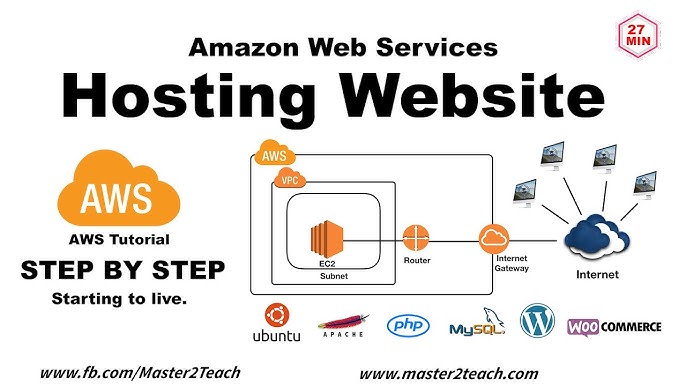
Hosting your web app on AWS EC2 involves launching an instance, configuring security groups, and deploying your code. Follow clear steps to ensure your app runs smoothly and securely on Amazon’s cloud platform. This approach provides flexibility and scalability for your web applications.
Preparing Your Application
Ensure your web app is ready for deployment. Check your code for errors. Test your app locally. Make sure it works well. Create a production build. A production build is optimized. It runs faster and uses fewer resources. Prepare configuration files. These files help your app run smoothly on EC2.
Transferring Files To Ec2
Use SSH to connect to your EC2 instance. You can transfer files using SCP or SFTP. SCP is secure and fast. SFTP is also secure. It is simple to use. Make sure your files are in the correct location. Verify file permissions. Permissions must allow your app to run.
Installing Dependencies
Log into your EC2 instance. Install necessary software packages. Use package managers like apt or yum. Install Node.js if your app requires it. Check for other dependencies. Ensure all are installed correctly. Run a test to confirm the installation. This helps avoid errors during deployment.
Configuring Web Server
Apache and Nginx are popular web servers. Choose one for your project. Apache is easy to set up. Nginx is faster with static files. Install the server using simple commands. Use package managers like apt or yum. They make installation easy. Configure the server with default settings. You can change them later. Test the server with a sample page. Ensure it works before moving forward.
Virtual hosts allow multiple sites. One server can host them. Use separate directories for each site. This keeps files organized. Edit configuration files to set up virtual hosts. Apache uses httpd.conf or sites-available. Nginx uses nginx.conf. Define server name and document root. Restart the server after changes. Check each site to ensure it loads. Virtual hosts make managing multiple sites easier.
Database Setup
First, open the AWS Management Console. Go to the RDS service. Select your database instance. Find the endpoint and port information. Note them down. You’ll need them soon.
Use a SQL client. Enter the endpoint and port. Type your username and password. Click connect. You are now connected to your RDS.
Go to the Security Groups in AWS. Find your RDS security group. Edit inbound rules. Add a new rule for your IP address. Use port 3306 for MySQL. This allows your app to access the database.
Save the changes. Ensure the rules are correct. Now your database access is configured. Your web app can connect securely.
Domain Name Setup
Registering a domain is the first step. Visit a domain registrar like GoDaddy or Namecheap. Search for your desired domain name. Check if it’s available. If it is, proceed to purchase. Keep your domain name short and easy to remember. Avoid using special characters. Use a .com extension if possible. This is the most common choice.
After registering, go to AWS Route 53. This is Amazon’s DNS service. Create a new hosted zone. Enter your domain name there. AWS will provide you with nameservers. Update these nameservers in your domain registrar’s settings. This connects your domain to Route 53. It may take some time to update. Wait for the changes to propagate. Your domain is now ready for use.
Testing And Monitoring
Deploy your web app on AWS EC2 by testing and monitoring its performance. Ensure server configurations are optimized for smooth operation. Regular checks help maintain security and efficiency, preventing downtime.
Testing Your Web App
It’s time to test your web app. Make sure everything works as planned. Try clicking every button. Fill out all forms. Test on different devices. A phone, a tablet, and a computer. Check if the app loads fast. You want it to be quick. If it is slow, users might leave. Try different browsers too. Chrome, Firefox, and Safari. They might show the app differently. Fix any problems you find. Test again. Keep doing it until the app works well. This makes users happy.
Monitoring Performance
Keep an eye on your app’s performance. Use tools to track speed. AWS CloudWatch is a good choice. It shows how well your app is doing. Check the server load. Is it too high? You might need more resources. Look at error logs. They tell you if something is wrong. Fix errors quickly. This keeps your app running smoothly. Users like apps that work well. Happy users come back. They might even tell their friends. That’s good for you.
Credit: www.youtube.com
Scaling And Optimization
Auto scaling helps your app handle more users. It adds more instances when needed. This keeps your app fast and smooth. AWS Auto Scaling watches your app. It adds or removes servers based on traffic. You pay for what you use. So, it’s cost-effective. This way, your app is always ready. Ready for more users, that is.
Choose the right instance type for your app. Some apps need lots of memory. Others need fast processors. Optimize your instance to match your app’s needs. Use monitoring tools to check performance. These tools help you see where improvements are needed. You can adjust settings for better performance. Always aim for a balance between cost and speed. Your app will run better this way.
Frequently Asked Questions
How To Host A Web App On Ec2?
Launch an EC2 instance on AWS. Install necessary software like web server and database. Deploy your web app files. Configure security groups for HTTP/HTTPS access. Update DNS settings if needed. Start the web server and test your application.
How Do I Deploy My Web App On Aws?
To deploy a web app on AWS, first create an AWS account. Set up a virtual server using EC2. Install necessary software, then transfer your app files. Configure security groups and launch your app. Use Elastic Beanstalk for easier deployment.
Monitor and manage via AWS Management Console.
Can I Host My Application On Aws?
Yes, you can host your application on AWS. AWS offers scalable cloud services, reliable infrastructure, and various hosting options. Easily deploy, manage, and scale your applications with AWS’s robust tools and features. AWS supports multiple programming languages and frameworks for seamless integration.
How Do I Host An Html Website On An Ec2 Instance?
Launch an EC2 instance and connect via SSH. Install Apache using `sudo apt-get install apache2`. Upload HTML files to `/var/www/html/`. Adjust security groups to allow HTTP traffic. Access your website through the instance’s public IP.
Conclusion
Hosting a web app on AWS EC2 is straightforward. Choose the right instance type. Install necessary software. Deploy your web app efficiently. AWS provides robust security features. Monitor your app’s performance closely. Optimize resources to reduce costs. Backup your data regularly for safety.
AWS EC2 offers flexibility for scaling. Understanding these basics ensures success. Start hosting your web app confidently today. With practice, it becomes easier. Enjoy the benefits of cloud hosting. Your web app can reach global users effortlessly. Keep learning and adapting for better results.
Your journey with AWS EC2 is just beginning.
