Are you ready to take your Web API application to the next level by hosting it in IIS? Imagine the seamless experience your users will enjoy with faster load times and enhanced security.
Hosting your Web API in Internet Information Services (IIS) not only optimizes performance but also scales your application effortlessly. Whether you’re a developer eager to showcase your skills or a business owner looking to improve your web service delivery, this guide is designed for you.
We’ll walk you through every step, ensuring you can confidently set up and manage your API. Curious to learn how to make your web application shine? Let’s dive in and unlock the full potential of your Web API with IIS hosting.

Credit: learn.microsoft.com
Prerequisites
To host a Web API in IIS, some tools are needed. First, install IIS on your Windows server or computer. Next, make sure .NET Framework is installed. Most Web APIs require it. Check your application to know which version is needed. Visual Studio can help in building and testing your application. It’s a helpful tool for developers. Ensure the Web Deploy Tool is installed on your server. This helps in deploying applications easily. Lastly, ensure your server firewall allows traffic on the ports you need.
Setting Up Iis
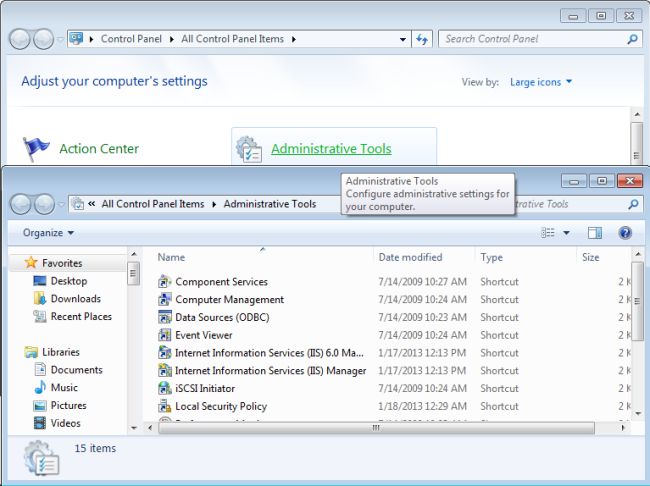
First, open the Control Panel on your computer. Select Programs and Features. Click on Turn Windows features on or off. A new window will open. Find Internet Information Services and check the box next to it. Click OK. Windows will install IIS for you. This may take some time. Once done, restart your computer.
Open the IIS Manager from the Start menu. Look for the Features View section. Here you can enable or disable features. Make sure ASP.NET and WCF Services are selected. Double-click any feature to configure it. You can set limits or change settings. Remember to click Apply to save changes.
Preparing The Web Api Application
First, ensure you have a working Web API project. Use tools like Visual Studio. Create a new project and select Web API. Add controllers for your data. Use simple names for easy understanding. Test your API using Postman or a browser. Fix any errors. This step is crucial. Make sure everything works.
Open your project in Visual Studio. Click on “Build” then “Publish”. Choose a folder or IIS. Select the right settings. For IIS, choose “IIS, FTP, etc”. Follow the steps to complete. Save your settings for next time. Check the published files in the folder. Everything should be there. You are now ready for the next step.
Credit: www.c-sharpcorner.com
Deploying To Iis
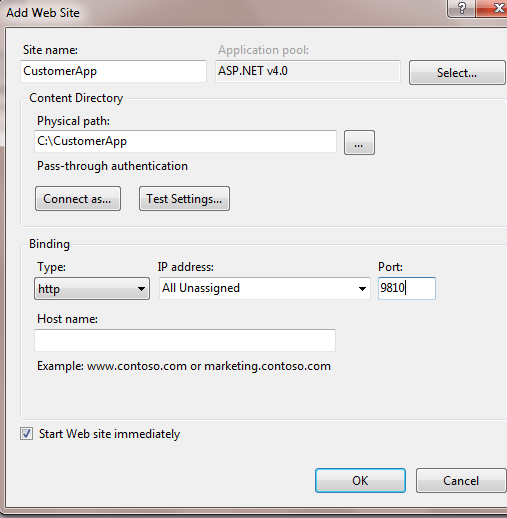
First, open the IIS Manager. Click on ‘Sites’ in the left panel. Choose ‘Add Website’. Fill in the website name. Pick the folder for your web app. Click ‘OK’ to create the site. Now, your site is ready in IIS. This is the start of hosting.
Each site needs an Application Pool. Select your site. Click on ‘Basic Settings’. Choose or create a new pool. Match the .NET version with your app. Click ‘OK’ to assign. The Application Pool helps manage resources.
Bindings link your site to the internet. Go to site settings. Click ‘Edit Bindings’. Set the port number and protocol. Commonly, use port 80 for HTTP. Use port 443 for HTTPS. This step is crucial for site access.
Configuring Application Settings
The Web.config file holds important settings for your application. It controls how your app behaves. Always check the file for errors. Errors can cause your app to fail. Use simple language in Web.config. Complex settings can confuse users. A clean file makes troubleshooting easier.
Connection strings connect your app to databases. They hold important information. Always keep them secure. Use strong passwords in connection strings. Test them before deploying your app. A wrong connection string can break your app. Double-check them for accuracy. They are vital for smooth operation.
Enabling Security Features
Setting up security features is crucial for hosting a Web API application in IIS. It helps protect against unauthorized access and data breaches, ensuring the application runs safely and efficiently.
Configuring Ssl
SSL keeps data safe. It encrypts data. Install an SSL certificate. This ensures secure connections. Use a trusted provider. Check SSL settings in IIS. Make sure it is active. This is important for user trust and data protection.
Setting Up Authentication And Authorization
Authentication checks user identity. Authorization decides user access. Use Windows Authentication in IIS. This is secure and simple. Adjust settings in the IIS Manager. Choose the right options. Set permissions carefully. Only allow access to those who need it. This keeps data safe and private.
Testing The Deployment
Deploying a Web API in IIS involves testing its functionality thoroughly. Ensure the application runs smoothly by checking endpoints and response times. Debug any issues to maintain optimal performance and user experience.
Accessing The Api Locally
Open a web browser. Type localhost in the address bar. Add the API’s port number. Press enter. You should see the API’s main page. Check if all functions work. Try clicking on different features. Ensure the API responds correctly. Test using different requests. Verify data retrieval and submission. Confirm error messages are clear.
Troubleshooting Common Issues
Errors might occur during testing. Check the IIS settings first. Ensure application pool is running. Verify the correct port is used. Look for typos in the address. Examine firewall settings. Ensure they allow traffic. Review log files for clues. Check if database connection works. Restart IIS if necessary. Re-test the API for issues. Ensure permissions are set properly.
Credit: geeksarray.com
Optimizing Performance
Compression makes your web app faster. It reduces data size. This saves bandwidth and speeds up load times. Use Gzip or Deflate for compression. IIS supports both. Enable them in the IIS Manager. Go to the Compression feature. Check both Static and Dynamic compression. This makes browsing smoother for users.
Caching stores data for quick access. It reduces server load. Use Output Caching in IIS. This keeps pages ready. Set cache duration for content. Choose the right data to cache. Not all data should be cached. Use caching for things that do not change often. This helps your app run efficiently. Users get data faster.
Monitoring And Maintenance
IIS logs are important for tracking application performance. They record every request and response. This helps find problems quickly. Logs show errors and slow responses. Analyzing logs helps improve the application. Look for patterns that cause issues. Regularly check logs to ensure smooth performance.
Keep the application updated for best performance. Updates fix bugs and security flaws. Always test updates in a safe environment first. This prevents breaking the live application. Schedule updates during low-traffic times. This minimizes disruption for users. Regular updates keep the application running smoothly and securely.
Frequently Asked Questions
How To Host The Web Api In Iis?
To host a Web API in IIS, create a new site in IIS Manager. Set the application pool to Integrated mode. Deploy the API files to the site’s directory. Configure bindings and access permissions. Test the API using a browser or tool.
Ensure proper firewall settings for external access.
How To Host A Web Application In Iis?
Install IIS via Control Panel. Create a new website in IIS Manager. Set the physical path to your web app’s folder. Bind the website to a port. Adjust permissions for the application pool. Test the web application in the browser.
Where Can I Host A Web Api?
You can host a Web API on platforms like AWS, Azure, Google Cloud, or Heroku. Ensure your hosting solution supports scalability, security, and performance needs. Consider the pricing structure and ease of integration with your existing systems.
How To Host Web Api In Windows Service?
Host a Web API in Windows Service by creating a service project. Add necessary API controllers and configurations. Use OWIN or Kestrel server for hosting. Build and install the service using service installer. Start the service to make the API accessible.
Regularly update and monitor for optimal performance.
Conclusion
Hosting your Web API in IIS is straightforward. Follow the steps carefully. Ensure your application works locally first. Configure IIS settings accurately. Check permissions and paths. Test your application after deployment. Address any errors promptly. This approach boosts your API’s accessibility and performance.
Remember to keep IIS updated. Regular maintenance ensures security and efficiency. Hosting Web API applications in IIS enhances reliability. It provides a stable environment for your services. Embrace these practices for successful deployment. Your application will serve users effectively. Enjoy the benefits of a well-hosted Web API.