Are you ready to launch your Python Flask web application and make it accessible to the world? Whether you’re a seasoned developer or just starting out, hosting your Flask app can seem daunting.
But fear not! In this guide, you’ll discover how to host your Python Flask web application with ease and confidence. Imagine having your project live, where others can interact with it, giving you real feedback and engagement. This article will walk you through every step, ensuring you have all the knowledge you need to succeed.
Stay with us, and let’s turn your hard work into a live reality.
Setting Up The Development Environment
First, download and install Python from the official website. Choose the version that fits your computer. Make sure to check the box that says “Add Python to PATH”. This step is very important. Without it, things won’t work well. After installing, open a terminal. Type python --version to check if Python is installed.
Once Python is ready, it’s time to install Flask. Open the terminal again. Type pip install Flask and press enter. This will download and install Flask. It might take a few seconds. After it’s done, Flask is ready to use.
Now, create a new folder for your Flask app. Open a text editor and create a file named app.py. In this file, write a simple Flask code. Start with from flask import Flask. Then, create a Flask object with app = Flask(__name__). Finally, add a route with @app.route('/') def home(): return "Hello, World!". Save the file and close the editor.
Configuring Flask For Deployment
Setting up environment variables is crucial. They store sensitive data. Keep API keys and database URLs safe. Use a .env file for easy management. Flask loads these variables automatically. It helps in maintaining security and flexibility. Edit your application’s configuration as needed. This ensures smooth deployment and operation.
Setting up the database is essential. Choose a reliable database system. Popular choices are PostgreSQL or MySQL. Flask works well with both. Configure database connections in your application. Use SQLAlchemy for easy integration. It simplifies database operations. Regularly check and update your database. This keeps data accessible and secure.
Choosing A Hosting Platform
There are many ways to host your Flask app. Shared hosting is cheap and easy. VPS hosting gives more control. Cloud hosting is very flexible. Each choice has its own pros and cons. Think about your needs. Budget matters too.
Pick a service that fits your needs. Reliability is key. Check if they offer 24/7 support. Look at uptime guarantees. Good hosting keeps your app running. Performance impacts user experience. Read reviews from real users. Cost should fit your budget. Choose wisely for the best results.
Credit: www.leniolabs.com
Deploying On A Virtual Private Server
Choose a Virtual Private Server provider. Popular options are AWS, DigitalOcean, and Linode. Create a new server instance. Select an operating system like Ubuntu. Access the server using SSH. Use terminal commands to connect. Update server packages using sudo apt-get update. Install Python and Flask. Use sudo apt-get install python3-flask. Check installations with python3 --version and flask --version. Verify everything works correctly.
Transfer your Flask application files to the server. Use SCP or FTP for file transfer. Configure the application. Set necessary environment variables. Use Gunicorn to run the app. Gunicorn is a WSGI server. Install it with pip install gunicorn. Start the app using Gunicorn. Command: gunicorn app:app. Replace “app” with your file name. Test the app in the browser. Ensure the server firewall allows access. Adjust firewall settings if needed.
Deploying On Platform-as-a-service
Heroku makes it easy to deploy your Python Flask app. First, create a Heroku account. Then, install the Heroku CLI on your computer. Log in to Heroku using the command line. Create a new app on Heroku with the command heroku create. This will give you a unique URL.
Set up your Flask app for Heroku. Add a file named Procfile to your project. This tells Heroku how to run your app. The Procfile should contain: web: python app.py. Replace app.py with your main file name. Ensure your app uses a requirements.txt file. This lists all the Python packages your app needs. Heroku uses this file to install them.
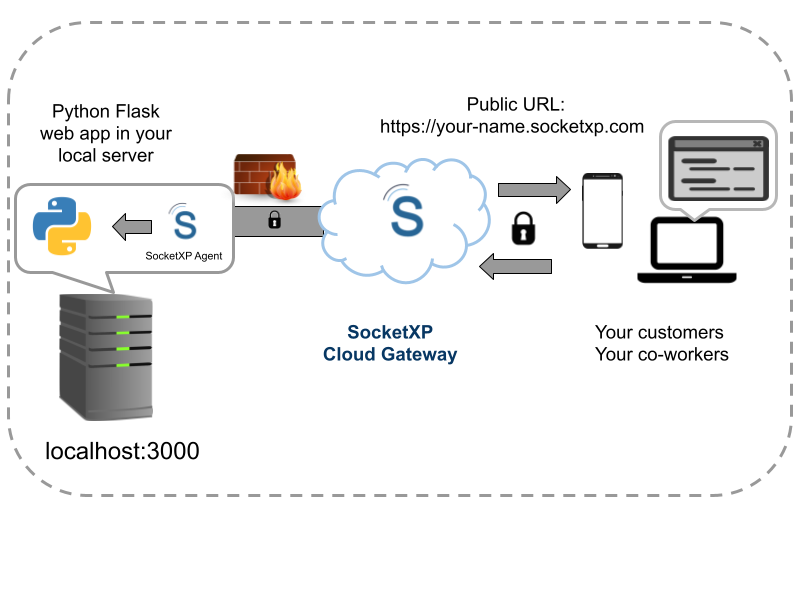
Credit: www.socketxp.com
Managing Security And Performance
Hosting a Python Flask web application demands careful security management to protect data. Ensuring optimal performance is crucial for user experience. Implement robust authentication and efficient code practices to maintain a secure, high-performing application.
Securing The Application
Python Flask apps must be secure. Use strong passwords for access. Protect data with encryption. Regularly update your software. Always check for vulnerabilities. Use secure libraries and plugins. Monitor network activity for threats. Validate user inputs carefully. This stops dangerous data from entering. Keep backup copies of your important files.
Optimizing For Speed
Speed is essential for a good user experience. Compress large files for faster loading. Minimize the use of heavy images. Use caching to store frequent data. This reduces server load. Optimize your database queries. Reduce unnecessary code in your app. Use a Content Delivery Network (CDN). A CDN speeds up content delivery. Measure performance regularly to find slow areas. Improve them quickly to keep users happy.
Maintaining And Monitoring The Application
Ensuring your Python Flask web application runs smoothly involves regular maintenance. Monitor server performance to identify issues early. Implement error logging to capture and fix bugs efficiently.
Setting Up Monitoring Tools
Monitoring tools help keep your Flask app running smoothly. Use tools to track errors and performance. They alert you when something goes wrong. This helps fix issues quickly. Tools like New Relic or Prometheus work well. They show you how your app is doing. You can see which parts need attention. Monitoring keeps your app reliable and fast.
Regular Updates And Maintenance
Updating your app is important. It keeps your app secure and efficient. Regular updates improve features and fix bugs. Test updates before applying them. This ensures everything works well. Maintenance is like caring for a garden. You remove weeds and add nutrients. This helps your app grow and thrive. Keep your code clean and organized. This makes future updates easier.

Credit: realpython.com
Frequently Asked Questions
How To Host A Python Flask Website?
To host a Python Flask website, choose a hosting service like Heroku or PythonAnywhere. Deploy your app by configuring the server, setting environment variables, and connecting a database if needed. Ensure your Flask app is production-ready and test thoroughly before going live.
How To Run Flask Web Application?
Install Flask using pip. Create a Python file for your app. Define routes and views. Set the `FLASK_APP` environment variable. Run the application using `flask run`. Access your app at `http://localhost:5000`. Ensure Python and Flask are installed correctly.
Can We Use Flask For A Web Application?
Yes, Flask is ideal for developing web applications. It is lightweight, flexible, and easy to use. Flask supports extensions, making it highly customizable. Its simplicity allows developers to quickly build prototypes. Flask is perfect for small to medium-sized projects, offering a strong foundation for web app development.
How To Deploy A Python Application On A Web?
Deploy a Python application by using a web server like Apache or Nginx. Set up a virtual environment, install dependencies, and configure WSGI for application handling. Use a platform like Heroku or AWS for hosting. Ensure proper security measures and monitor performance for optimal results.
Conclusion
Hosting a Python Flask web application is straightforward. Choose a reliable hosting service. Set up your environment and install Flask. Deploy your application using a service like Heroku or AWS. Test thoroughly to ensure everything works. Regular updates keep your application secure.
Troubleshooting skills are valuable when issues arise. Keep learning to improve your hosting skills. With practice, hosting becomes second nature. Flask is a powerful tool for web development. Building and hosting applications can be rewarding. Experiment with different hosting options.
Find what works best for you. Happy hosting!