
Imagine having the power to share files with anyone, anywhere, at any time. You can transform your web server into a versatile hub for hosting files, making them accessible across the globe.
This guide is crafted just for you, breaking down the process into simple, easy-to-follow steps. Whether you’re a seasoned developer or a curious beginner, unlocking this skill will elevate your online presence. Picture the convenience, the efficiency, and the satisfaction of effortlessly managing your files.
Stay with us, and you’ll discover how hosting files on your web server can be both empowering and straightforward. Ready to dive in? Let’s simplify the complex and put control at your fingertips.
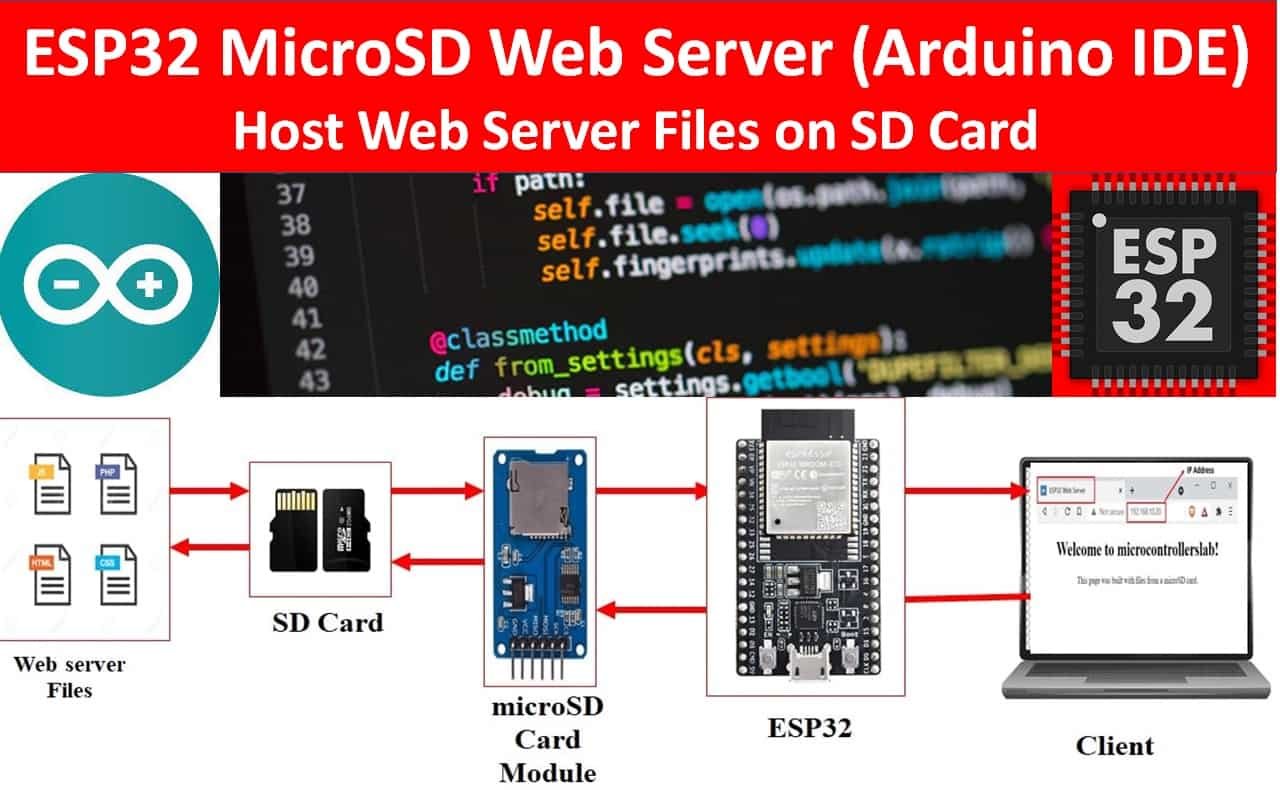
Credit: microcontrollerslab.com
Choosing The Right Web Server
Apache is a very popular web server. It is known for its flexibility. Many people use Apache for their websites. Another option is Nginx. This server is fast and uses fewer resources. It can handle many connections at once. Microsoft IIS is another choice. It works well with Windows. Some people prefer it for their ease of use. LiteSpeed is also popular. It is good for high-traffic sites. Each server has its own features. Choose the one that fits your needs.
Cost is a big factor. Some servers are free, like Apache. Others might cost money. Ease of use is important too. Some servers are simple to set up. Support is another factor. Some servers have lots of help online. Performance matters as well. You want a server that is reliable. Think about security features too. A safe server keeps your files protected. Choose wisely.
Setting Up The Server Environment
First, you need to install a web server software. Apache and Nginx are popular options. Choose one that fits your needs. Download the software from its official website. Follow the installation steps carefully. Make sure you have the latest version. Check for any updates regularly. This helps in keeping your server secure.
After installation, start the server. Open the configuration file. This file is usually a text file. It contains important settings. Set the server’s root directory. This is where your files will be stored. Don’t forget to set the port number. The default is usually 80. Save the changes and restart the server. Your server is now ready to host files.
Uploading Files To The Server
FTP clients help move files to a server. They are easy to use. FileZilla is a popular choice. Download and install the client. Connect to the server by entering details. Use a username and password. Drag and drop files to upload them. Watch the progress bar to see the upload. Files move from your computer to the server.
Command line tools offer another way to upload files. SSH is one method. Open your terminal or command prompt. Type the command to connect to your server. Use login details to access it. Use the scp command to upload files. Type the file path and server address. Press enter and watch the transfer. Check if the file is on the server.
Managing File Permissions
Files have permissions to control access. Read, write, and execute are the main types. Read lets you open a file. Write allows changes. Execute means you can run a file. Permissions are often shown as numbers. For example, 755 means full access for the owner. Others can only read and execute. Knowing these types helps you keep files safe.
Always set permissions carefully. Never give more access than needed. Use chmod to change permissions. Common settings are 755 or 644. 755 lets everyone read, but only the owner writes. 644 is for files not needing execution. Always check who can access your files. Keeping permissions tight helps protect your data.
Securing Hosted Files
Protecting hosted files is essential for web servers. Encrypt files before uploading. Use strong passwords to secure access. Implement firewalls and antivirus software to prevent unauthorized entry. Regularly update server security settings. Monitor activity to catch suspicious behavior early.
Implementing Ssl Certificates
SSL certificates keep data safe. They encrypt information between users and servers. This stops hackers from seeing private details. Websites with SSL show a padlock icon. This icon makes users feel safe. To get an SSL, choose a trusted provider. Follow their steps to set it up. Always check if your SSL is working. This protects your website and visitors.
Protecting Against Unauthorized Access
Unauthorized access can cause big problems. Use strong passwords for all accounts. Change passwords often. Limit access to important files. Use firewalls to block bad traffic. Firewalls act like guards. They keep out unwanted visitors. Regularly update your software. Updates fix security holes. Teach your team about safety online. Everyone should know how to stay safe. This helps keep files secure.
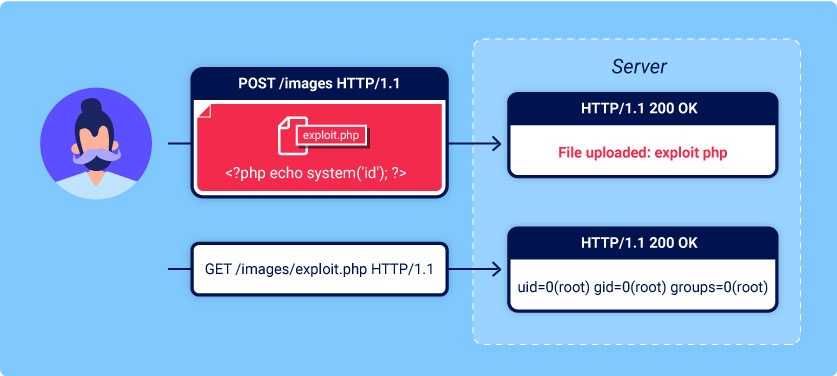
Credit: portswigger.net
Troubleshooting Common Issues
Connection problems can stop your files from loading. First, check your internet connection. Make sure it is stable. Then, ensure the server address is correct. Sometimes, typing errors happen. Firewall settings might block access. Check them too. If you use a router, restart it. This can fix many issues. Also, try clearing your browser cache. Old data can cause problems.
File access errors happen if permissions are wrong. Check the file permissions. Set them correctly. Use the chmod command for this. Files should be readable. Sometimes, the file path is wrong. Double-check it. Ensure the file exists on the server. Also, ensure the file name is correct. It is case-sensitive. Error logs can help too. Look at them for clues.
Monitoring Server Performance
Usage statistics help you understand your server’s activity. They show how many users visit your site. They also show which files are popular. Analyzing these numbers can guide improvements. High traffic times may need more server power. Low usage might mean a need for promotion. Regular checks of these stats ensure optimal performance. Tools like Google Analytics can be helpful here. They provide detailed information easily. Understanding these details keeps your server healthy.
Server resources must be used wisely. Memory, CPU, and storage are key. Each has a limit you should respect. Overuse can slow down your site. It can even cause crashes. Regular monitoring helps avoid issues. Adjust settings to fit current needs. Remove unused files to free up space. Balance load during peak times. Proper use keeps your server running smoothly. Efficient resource management enhances user experience.

Credit: hstechdocs.helpsystems.com
Frequently Asked Questions
How To Host A File On A Webserver?
To host a file on a webserver, choose a reliable hosting provider. Upload your file using FTP or a control panel. Ensure the file permissions are set correctly for public access. Verify the file URL is accessible via your browser.
Regularly update and backup your hosted files for security.
What Is The Process Of Putting Files On A Web Server?
To upload files to a web server, connect using FTP or a web hosting panel. Select files, and transfer them to the server’s designated directory. Ensure file permissions are set correctly for accessibility. Verify by accessing the files through a browser.
Do You Need A Server To Host Website Files?
Yes, a server is essential to host website files. It stores and serves content to visitors. Cloud hosting or shared servers are popular options. Servers ensure your website is accessible online. They handle data requests, security, and uptime. Choose reliable hosting for optimal performance and user experience.
What Is The Best File Hosting Site?
Dropbox is a popular file hosting site due to its user-friendly interface and reliable cloud storage. Google Drive offers seamless integration with Google services. Microsoft OneDrive provides excellent collaboration tools. Each platform has unique features, so the best choice depends on your specific needs and preferences.
Conclusion
Hosting files on a web server can seem tricky at first. But with practice, it becomes easier. Start by choosing the right server and software. Ensure your files are organized well. Keep security in mind always. Make regular backups to avoid data loss.
Test your setup to ensure it works smoothly. With these steps, you can host files efficiently. Remember to stay updated with new technologies. This will help you improve your hosting skills. Hosting files on a web server can be simple.
Take the time to learn and implement correctly.


