Are you ready to unleash your ASP.NET web application into the world? Hosting your application on IIS7 might seem like a daunting task, but it doesn’t have to be.
Imagine the satisfaction of seeing your creation live and accessible to users everywhere. Whether you’re a seasoned developer or just starting out, understanding the hosting process can open doors to endless possibilities. You’ll learn how to configure your server, deploy your application, and ensure seamless performance.
Stay with us as we guide you through each step, making it simple and straightforward. Your web application deserves to shine, and you deserve the confidence of knowing how to make it happen. Let’s dive in!
Prerequisites For Hosting
Your computer needs specific requirements. Ensure it has Windows Server 2008. The RAM should be at least 2 GB. The processor must be 1.4 GHz or faster. Check the hard disk space; it should be 10 GB or more. These are the basic needs.
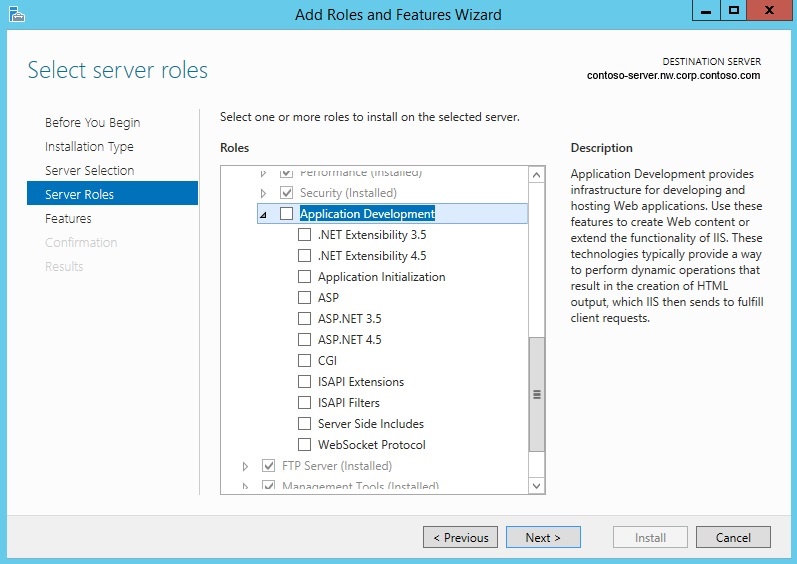
Open the Control Panel. Find Programs and Features. Click on Turn Windows features on or off. A list will appear. Look for Internet Information Services (IIS). Check the box next to it. Press OK to install. Wait for the process to finish. Once done, IIS7 is ready on your computer.
Configuring Iis7
First, open IIS Manager on your computer. Find the Application Pools section in the left panel. Click on it to open. Now, choose Add Application Pool from the Actions pane. Give your pool a name. Make it simple and clear. Choose .NET Framework version. Select Integrated as the pipeline mode. Click OK to create your pool. Your application pool is ready now.
Go to your application folder on the computer. Right-click on it. Choose Properties from the menu. Find the Security tab. Click on Edit to change permissions. Add the user IIS_IUSRS. Give this user Read and Execute rights. This helps the server run your application safely. Click OK to save changes. Your security settings are now set.
Deploying Asp.net Application
First, publish your ASP.NET application. Use the Publish Wizard in Visual Studio. Choose File System as the target. This creates a folder with your application files. These files are ready for the server. Double-check your web.config settings. Ensure they are correct for production. Make a copy of the folder. Keep it safe on your computer.
Use an FTP client to upload files. FileZilla is a good choice. Enter your server’s FTP details. Copy the published files to the server’s wwwroot folder. Verify that all files are uploaded. Do not skip any files. Check permissions on the server. Make sure files are readable. Now your app is on the server. Ready to run.
Credit: learn.microsoft.com
Configuring Application In Iis7
First, open IIS Manager on your computer. Look for Sites in the left panel. Right-click on Sites. Choose Add Website. A new window will pop up. Enter your Website Name. Choose the Physical Path to your web files. Pick a Port Number. Click OK. Your website is now created. This is how you set up a basic site.
Navigate to your new website in IIS Manager. Click on it. You will see Basic Settings on the right. Select it. Here, you can set the Application Path. Click the … button. Find your project folder. Click OK. Now, your application path is set. This tells IIS where to find your web files. You have set the path correctly.
Managing Application Settings
The Web.config file is important for your app. It stores key settings. You can change these to manage your app. Make sure the settings are correct. Check the paths and URLs. These must match your server. Double-check your file before you save. This helps avoid errors. Always keep a backup of your Web.config file. You might need it later.
Connection strings link your app to a database. They are crucial for data access. Place them in the Web.config file. Use secure strings to protect data. Avoid plain text for security reasons. Test your connection to ensure it works. A wrong string can cause issues. Keep your strings up to date. Update them if the database changes. This keeps your app running smoothly.

Credit: www.amazon.com
Testing And Troubleshooting
Run the application to check if it opens well. Ensure all features work as expected. Look for any missing files. Missing files can cause errors. Test with different browsers for compatibility. Watch for slow loading times. Slow times may need optimization.
Errors can appear in various forms. 404 error means a missing page. 500 error indicates server issues. Check the web.config file for mistakes. Ensure all paths are correct. Look for typos in code. Typos can cause unexpected errors. Use logs to identify error sources. Logs help trace problems fast.
Optimizing Performance
Hosting an Asp. Net web application in IIS7 boosts performance by efficiently managing server resources. Ensure seamless deployment through proper configuration, optimizing speed and security.
Enabling Compression
Compression makes your web pages load faster. It reduces file size. You should enable it in IIS7. Use Gzip for this task. It helps to compress HTML, CSS, and JavaScript files. This way, users get a faster experience. Faster loading keeps visitors happy. It also helps your server work better.
Managing Caching
Caching stores data for quick access. It helps reduce server load. It also speeds up page delivery. Set cache headers correctly in IIS7. Use cache control settings. This tells browsers how long to keep files. Good caching improves site performance. It saves time for users. It also saves resources for servers.
Credit: weblogs.asp.net
Frequently Asked Questions
How To Host Asp.net Website In Iis 7 Step By Step?
Open IIS Manager. Add a new site under “Sites. ” Set a site name and physical path. Choose a host name. Bind the site to a port. Select “ASP. NET v4. 0” in Application Pool. Click “OK” to complete the setup.
Deploy your ASP. NET files to the specified folder.
How To Host An Asp.net Application?
Choose a Windows server hosting provider supporting ASP. NET. Upload your application files via FTP. Configure IIS to manage your app. Ensure database connections and settings are correct. Test your application to ensure it’s running smoothly.
How To Set Up Iis For Asp.net Application?
To set up IIS for an ASP. NET application, install IIS via Windows Features. Configure a new site, set the application pool to. NET version, and point it to your application folder. Ensure necessary permissions and bind the site to a port.
How To Run Asp File On Iis Server?
Install IIS via Control Panel. Enable ASP under IIS features. Place your ASP file in the “wwwroot” directory. Configure site in IIS Manager. Test ASP file by accessing it in a browser using localhost URL.
Conclusion
Hosting ASP. NET web applications in IIS7 is straightforward. Follow the steps carefully. Ensure your server meets requirements. Check your application’s compatibility. Configure settings correctly. Test thoroughly before going live. Troubleshooting helps fix common issues. Keep your server updated for security.
Regular monitoring ensures smooth performance. Consider using online resources for extra help. Hosting can boost your application’s accessibility. It helps reach a wider audience. With practice, hosting gets easier. Make sure to back up your data regularly. Happy hosting!