Are you ready to take your ASP.NET web application live on the internet? If you’ve been wondering how to share your creation with the world, you’ve landed in the right place.
This guide will walk you through the steps to host your ASP. NET web application effectively and efficiently. Imagine the satisfaction of seeing your hard work accessible to users across the globe. By the end of this article, you’ll have the confidence and knowledge to get your application online.
Let’s make sure your web application not only meets your expectations but also delivers a seamless experience to your users. Dive in, and let’s turn your vision into reality!

Credit: dotnettutorials.net
Preparation For Deployment
Before deploying, check your system. Ensure it meets basic needs. Your server should have a good processor. The minimum should be dual-core. Memory is key. At least 4GB RAM is needed. Storage matters too. You need enough space for your application files. Make sure your server can handle web traffic. Check network speed. It should be fast enough. A stable internet connection is a must.
First, install necessary software. Begin with Visual Studio. This helps in building applications. Then, install SQL Server. It manages your database. Next, get IIS for hosting. This helps serve web pages. Configure your server. Ensure software runs smoothly. Update regularly. This improves performance and security. Keep a backup of your data. Always have a recovery plan.
Credit: www.freecodespot.com
Configuring Iis
Setting up IIS allows you to host an ASP. NET web application on the internet. Start by installing IIS on your server and configuring the necessary settings. Ensure your application files are placed in the correct directory, and adjust permissions to enable public access.
Setting Up Iis
First, open the Control Panel on your computer. Find the Programs option and click it. Then, choose Turn Windows features on or off. Look for Internet Information Services (IIS) in the list. Make sure to check the box next to it. Click OK to install IIS. This allows your computer to serve web pages.
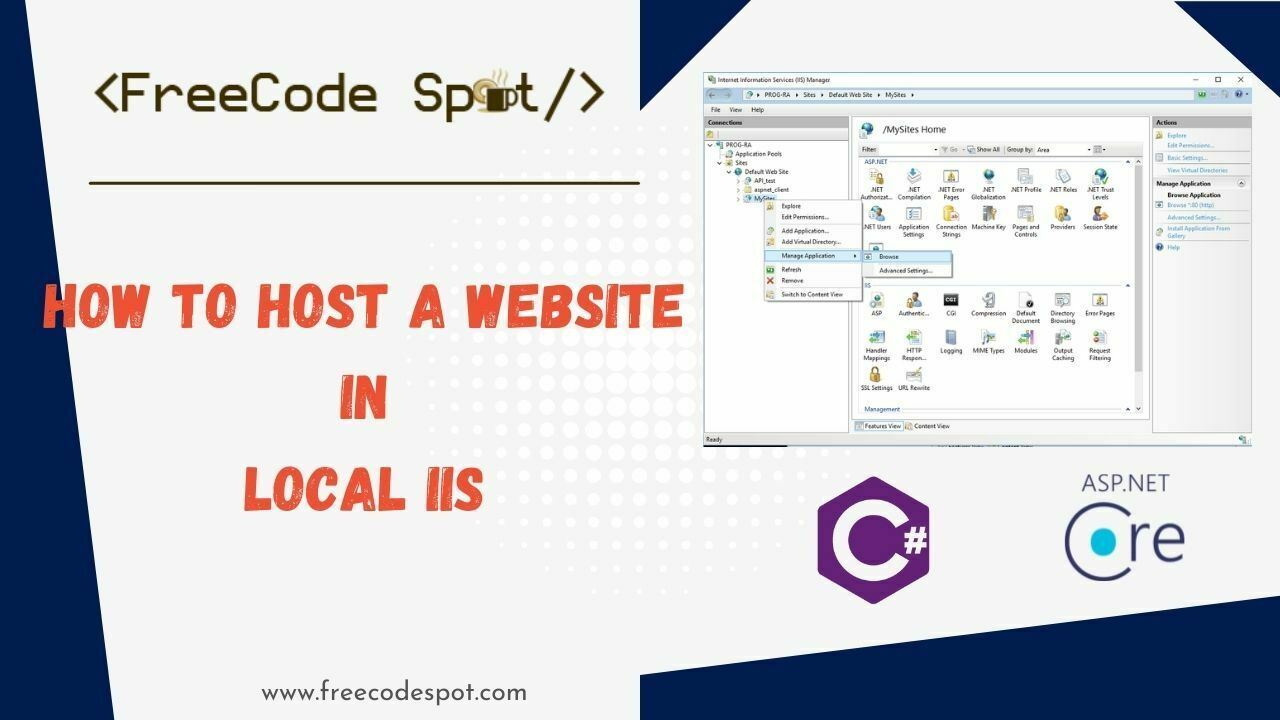
Creating A New Website
Open the IIS Manager from the Start menu. Right-click on Sites in the left pane. Choose Add Website. Enter a name for your website. Set the physical path to your web app folder. Select a port number for your website. Click OK to create the website. Now, IIS knows where your files are.
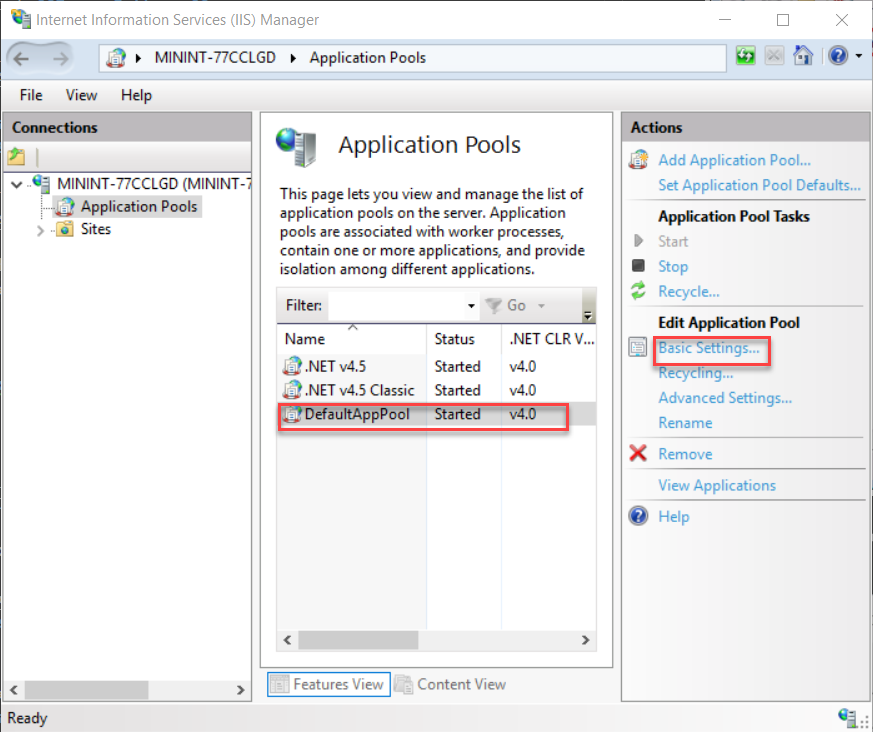
Configuring Application Pool
Go to the Application Pools section in IIS Manager. Right-click and select Add Application Pool. Name your application pool. Choose the .NET Framework version. Set the Managed Pipeline Mode to Integrated. Click OK to finish. This ensures your web app runs smoothly.
Deploying Asp.net Application
Open Visual Studio and load your project. Click on Build in the menu. Choose Publish. A window will pop up. Select a target for your application. You can publish to a folder or a web server. Click Next. Choose your publish method. For example, use FTP for a web server. Enter the required details and click Finish. Your project files are now ready.
Use FTP software like FileZilla. Connect to your server using your login details. Find the published files on your computer. Drag and drop these files to the server folder. Ensure all files are copied without errors. Check permissions if needed. Once copied, your web app should be live. Test the app in a web browser.
Database Setup
Connection strings link your app to the database. Find them in the web.config file. They tell your app where the database is. Use the correct server name and database name. Check the username and password too. Make sure they are correct. Test the connection to see if it works. Fix any errors you find. This is important for your app to run smoothly.
Migrating means moving your database to a new place. First, back up your current data. This keeps it safe. Then, set up your new database. Use tools like SQL Server Management Studio. Import the old data into the new database. Check if all data is there. Fix any problems you see. Ensure the app reads data from the new database. This step is key for keeping your app data safe.
Security And Permissions
Firewalls protect your web application from threats. Set rules to allow only trusted traffic. Block suspicious connections. Ensure ports used by your application are open. Close all unused ports. Monitor traffic regularly. This keeps your application safe. Update firewall settings often. Regular updates improve security. Protect sensitive data from hackers.
Permissions control who can access files. Give access only to necessary users. Limit folder permissions to essential tasks. Set read, write, execute permissions carefully. This prevents unauthorized changes. Regularly review and update permissions. Keep sensitive data secure. Use strong passwords for user accounts. Strong passwords add extra security. Protect important files from deletion.
Dns And Domain Configuration
First, choose a domain name. Make it simple and easy to remember. Visit a domain registrar. Popular choices include GoDaddy and Namecheap. Enter your chosen domain name. Check its availability. If it’s available, proceed to register. Fill in your details. Pay the registration fee. Your domain is now registered.
Open your registrar’s website. Find the DNS settings option. Enter your web server’s IP address. This links your domain to your server. Set up record types. The common ones are A, CNAME, and MX. Save your changes. Wait for the DNS to propagate. This may take up to 48 hours. Once done, your domain points to your server.
Testing The Deployment
Deploying an ASP. NET web application online requires careful testing. Ensure the site functions correctly by checking links, forms, and navigation. Verifying security settings and database connectivity is also crucial to provide a smooth user experience.
Accessing The Application
Enter the app URL in your browser’s address bar. The homepage should appear if everything is correct. Check if all links and buttons work. Ensure images and styles load properly. Try different devices and browsers. This helps find any display issues. Make sure that login works fine. Test forms and submit data. Verify that the database is updating. This confirms proper app function.
Debugging Issues
Errors can occur during deployment. Check server logs for clues. They often show error details. Use browser developer tools. They help find JavaScript errors. Verify server settings. Ensure they match app requirements. Check firewall rules. They might block necessary connections. Update software libraries if needed. Bugs might be fixed in new versions. Contact support if problems persist. They might offer additional help.
Credit: learn.microsoft.com
Monitoring And Maintenance
Keep your ASP. NET web application running smoothly with regular monitoring and maintenance. Check server performance and update software. Ensure security patches are applied promptly to protect your site.
Performance Monitoring
Keeping an eye on your web app’s performance is crucial. Use tools to check its speed and efficiency. Watch for any slowdowns. Slow apps can upset users. Check server health often. Servers need to be strong and stable. Track resource usage like memory and CPU. Ensure they are not overloaded. This helps keep the app running smoothly.
Regular Updates
Update your app regularly. Fix bugs to improve the app. Bugs can make the app act oddly. Add new features if needed. New features keep users interested. Security updates are very important. They protect the app from attacks. Updating software libraries is also key. This ensures everything works well together. Regular updates help maintain a strong app.
Frequently Asked Questions
How To Host An Asp.net Application?
Host an ASP. NET application by choosing a reliable web hosting provider. Install necessary software like IIS. Upload your files using FTP or a web interface. Configure database connections. Set up the domain name and ensure SSL for security. Regularly update and monitor for performance optimization.
How To Deploy Asp.net Web Application On Internet Information Server Iis?
Open IIS Manager, create a new website, and select the application’s folder. Configure bindings and set default documents. Ensure. NET version compatibility and permissions. Start the website to deploy your ASP. NET application on IIS.
Can You Host Asp.net For Free?
Yes, you can host ASP. NET for free. Platforms like Azure offer free tiers for hosting ASP. NET applications. Explore options like GitHub Pages for static content. Consider trial offers from other hosting services. Always check resource limits and conditions for free plans.
How To Host A Web Application Locally?
Install a local server like XAMPP or WAMP. Place your web application files in the server’s root directory. Start the server and access your application via a web browser using “localhost” followed by the port number. Ensure necessary software like PHP, Python, or Node.
js is installed if needed.
Conclusion
Hosting an ASP. NET web application is straightforward. Start with choosing a reliable hosting provider. Configure your server settings correctly. Upload your application files using FTP or a control panel. Ensure your database connections are secure. Test your application thoroughly before going live.
Keep your software updated to avoid security risks. Monitor performance regularly for optimal user experience. Troubleshoot issues promptly to maintain functionality. With these steps, your ASP. NET web application runs smoothly on the internet. Happy hosting!