
Are you ready to take your web app to the next level by hosting it on Microsoft Azure? Imagine a world where your app runs smoothly, scales effortlessly, and reaches users all around the globe.
Azure makes this possible, and it’s more accessible than you might think. You don’t need to be a tech wizard to get started. In this guide, we’re going to demystify the process, showing you step-by-step how to host your web app on Azure.
By the end, you’ll have the confidence and knowledge to deploy your application, ensuring it performs at its best. Let’s dive in and unlock the potential of your web app together!
Credit: gunnarpeipman.com
Understanding Azure Hosting
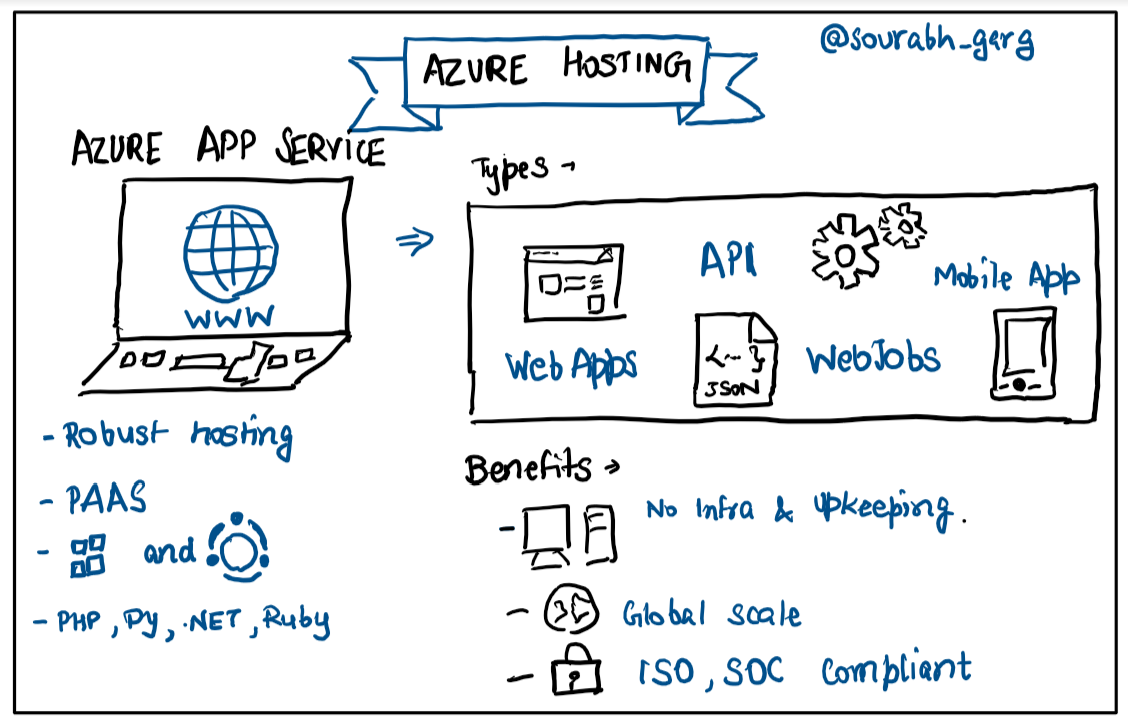
Azure is a cloud service by Microsoft. It helps host web apps. Many people use it for its flexibility. You can scale your app easily. This means your app can grow with more users. Azure also offers security. Your app’s data stays safe with Azure. Another great feature is its global reach. Your web app can be accessed from anywhere. Azure provides many tools for developers. These tools help in building and testing apps.
Hosting on Azure is cost-effective. You only pay for what you use. This helps save money. Azure’s support team is helpful too. They assist when you face problems. With Azure, you get a strong platform for your web app. It’s reliable and trusted by many businesses. Start hosting and see the benefits.
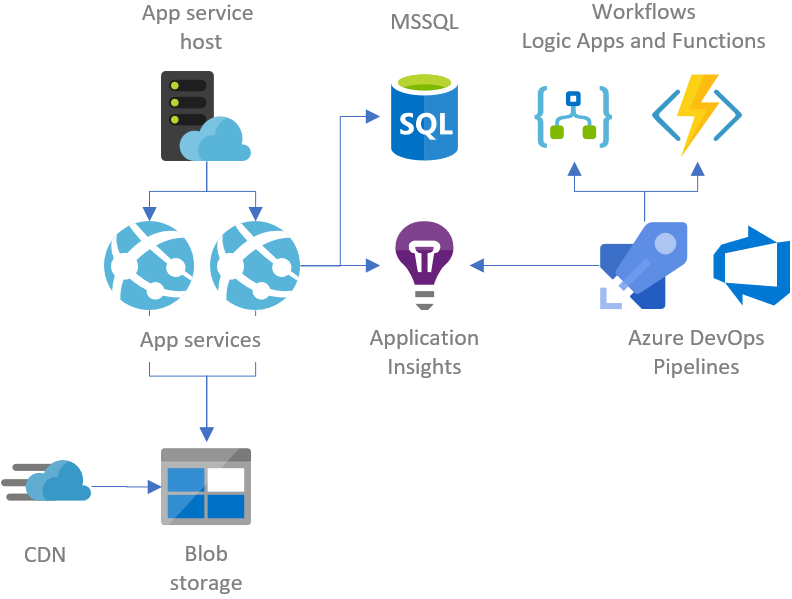
Credit: faun.pub
Setting Up Your Azure Account
First, visit the Azure website and find the sign-up page. Enter your email and password. This makes your Azure account. You get a free trial. It offers $200 credits for 30 days. Check your email for a confirmation link. Click it to verify your account. Now, you have an Azure account ready.
Azure has many pricing plans. Some are Pay-As-You-Go plans. Others are subscription-based. Pay-As-You-Go means you only pay for what you use. Each plan has different features. Choose one that fits your needs. It is important to monitor your usage. This helps to avoid extra charges.
Preparing Your Web App
Picking the right app framework is important. It helps your app run well. Some popular choices are Node.js, Python, and Java. Each has its own benefits and uses. Think about what your app needs. This will help in making the best choice.
Make sure your app is compatible with Azure. Check the Azure documentation for supported frameworks. This ensures your app will work smoothly. Azure offers many tools to help. Use them to test your app before hosting.
Configuring Azure Services
Choose the right App Service Plan for your web app. Consider the size and performance needs of your app. Basic plans are good for small apps. Premium plans are better for large, busy apps. The right plan helps your app run smoothly. It also helps keep costs under control. Look for plans with scalability options. They allow your app to grow as needed. Ensure the plan matches your budget and app needs.
Databases and storage are key for web apps. Azure offers many database choices. Choose one that suits your app’s data needs. SQL Database is popular for structured data. Cosmos DB works well for diverse data types. Storage options include Azure Blob Storage. It is great for storing files and media. Make sure your data is secure and easy to access. This setup helps keep your app fast and reliable.
Deploying Your Web App
Start by logging into the Azure Portal. Choose your subscription and resource group. Click on Create a resource and pick Web App. Fill in the necessary details like the App name and Runtime stack. Click Review + Create and then Create. Your app is ready in minutes. This method is simple for beginners. No coding skills needed.
Open your command line interface. Install the Azure CLI if not already. Log in using az login. Create a resource group with az group create. Use az webapp up to deploy your app. This command is quick and efficient. Ensure your app files are ready. Azure CLI is best for developers. It provides more control and flexibility.
Testing And Monitoring
Setting up a web app on Azure involves testing and monitoring to ensure peak performance. Use Azure’s tools to track app behavior, detect issues, and optimize for efficiency. Proper monitoring guarantees a seamless user experience and reliable service.
Conducting Initial Tests
Start by checking your web app on Azure. Make sure it loads correctly. Look for errors or problems. Test different features. Try logging in or uploading files. Use different devices and browsers. Keep notes on what works well. Fix any issues you find. Ask others to test too. This helps catch more problems.
Setting Up Monitoring And Alerts
Set up monitoring for your app. Use Azure tools for this. Watch app performance. Check speed and uptime. Set alerts for issues. Alerts notify when things go wrong. You can fix problems fast. This keeps your app running smoothly. Regular checks prevent bigger issues.
Managing And Scaling
Explore the ease of hosting a web app on Azure. Manage resources efficiently with Azure’s comprehensive tools. Scale your application seamlessly to meet growing user demands.
Scaling Your App As Needed
Azure helps your app grow when more people use it. Scale up to handle more users. Scale down to save costs. Adjust resources based on demand. This keeps your app running smoothly. Use Azure’s tools to manage scaling. Automation can help with this. Choose the right size for your app. This will help to avoid wasted resources. Azure’s flexibility makes scaling easy. Keep an eye on app performance. Make changes as needed. This ensures user satisfaction.
Managing Resources Efficiently
Azure helps manage resources well. Use Azure’s dashboard to see usage. This helps you understand what is needed. Avoid using too many resources. This saves money and keeps apps fast. Monitor usage regularly. Adjust settings when necessary. Optimize resources for efficiency. Azure tools help in this process. They make managing easy. Choose the right resources for your app. This ensures smooth operation. Keep apps running at their best with Azure.
Troubleshooting Common Issues
Deployment errors can cause stress. First, check your connection settings. Make sure they are correct. Next, verify the resource group. It should be active. Also, inspect the app service plan. Ensure it has enough resources. Lastly, review your code. Small errors can cause big problems. Fix them carefully.
Slow apps annoy users. Boost performance by checking the server location. Choose a location close to users. Increase memory and CPU if needed. They help the app run faster. Use caching for frequent data. It speeds up delivery. Monitor the app health. Regular checks prevent issues.

Credit: build5nines.com
Frequently Asked Questions
Can I Host My Own Website On Azure?
Yes, you can host your own website on Azure. Azure offers various services like Virtual Machines and App Services for hosting. It provides scalability, security, and flexibility. You can choose the hosting plan that fits your needs and budget. Azure’s global network ensures fast and reliable access to your website.
Is The Azure Web App Free?
Azure offers a free tier for web apps with limited features. Users can host small applications with basic resources. For advanced features and scalability, paid plans are available. Pricing depends on the chosen plan and usage. Always check the latest Azure pricing page for updated information.
Is Azure Good For Hosting A Website?
Azure is excellent for hosting websites. It offers scalability, reliability, and robust security features. Users benefit from seamless integration with various Microsoft services. Azure’s global data centers ensure fast performance and minimal downtime. Its flexible pricing plans cater to businesses of all sizes, making it a top choice for web hosting.
How To Create A Web Service In Azure?
To create a web service in Azure, sign in to the Azure portal. Click “Create a resource” and select “Web App”. Configure the app settings, choose a hosting plan, and deploy your code. Monitor and manage your web service using Azure tools.
Conclusion
Hosting your web app on Azure is a smart choice. Azure offers reliability and scalability. Start with a simple setup. Grow as your needs expand. Azure’s tools make management easy. Security features protect your data. Support is available whenever you need help.
With Azure, your web app can thrive. Explore Azure’s features. Make informed decisions. Azure’s platform adapts to various needs. It’s a solid option for developers. Consider Azure for your next project. Build, deploy, and succeed with Azure. Your web app deserves a stable home.
Azure provides that foundation.


