Are you ready to take your .NET web application live for the world to see? Hosting it on IIS (Internet Information Services) can be a game-changer.
You might be wondering about the steps involved and how to ensure a smooth deployment. This guide is crafted just for you, breaking down the process into simple, actionable steps. Imagine impressing your users with fast loading times and seamless performance, all thanks to IIS.
We’ll cover everything from installation to optimization, so you can confidently host your application. Dive in, and let’s get your web app up and running!

Credit: www.binaryintellect.net
Preparing Your Environment
Ensure your computer meets system requirements. Windows operating system is necessary. Check for Windows 10 or newer versions. Ensure adequate RAM and disk space. At least 2GB RAM is recommended. 5GB free disk space is ideal. A stable internet connection is useful.
To install IIS, open the Control Panel. Click on Programs. Then select Turn Windows features on or off. Look for Internet Information Services. Check the box next to IIS. Click OK to install. Wait for the installation to complete. Restart your computer if needed.
Credit: www.freecodespot.com
Configuring Iis For .net Applications
Open Control Panel on your computer. Go to Programs. Click on Turn Windows features on or off. A list will appear. Find Internet Information Services (IIS). Check the box next to it. Expand World Wide Web Services. Also, check Application Development Features. Ensure ASP.NET is checked. This lets .NET apps run. Press OK to save changes. Wait for it to install. Your IIS is now ready.
Open the IIS Manager tool. Find Application Pools on the left. Click on it. See a list of pools. Right-click and choose Add Application Pool. Name your pool. Choose the .NET version needed. Keep Managed pipeline mode set to Integrated. Click OK to create it. Your pool is ready. Use it for your web app. It helps in managing resources well.
Deploying The .net Application
First, open your .NET project in Visual Studio. Click on “Build” in the menu. Then select “Publish”. Choose a folder to save your files. This creates a package. The package includes all necessary files. Ensure your code is bug-free. This will make hosting easier.
Connect to the server using an FTP client. Use simple tools like FileZilla. Enter your server’s IP address. Also, input your username and password. Navigate to the “wwwroot” folder on the server. Drag and drop your published files there. Ensure all files are uploaded. Check for any missing files. This step is crucial. It ensures your application runs smoothly.

Credit: learn.microsoft.com
Setting Up Application Bindings
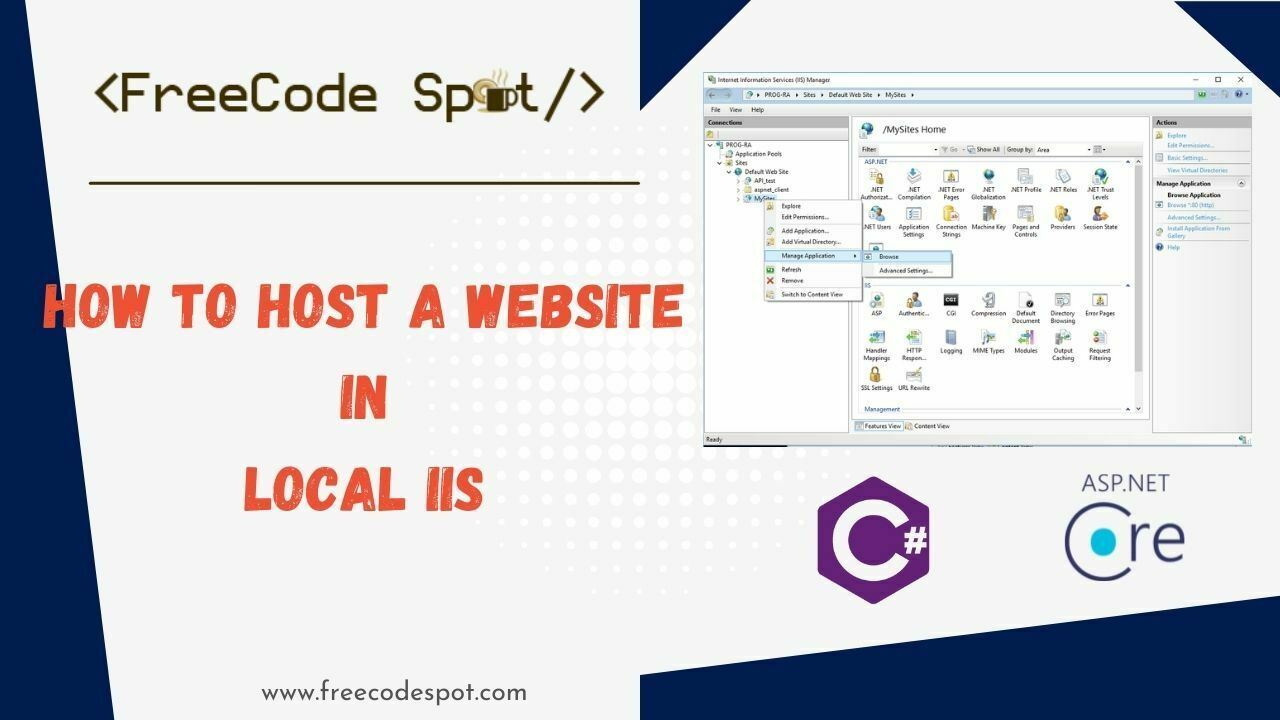
The first step is to open the IIS Manager on your computer. Find your site and click on it. On the right side, select Edit Bindings. A new window will open. Here, you can add or edit bindings.
In the bindings window, click Add to create a new binding. Choose HTTP or HTTPS for type. Enter the host name. This is the name people type in the browser. Next, choose a port. Port 80 is common for HTTP. For HTTPS, use port 443.
Ensure the host name is correct. Double-check the port number. Press OK to save your changes. Your site should now be live.
Managing Security Settings
HTTPS makes your site safe. It protects data from hackers. Use an SSL certificate. This encrypts the data. Install it on your server. Ensure it is active. Test your site with HTTPS. Make sure all pages load securely. Redirect HTTP traffic to HTTPS. This keeps all connections secure.
Authentication checks who is accessing the site. Authorization decides what they can see. Use strong passwords. Limit access to important areas. Set up roles. Assign users to roles. This controls their permissions. Use Windows Authentication. This is secure and reliable. Regularly update your user lists. Remove users who no longer need access.
Testing The Hosted Application
Hosting a. NET web application in IIS involves setting up the server environment. Ensure IIS is installed and configured properly. Deploy the application files, configure application pools, and set up necessary bindings for seamless access.
Verifying Application Functionality
Check if the application works as expected. Open a web browser. Enter the URL of your application. Press enter. The application should load without errors. Try clicking on buttons. Navigate through different pages. Ensure everything works smoothly. Pay attention to any error messages. They might show up on the screen.
Confirm that data is saving correctly. Test forms by entering data. Then, submit it. Verify the data appears as expected. Check if all images load properly. Also, ensure videos play without issues.
Troubleshooting Common Issues
Sometimes, things might not work right. Check your internet connection. Make sure it’s stable. Clear your browser’s cache. It might help fix some issues. Look at the IIS logs for errors. They provide clues on what’s wrong.
Ensure the application pool is running. Restart it if needed. Verify all services linked to the application are active. If issues persist, ask someone with more experience. They might help you fix the problem.
Maintaining The Application
Hosting a. NET web application in IIS involves configuring the server, deploying files, and setting permissions. Regular updates ensure security and performance. Monitoring and logging help maintain application health and user satisfaction.
Regular Backups
Backups keep your data safe. Create backups often to prevent data loss. Use automated tools to help. Store your backups in different places. This way, if one copy is lost, others remain. Check your backups. Make sure they work. A good backup plan saves time and stress.
Monitoring Performance
Keep an eye on your app’s performance. Watch for slowdowns or errors. Use performance tools to help monitor. These tools can show traffic spikes or resource issues. Fixing problems early is key. This helps the app run smoothly. Happy users stay longer.
Frequently Asked Questions
How To Host A .net Web Application In Iis?
Install IIS and enable the ASP. NET feature. Deploy your. NET application to the server. Use IIS Manager to create a new site or application. Set the application pool to use the correct. NET version. Ensure necessary permissions and configurations are set.
Test the application to confirm successful hosting.
How To Deploy .net Framework Application On Iis?
Deploy. NET Framework app on IIS by installing the framework, configuring application pool, and setting up a site. Ensure the app uses the correct framework version and permissions. Use IIS Manager for configuration and verify the application is running correctly.
How To Run A Web Application From Iis?
To run a web application from IIS, install IIS on your server. Add a website in IIS Manager. Set the physical path to your application folder. Configure bindings for domain and port. Ensure the application pool is correctly configured. Start the website to launch your web application.
How To Deploy A .net Application?
Deploy a. NET application by building it in Visual Studio, then publish using IIS or Azure. Configure necessary settings, test thoroughly, and ensure all dependencies are included. Monitor post-deployment for performance and errors. Regular updates and maintenance keep your application running smoothly and securely.
Conclusion
Setting up a. NET web app in IIS is straightforward. Follow the steps, and your application will run smoothly. Ensure your server meets all requirements. Configure settings carefully to avoid issues. Regularly update and maintain your application. This keeps it secure and efficient.
Testing your setup is essential. It helps identify and fix potential problems. With patience and practice, hosting becomes easier. Remember, a well-hosted application enhances user experience. Happy hosting!