
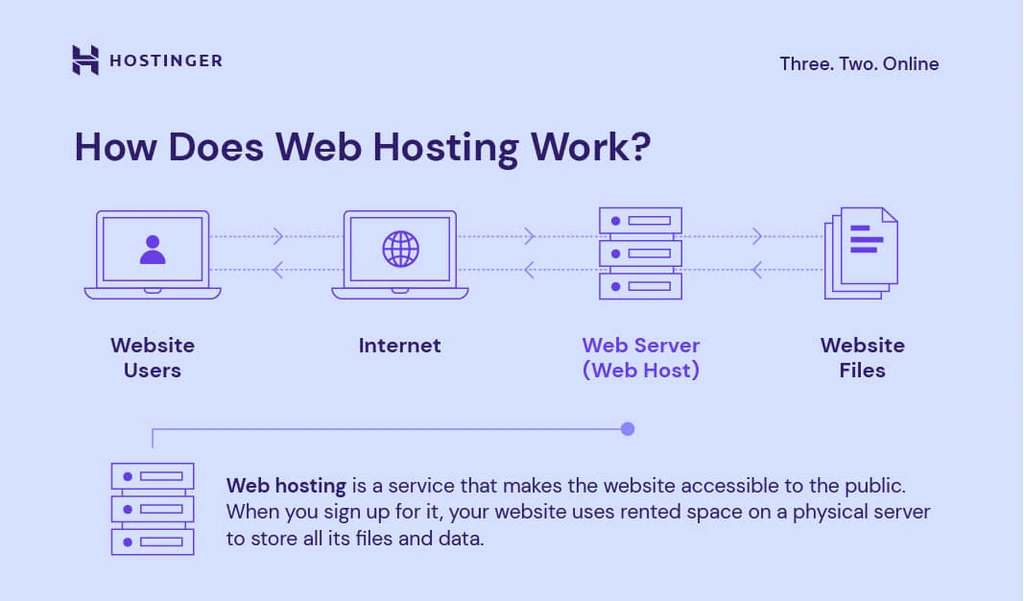
Have you ever wondered how websites are accessible 24/7, no matter where you are? The answer lies in web hosting servers.
Understanding how to create your own web hosting server can open up a world of possibilities. Imagine having complete control over your website’s performance, security, and scalability. This guide will walk you through the process, step-by-step, making it simple and straightforward.
Whether you’re a tech enthusiast or a business owner looking to optimize your online presence, setting up your own server could be a game-changer. Stay with us, and you’ll soon discover how empowering it is to have your website running on your terms.
Choosing The Right Hardware
Selecting the right hardware is crucial for setting up a reliable web hosting server. Focus on components like a powerful processor, sufficient RAM, and ample storage. Ensure your setup can handle expected traffic and provide a smooth user experience.
Server Specifications
A web hosting server needs strong specifications. Processor speed is crucial. It impacts how fast your server works. RAM size matters too. It helps in handling multiple tasks. Bigger RAM means smoother performance. Storage space is another key feature. It holds all your website data. Choose between HDD or SSD. SSDs are faster and more reliable. Network connectivity must be fast. It ensures quick data transfer. Good server specifications lead to a better experience.
Power And Cooling Requirements
Servers need power to run. Make sure you have a stable power supply. Avoid power cuts with backup systems. Cooling keeps your server safe. Heat can damage your hardware. Use fans or cooling systems to control temperature. Proper cooling extends hardware life. Monitor temperature regularly. It prevents overheating issues. Keep the server room cool and clean. Power and cooling are vital for server health.
Selecting The Operating System
Choosing an operating system is important. Linux is open-source and free. Windows is user-friendly but costs money. Linux is stable and secure. It’s popular for web servers. Windows is good for software support. It works well with Microsoft tools.
Begin with downloading the OS. Follow the setup instructions. For Linux, create partitions. For Windows, select the installation type. Both need network configuration. Ensure you have a strong password. Regular updates keep the server safe.
Installing Web Server Software
Apache and Nginx are two popular web server options. Both are powerful and reliable. Apache is older and has a lot of features. It is great for custom setups. Nginx is newer and faster. It handles many requests at once. This makes it good for busy sites.
Apache uses a process-based model. Each request gets its own process. Nginx uses an event-driven model. It can handle many requests with one process. This makes it faster. Both servers are open-source. This means they are free to use.
Begin by installing the web server software. You can install Apache or Nginx. Use the package manager of your operating system. Configure the server after installation. Set the document root. This is where your files will go. Configure the domain name settings. This lets users find your site. Keep your configuration files organized. This helps with troubleshooting. Both Apache and Nginx have good documentation. They can guide you through setup.
Setting Up Domain And Dns
Choosing a domain name is important. Pick a name that matches your website’s purpose. Use a domain registrar to buy your domain. Popular registrars include GoDaddy and Namecheap. Ensure the name is available before purchasing. Prices vary based on popularity and length. Once you buy it, you own the name for a year. You can renew it every year. Keep your domain simple and easy to remember. Avoid using numbers and special characters. They can confuse visitors.
DNS stands for Domain Name System. It connects your domain name to your hosting server. First, find your DNS settings in your domain registrar account. You will need the hosting provider’s DNS records. These are usually two nameservers. Enter them in the DNS settings. This process can take some hours to work. Once done, your domain will point to your server. Check your website to see if it loads correctly. DNS settings are crucial for website functioning.
Securing Your Server
A firewall is a safety tool for your server. It blocks bad traffic. Only good traffic can come in. Set up rules for your firewall. These rules decide what traffic can pass. This keeps your server safe. You can use free or paid firewall software. Choose what fits your needs best. Keep your firewall updated. Updates fix security holes. This makes your server more secure. Remember, a strong firewall is a must.
An SSL certificate protects your data. It makes a secure link between server and user. Without SSL, data can be stolen. Websites with SSL show a padlock icon. This tells users the site is safe. Get an SSL from a trusted source. Some SSLs are free, like Let’s Encrypt. Others are paid, but offer more features. Install SSL to encrypt data and protect your users. Always renew SSL before it expires. This keeps your site secure.
Credit: www.hostinger.com
Database Integration
Integrating a database is essential when creating a web hosting server. It ensures data is stored securely and accessed efficiently. This integration helps manage and retrieve data seamlessly for websites hosted on the server.
Choosing A Database
Selecting the right database is crucial. It stores all website data. Many options exist like MySQL and PostgreSQL. Think about your project needs. Some databases are fast. Others handle big data well. Look at community support. Good support helps solve problems quickly. Consider security features too. Secure databases protect your data. Choose wisely to avoid issues later.
Connecting To The Web Server
Linking the database to your web server is key. Use reliable software for this task. Many tools make this easy. Check compatibility with your server. Compatible tools work better. Follow the setup guide carefully. Guides provide step-by-step help. Ensure settings are correct. Proper settings prevent errors. Keep connection details safe. Never share passwords or keys.
Managing User Accounts
Creating user accounts is essential for managing a web hosting server. Assign each user specific permissions to ensure security. Easy account management helps maintain server organization and efficiency.
Creating User Profiles
Creating user profiles is important. It helps keep track of users. Each user gets a profile. This profile has their name. It also has their email and password. User profiles help organize information. They make it easy to manage users. Profiles store important data safely. This prevents unauthorized access. Users can change their profiles. They can update their password. They can also change their email. Profiles are easy to create. Simple steps are required. Make sure information is correct. Always check for errors.
Access Control
Access control keeps your server safe. It helps manage who can see data. Each user has different access levels. Some users can change settings. Others can only view data. Access control uses passwords. It uses usernames too. Strong passwords are important. They prevent unauthorized access. Always update passwords regularly. Check access permissions often. Limit access to important data. This keeps information secure. Access control is easy to set up. Follow simple steps carefully.
Monitoring And Maintenance
Performance monitoring tools help keep your server running well. They track server speed and memory use. These tools alert you if there’s a problem. It is like having a watchful eye on your server. Popular tools include Nagios and Zabbix. They are easy to use and understand. Always know how your server performs.
Servers need regular updates and patches to stay safe. Updates fix bugs and improve security. Patches protect against new threats. Always check for updates. Install them as soon as possible. This keeps your server healthy and secure. A secure server is a happy server.
Backup And Recovery
Automated backup helps save time. It protects important data without manual work. Choose a reliable backup tool. Set it to run daily or weekly. This ensures data stays safe. Cloud backups are a good choice. They store data online. Local backups store data on the server. Both are useful. Always check backup files. Make sure they work. This prevents data loss.
Disaster recovery gets your server back to work after problems. Have a plan ready. Know what to do if the server fails. Backup data is key. Keep copies in different places. Test the recovery plan often. This ensures it works well. Train staff on recovery steps. Everyone should know their role. Quick action saves time and stress.

Credit: www.siteuptime.com

Credit: www.youtube.com
Frequently Asked Questions
Can I Create My Own Web Hosting Server?
Yes, you can create your own web hosting server. Use a dedicated computer, install server software, and configure it. Ensure a stable internet connection and proper security measures for optimal performance. This option can offer flexibility and control, but requires technical knowledge and maintenance efforts.
How Do I Make A Web Server Server?
Install a web server software like Apache or Nginx on your computer. Configure server settings, ensuring proper security measures. Test server functionality with a browser. Use a domain name for easier access. Regularly update software to maintain security and efficiency.
How Do I Setup A Host Server?
Begin by selecting a server hosting provider. Install server software, configure settings, and ensure security measures are in place. Test connectivity and performance regularly.
Can You Do Web Hosting Yourself?
Yes, you can host your own website using a personal server. You need technical skills and proper equipment. Choose reliable server software and ensure a stable internet connection. Consider security measures to protect your data. Self-hosting can offer control, but requires maintenance and knowledge.
Conclusion
Creating a web hosting server can be simple. Follow the steps carefully. Start with choosing reliable hardware. Install the necessary software. Configure your server settings accurately. Secure your server with strong passwords. Regular updates are crucial. Test your server performance regularly.
Troubleshoot issues promptly. A successful setup demands patience and practice. With dedication, you’ll manage your own server. Enjoy the flexibility it offers. Host websites effectively and efficiently. Share your knowledge with others. Keep learning and improving your skills. Your web hosting journey begins now.
