
Creating a subdomain on Namecheap might sound technical, but it’s easier than you think. Imagine having a special corner of your website dedicated to a new project, blog, or even an online store.
This is exactly what a subdomain can offer you—a chance to expand your digital presence without the need for a new domain. Picture this: a neat, organized web structure that not only enhances user experience but also boosts your SEO.
By setting up a subdomain, you’re not just adding a new section to your site; you’re opening doors to endless possibilities. Whether you’re a business owner, blogger, or just someone looking to explore new digital avenues, this guide is crafted to make the process simple and efficient for you. Stay with us as we walk you through each step of creating a subdomain on Namecheap, ensuring you have the tools and knowledge to enhance your online footprint effortlessly. Let’s dive in and unlock the potential of your website together!

Credit: www.youtube.com
Setting Up Your Namecheap Account
Setting up your Namecheap account is the first step in creating a subdomain. This process is simple and user-friendly, making it accessible for everyone. Namecheap is known for its intuitive interface, helping users manage domains without hassle.
To start, ensure you have a Namecheap account. If you don’t, signing up is quick and easy. Once logged in, familiarize yourself with the dashboard. This is where you’ll manage all domain-related tasks.
Creating Your Namecheap Account
Visit the Namecheap website. Click on the “Sign Up” button. Fill in your details. Make sure your email is correct. It will be used for verification. Set a strong password. Your account security is important.
Logging Into Your Namecheap Account
Go to the Namecheap homepage. Click “Login” at the top right. Enter your username and password. If you forgot your password, use the “Forgot Password” link. Check your email for reset instructions.
Navigating The Dashboard
After logging in, you’ll see the dashboard. This is your control center. From here, manage your domains and subdomains. Look for the “Domain List” section. It’s usually on the left side.
Accessing Domain Management
Click on “Domain List” in the dashboard. You will see all your domains. Choose the domain you want to modify. Click “Manage” next to it. This opens the settings page for your domain.
Exploring The Subdomain Options
In the domain management page, look for “Advanced DNS.” This section allows subdomain creation. Click it to explore options. You’re ready to create your subdomain.

Credit: hostadvice.com
Navigating The Domain Dashboard
Creating a subdomain on Namecheap starts with accessing the domain dashboard. The dashboard is your command center for all domain-related tasks. Here, you can manage settings, configure DNS, and create subdomains.
Understanding the layout of the dashboard is essential. It streamlines the process of creating a subdomain. Let’s walk through the key areas you’ll interact with.
Accessing Your Domain List
First, log into your Namecheap account. Once logged in, find the “Domain List” tab on the left menu. Click it to see all your registered domains.
Locate the domain for which you want a subdomain. This step is crucial. Ensure you select the correct one before proceeding.
Opening The Domain Management Page
After selecting your domain, click on the “Manage” button. This button is next to your chosen domain. It directs you to the domain management page.
Here, you can view and edit domain details. This is where the magic happens.
Finding The Dns Settings
On the domain management page, look for the “Advanced DNS” tab. This tab holds all DNS-related configurations. Click on it to access DNS settings.
Make sure you’re in the right section. This is where you’ll create your subdomain.
Creating Your Subdomain
In the “Advanced DNS” section, scroll down to “Host Records.” Click on “Add New Record” to start creating a subdomain.
Choose “A Record” or “CNAME Record” based on your needs. Enter your subdomain name in the “Host” field.
Fill in the required fields and save changes. Your subdomain is now live.
Creating And Managing Subdomains
Setting up a subdomain on Namecheap is straightforward. Log into your account, access the Domain List, and select “Manage” next to your domain. Navigate to the “Advanced DNS” tab and click “Add New Record” to input your subdomain details.
Creating and managing subdomains can enhance your website’s organization. Subdomains act as extensions of your primary domain. They help separate different sections of your site. This is useful for blogs, shops, or specific content areas. Namecheap offers a user-friendly way to set up and manage subdomains. Let’s dive into the process.Step 1: Log Into Your Namecheap Account
First, access your Namecheap account dashboard. Use your login credentials. After logging in, locate the “Domain List” section. This section displays all your registered domains.Step 2: Select Your Domain
Next, find the domain you want to create a subdomain for. Click on the “Manage” button next to it. This takes you to the domain settings page. Here, you can make various adjustments.Step 3: Navigate To The “advanced Dns” Tab
On the domain settings page, locate the “Advanced DNS” tab. Click on it. This section lets you modify DNS records, including subdomains.Step 4: Add A New Subdomain
Scroll down to the “Host Records” section. Click “Add New Record.” Choose “CNAME Record” from the dropdown menu. In the “Host” field, enter your desired subdomain name. For example, “blog” if you want blog.yourdomain.com.Step 5: Point Your Subdomain To A Target
In the “Value” field, enter your target URL or IP address. This directs the subdomain to the right location. Ensure the “TTL” is set to “Automatic” for quicker updates.Step 6: Save Your Changes
Once all fields are complete, click the green checkmark. This saves your new subdomain configuration. It may take a few minutes to propagate.Managing Existing Subdomains
To manage existing subdomains, revisit the “Advanced DNS” tab. Here, you can view, edit, or delete subdomains. Simply adjust the “Host Records” as needed. Creating and managing subdomains on Namecheap is straightforward. It provides flexibility for organizing your website. Follow these steps to enhance your domain’s functionality.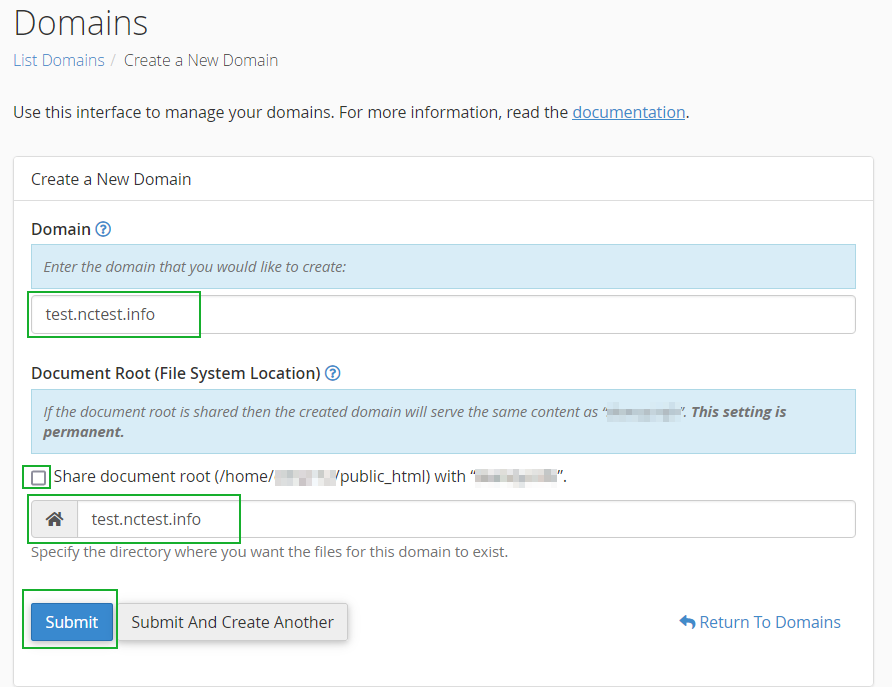
Credit: www.namecheap.com
Frequently Asked Questions
How Do I Create A Subdomain In Namecheap?
Log into your Namecheap account. Go to “Domain List”. Select the domain, then click “Manage”. Navigate to the “Advanced DNS” tab. Click “Add New Record”, choose “CNAME” or “A Record”, enter the subdomain details, and save changes. Your subdomain is now created.
How Do I Create My Own Subdomain?
Log into your hosting account. Navigate to the domain management section. Click “Create Subdomain. ” Enter your desired subdomain name and associate it with your main domain. Save the changes to complete the setup.
Why Are Subdomains Bad For Seo?
Subdomains can split domain authority, reducing SEO effectiveness. Search engines treat subdomains as separate entities, impacting keyword rankings. This division can dilute backlink value and site traffic. For better SEO, use subfolders to consolidate authority and improve search visibility.
Is Creating Subdomains Free?
Creating subdomains is typically free with most web hosting plans. Check with your hosting provider for details.
Conclusion
Creating a subdomain on Namecheap is simple and straightforward. Follow the steps outlined to manage your website effectively. Subdomains help organize content and improve site navigation. They also enhance user experience by making it easier to find information. Always ensure your subdomain aligns with your site’s main theme.
This helps in maintaining a consistent brand image. Regularly update and check your subdomains for any issues. With practice, managing subdomains will become second nature. Now, you can confidently create and manage subdomains on Namecheap. Happy hosting!
