
Are you looking to switch your primary domain on Namecheap hosting? You might feel a bit overwhelmed, but don’t worry—you’re not alone.
Many users find themselves needing to change their primary domain for various reasons, whether it’s a rebranding effort, a new business direction, or simply a desire for a more suitable web address. Imagine the satisfaction of seeing your new domain perfectly aligned with your vision.
By following a few straightforward steps, you can easily make this change and ensure your online presence accurately reflects your goals. This guide will walk you through the process, offering clear instructions and helpful tips to make the transition smooth and stress-free. Dive in, and let’s transform your web identity together. You’ll soon see just how simple it can be to change your primary domain on Namecheap hosting.
Credit: www.namecheap.com
Preparation Before Domain Change
Changing the primary domain in Namecheap hosting requires careful preparation. This ensures a smooth transition without any hiccups. Before diving into the process, several key steps should be followed. These steps help avoid potential issues that could disrupt your site.
Backup Your Website Data
Always create a backup of your website data. This is crucial to prevent data loss. Use Namecheap’s backup tools or a trusted plugin. Save a copy of all files, databases, and configurations. Store backups securely on a different platform. This safety measure provides peace of mind.
Check Domain Availability
Ensure the new primary domain is available. Use Namecheap’s domain search tool for this. Confirm the domain is not registered by someone else. This step is critical to avoid future conflicts. If available, proceed to the next step.
Inform Your Users
Notify your users about the upcoming domain change. Use email newsletters or announcements on your website. This keeps your audience informed and reduces confusion. Clear communication helps maintain trust with your visitors.
Review Seo Implications
Consider the impact on your site’s SEO. Changing the primary domain can affect search rankings. Update sitemaps and inform search engines about the change. Use 301 redirects to transfer SEO value. This ensures minimal disruption to your site’s visibility.
Prepare Dns Settings
Adjust DNS settings for the new domain. Ensure all records point to the correct server. Double-check A, CNAME, and MX records. Proper DNS configuration is essential for domain functionality. Verify changes with your hosting provider if needed.

Credit: www.youtube.com
Executing Domain Change In Namecheap
Change your primary domain on Namecheap hosting easily. Access your cPanel, navigate to the domain section, and update your settings. This process ensures a seamless transition to your new domain.
Changing the primary domain in Namecheap hosting can feel like a daunting task, especially if you’re not well-versed in domain management. However, with a few simple steps, you can smoothly transition to a new primary domain. Whether you’re rebranding or simply updating your online presence, executing this change can significantly impact your website’s effectiveness and reach.Understanding The Importance Of A Primary Domain
Your primary domain is the main web address associated with your hosting account. This domain is crucial as it represents your brand and is the gateway through which visitors access your website. Choosing the right primary domain can boost your site’s visibility and help establish a strong online identity.Step-by-step Guide To Change Your Primary Domain
To change your primary domain, start by logging into your Namecheap account. Once logged in, navigate to the hosting dashboard where you’ll find the option to manage your domains. Here, you’ll see an option to change the primary domain. Select the new domain you wish to use from the list of domains associated with your account. Ensure that this domain is already registered and available in your Namecheap account. If not, you may need to register it first.Precautions Before Making Changes
Before making the change, backup your website data. This includes all files and databases associated with your current primary domain. A backup ensures that you can restore your site in case anything goes wrong during the transition. Consider notifying your audience about the domain change. Update your social media profiles and any online listings to reflect your new domain. This will prevent confusion and maintain your brand’s consistency across platforms.After The Change: What To Do Next
Once the primary domain is updated, check that all website links and functionalities are working correctly under the new domain. Update your site’s SEO settings to optimize for the new domain name, ensuring search engines index it properly. Think about how this change affects your email addresses. Update your email client settings to use the new domain if needed. This step is vital to ensure uninterrupted communication with your clients and partners. Have you ever noticed how a simple domain change can breathe new life into your website? It’s not just about a new address; it’s about taking charge of your online identity. By executing these steps, you’re well on your way to enhancing your digital presence.Post-change Verification And Troubleshooting
Changing the primary domain in Namecheap Hosting requires careful verification and troubleshooting. Ensure DNS settings are correct and clear cache for updates to take effect. Verify website functionality to address any issues promptly.
Changing the primary domain in Namecheap hosting is a straightforward process, but the journey doesn’t end there. After making the switch, it’s crucial to verify that everything is functioning correctly and troubleshoot any hiccups. This step ensures your website visitors have a seamless experience and your site remains visible and operational. Let’s dive into how you can confirm your changes and tackle any issues that might arise. ###Verify Dns Settings
After changing your domain, double-check your DNS settings. They play a crucial role in how your website connects to the internet. Ensure your DNS records point to the correct IP address. Mistakes here can lead to downtime or errors. Use online tools to verify that your DNS settings propagate correctly across the web. ###Check Website Functionality
Navigate through your website to ensure all pages load as expected. Test links and forms to make sure they work properly. Broken links can frustrate visitors. Consider asking a friend to explore your site. Fresh eyes can catch issues you might miss. ###Monitor Email Services
Changing your primary domain can affect email services linked to your website. Send test emails to confirm delivery and reception. Missing emails can impact communication. Ensure your email client settings are updated to reflect the new domain. ###Update Ssl Certificates
An SSL certificate is essential for website security and visitor trust. Verify that your SSL certificate is valid for your new domain. An expired certificate can deter visitors. Use online tools to check your SSL status and renew if necessary. ###Search Engine Visibility
The domain change can impact your site’s visibility on search engines. Submit your updated sitemap to search engines. It helps them index your site correctly. Monitor your site’s ranking and traffic using tools like Google Analytics. ###Seek Support For Persistent Issues
Encountering persistent problems after changing your domain can be frustrating. Namecheap offers support through live chat and email. Reach out for assistance when needed. Consider sharing your experiences in online forums. Other users might have faced similar issues and can offer solutions. By ensuring your site functions properly, you protect your online presence and offer visitors a reliable experience. Have you ever faced unexpected challenges while switching domains? What steps did you take to resolve them? Share your thoughts below!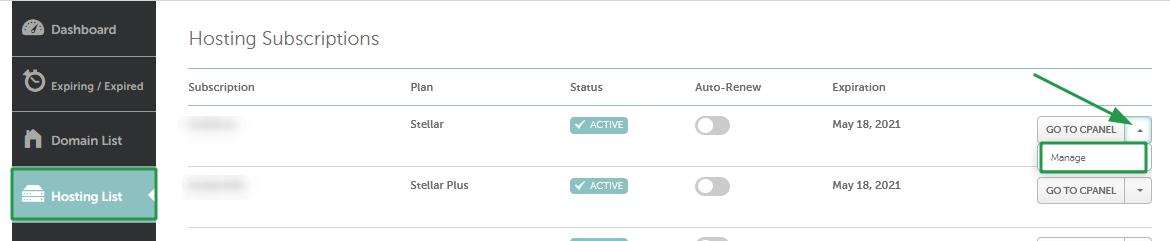
Credit: www.namecheap.com
Frequently Asked Questions
How To Change Primary Domain In Hosting?
Log in to your hosting account. Navigate to the domain settings. Select ‘Change Primary Domain. ‘ Follow the prompts to update. Ensure backups are complete before making changes. Contact support if needed.
How Do I Change My Domain On Namecheap?
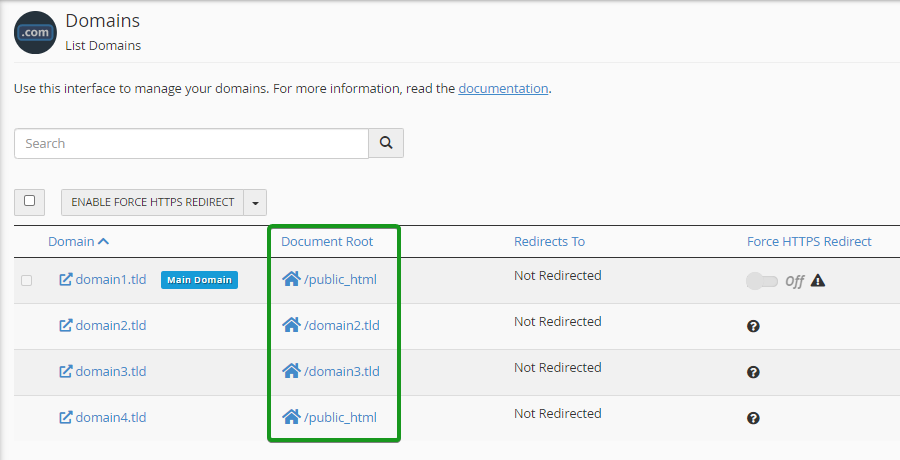
Log in to your Namecheap account. Navigate to “Domain List” and select the domain. Click “Manage” next to the domain. Choose “Domain Name Server Setup” and update your domain settings. Save changes to apply the new domain configuration.
How To Remove Main Domain From Cpanel Namecheap?
You can’t directly remove the main domain from cPanel. Contact Namecheap support for assistance. They can guide you through changing the main domain or migrating data to a new account. Always back up your data before making changes.
How Do I Change The Main Domain On Cpanel?
To change the main domain on cPanel, contact your hosting provider. They will assist with the domain update. Backup your data before making changes. Some providers allow domain change through their dashboard. Follow their instructions for a smooth transition. Verify DNS settings and ensure your website is operational post-update.
Conclusion
Changing your primary domain in Namecheap is straightforward. Follow the steps carefully for a smooth process. Double-check settings to avoid errors. Remember to update your DNS records if needed. Backup your data to prevent loss. Contact Namecheap support if issues arise.
They can provide assistance quickly. Regularly review your domain settings for optimal performance. This ensures your website runs smoothly. Keep learning about domain management for future ease. Practice makes perfect. A well-managed domain boosts your online presence. Stay proactive and informed.
Your website’s success depends on it. Enjoy your updated domain configuration!
