
Have you ever found yourself wanting to change your Namecheap username but not knowing where to start? You’re not alone.
Many users find themselves stuck with a username that no longer fits their brand or personal identity. The good news is, changing your Namecheap username is easier than you might think. In this guide, we’ll walk you through the simple steps to make this change seamlessly.
Imagine the relief of having a username that truly reflects who you are, or what your business stands for. Keep reading to discover how you can effortlessly update your Namecheap profile and ensure it aligns perfectly with your needs.

Credit: www.youtube.com
Account Access
Accessing your Namecheap account is essential. It allows you to manage your services and make necessary updates, such as changing your username. Knowing how to navigate through your account is crucial for seamless management. Understanding the steps involved in accessing and modifying your account details ensures smooth operation.
Access Your Namecheap Account
Log into your Namecheap account using your existing username and password. This takes you to the dashboard where you manage your services. Ensure your login details are correct to avoid issues.
Navigate To Account Settings
Once logged in, find the account settings section. This is usually located in the menu or toolbar. The settings area contains options for updating personal information, including your username.
Update Your Username
In the account settings, look for the username change option. Click on it to start the process. Follow the prompts to enter your new username. Ensure the new username is unique and meets Namecheap’s requirements.
Verify Changes
After updating, verify the change by checking your account details. Ensure the new username is displayed correctly in your profile. This confirmation helps in avoiding future login issues.
Navigating Account Settings
Changing your Namecheap username is a simple process. To start, you need to access your account settings. This section will guide you through the steps of navigating your account settings with ease. Follow the instructions carefully to ensure a smooth username change.
Accessing Your Namecheap Dashboard
First, log in to your Namecheap account. Use your email and password. Once logged in, you will land on your dashboard. This is the main control panel for your account. Familiarize yourself with the options available here.
Locating Account Settings
On the dashboard, find the ‘Account’ menu. This menu is usually on the top right corner. Click on it to reveal a dropdown list. From this list, select ‘Profile’ to access your account settings.
Exploring The Profile Section
Within the Profile section, you can manage personal details. Look for the ‘Username’ field. This is where you can edit your current username. Double-check your new username for accuracy.
Saving Your Changes
After entering the new username, find the ‘Save Changes’ button. Click it to confirm your update. A confirmation message will appear on the screen. This indicates your username has been changed successfully.
Verifying Your Username Update
To ensure everything went smoothly, log out of your account. Then log back in with your new username. If you can access your account, the update was successful. Remember, updating your username might affect linked services.
Updating Username
Changing your Namecheap username is a straightforward process. This task may arise due to rebranding or personal preferences. Whatever the reason, updating your username ensures your account remains relevant and personalized.
Follow these simple steps to change your Namecheap username. The process is user-friendly and requires minimal technical knowledge. Read on to learn more.
Step 1: Log Into Your Account
Start by visiting the Namecheap website. Enter your current username and password to log in. Accessing your account is the first step in the process.
Step 2: Navigate To Account Settings
Once logged in, locate the account settings menu. This menu houses various account options. Find the “Username” section within these settings.
Step 3: Enter Your New Username
Click on the “Edit” option next to your current username. A text box will appear. Type your new desired username into the box.
Step 4: Save Your Changes
After entering the new username, look for a “Save” button. Click this button to confirm your changes. Your account will now display the updated username.
Step 5: Verify Your Email
Check your email inbox for a confirmation message. This email verifies the username change. Click the link in the email to complete the process.
Troubleshooting Common Issues
Ensure your new username meets Namecheap’s guidelines. Avoid using special characters or spaces. If issues persist, contact Namecheap support for assistance.
Benefits Of A New Username
A new username can enhance your brand identity. It provides a fresh start and aligns with current business goals. Enjoy a more personalized online presence with a new username.
Credit: www.namecheap.com

Credit: www.youtube.com
Frequently Asked Questions
Can I Change My Username On Namecheap?
No, you cannot change your username on Namecheap. Account usernames are permanent once created.
What Is A Valid Username For Namecheap?
A valid Namecheap username must be 4-32 characters long, starting with a letter. Use letters, numbers, underscores, and hyphens. Avoid spaces and special characters.
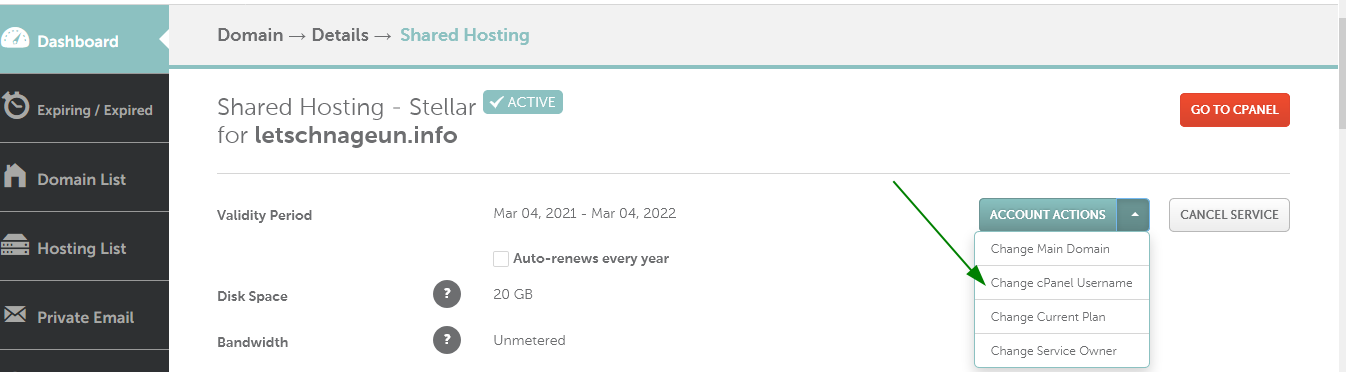
Can I Change My Cpanel Username?
You cannot change your cPanel username. The username is set during the account creation and remains fixed. Contact your hosting provider for further assistance or possible alternatives.
Can I Change The Name Of My Domain On Namecheap?
You can’t directly change your domain name on Namecheap. You need to register a new domain. Consider transferring website content to the new domain.
Conclusion
Changing your Namecheap username is simple with the right steps. First, log into your account. Next, navigate to the account settings. Follow the prompts. Ensure you save any changes. This process secures your account identity. Always keep your account information updated.
Protect your online presence. A few minutes now can save headaches later. Remember, it’s important to maintain accurate account details. This guarantees smooth transactions and support. If you encounter any issues, contact Namecheap support for help. Stay informed. Stay secure.
