
Are you feeling stuck trying to change your name server in Namecheap? You’re not alone.
Navigating the technical aspects of domain management can be confusing, especially if you’re not a tech wizard. But here’s the good news: changing your name server doesn’t have to be a headache. Imagine the peace of mind you’ll have knowing your website is perfectly set up for optimal performance.
We’ll walk you through each step, ensuring you feel confident and in control of your domain settings. With our easy-to-follow guide, you’ll have your name server changed in no time, allowing you to focus on what truly matters—growing your online presence. Ready to dive in and make it happen? Let’s get started!
Credit: kinsta.com
Accessing Your Namecheap Account
Changing name servers in Namecheap is a simple process. First, log in to your Namecheap account. Then, navigate to the “Domain List” and select the domain. Choose “Manage,” then “Custom DNS” to enter your new name servers. Save the changes, and your name servers will update.
Accessing your Namecheap account is the first step in changing your name server settings. If you’ve ever felt overwhelmed by the technical side of managing your domains, you’re not alone. Many people find it daunting, but with a little guidance, you can navigate this task confidently. Let’s dive into the process and simplify it for you. ###Log Into Your Account
Start by heading over to Namecheap’s website. You’ll see a login button prominently displayed at the top right corner. Click on it and enter your username and password. If you don’t remember your password, use the ‘Forgot Password’ link to reset it. Once logged in, you’ll land on your dashboard. This is your command center for managing all your domains and services. Take a moment to familiarize yourself with its layout. Knowing where things are can save time when making changes. ###Navigate To Domain List
On your dashboard, locate the ‘Domain List’ option in the left sidebar. Clicking this will display all the domains registered under your account. This is where you’ll select the domain whose name server you want to change. Finding your domain in a long list can sometimes be challenging. Use the search bar at the top if you have many domains. This feature makes it easy to locate your specific domain quickly. ###Select Your Domain
Once you’ve found your domain, click on it to access its settings. This action will open a new page with various options related to your domain. Look for the ‘Manage’ button next to the domain name and click it. This page is crucial because it contains all the settings you can modify for your domain. You’ll see options like DNS, contact details, and more. Focus on the DNS section as this is where name server changes happen. ###Considerations Before Changing
Before you proceed, think about why you’re changing your name server. Are you switching hosting providers? Or perhaps you’re setting up a new website? Understanding your reason can guide you on how to configure the new settings properly. Changing name servers can affect how your site loads and functions. Ensure you have all the necessary information from your hosting provider or web service before making any changes. This will prevent downtime or errors. ###Actionable Steps
Are you ready to make the change? Gather your new name server details and have them handy. Double-check that they are correct to avoid any misconfigurations. Updating your name server is straightforward once you have the right information. It’s a simple process that can have a big impact on your site’s performance. Are you ready to enhance your site’s capabilities?Locating Domain Settings
Accessing domain settings on Namecheap lets you change your name server quickly. Start by logging into your account. Navigate to the Domain List section. Select your domain. Click “Manage. ” Find “Name Servers” and choose your preferred option. Save the changes to update DNS settings.
Navigating the online world can be daunting, especially when managing domain settings. If you’ve ever found yourself staring at your Namecheap account, unsure of where to go next, you’re not alone. Changing name servers is a crucial step in pointing your domain to your desired hosting provider. Before you can do that, you need to locate the domain settings within your Namecheap account. Once you know where to look, the process becomes much simpler. ### First, ensure you’re logged into your Namecheap account. It’s like having the keys to your online kingdom. Once you’re in, you’ll have access to all the domains you’ve registered. Seeing your domain names listed can be empowering and a little intimidating at first. But don’t worry, each step is straightforward. ###Finding Your Domain List
After logging in, direct your attention to the left-hand sidebar. There, you’ll find the “Domain List” option. Clicking on this will present you with all the domains under your account. Remember when you first registered your domain and how exciting it was? Now is the time to put that enthusiasm to good use as you manage your domain settings. ###Selecting The Right Domain
Identify the domain for which you wish to change the name servers. Click on “Manage” next to the appropriate domain. This selection will lead you to a comprehensive overview of your domain’s settings. It’s essential to be sure of your choice here. Have you ever accidentally clicked the wrong option and had to backtrack? This step ensures you avoid that hassle. ###Accessing The Domain Settings
With your domain selected, you’re now in the management interface. Here, locate the “Domain” tab in the top menu. This tab is your gateway to changing the name servers. It’s the control panel for your domain’s settings, much like the dashboard of a car. Imagine the satisfaction of knowing exactly where to go and what to do next. ###Why This Matters
Understanding how to locate your domain settings is crucial. It empowers you to make changes swiftly and confidently. Have you ever felt stuck because you didn’t know where to find an option? This guide aims to make sure that doesn’t happen again. By mastering these steps, you enhance your ability to manage your online presence effectively. What could be more rewarding than having full control over your domain’s destiny?Updating Name Servers
Easily change Namecheap name servers by logging into your account. Navigate to the domain list section. Select the domain and update the name server settings with new details.
Updating your name servers in Namecheap is a crucial step when managing your domain. Whether you’re setting up a new website or switching hosting providers, knowing how to update your name servers is essential. Let’s dive into the process of changing name servers in Namecheap. ### First, log into your Namecheap account. The dashboard is your command center. You’ll find everything you need here. Once logged in, head to the “Domain List” section. It’s usually on the left sidebar. Here, you’ll see a list of all your domains. ###Selecting The Domain
Click on the domain you wish to update. This action will open up a new page. You’ll see various options related to your domain management. Look for the “Manage” button next to your domain. Click it to proceed. This will take you to the settings specific to that domain. ###Finding The Name Server Settings
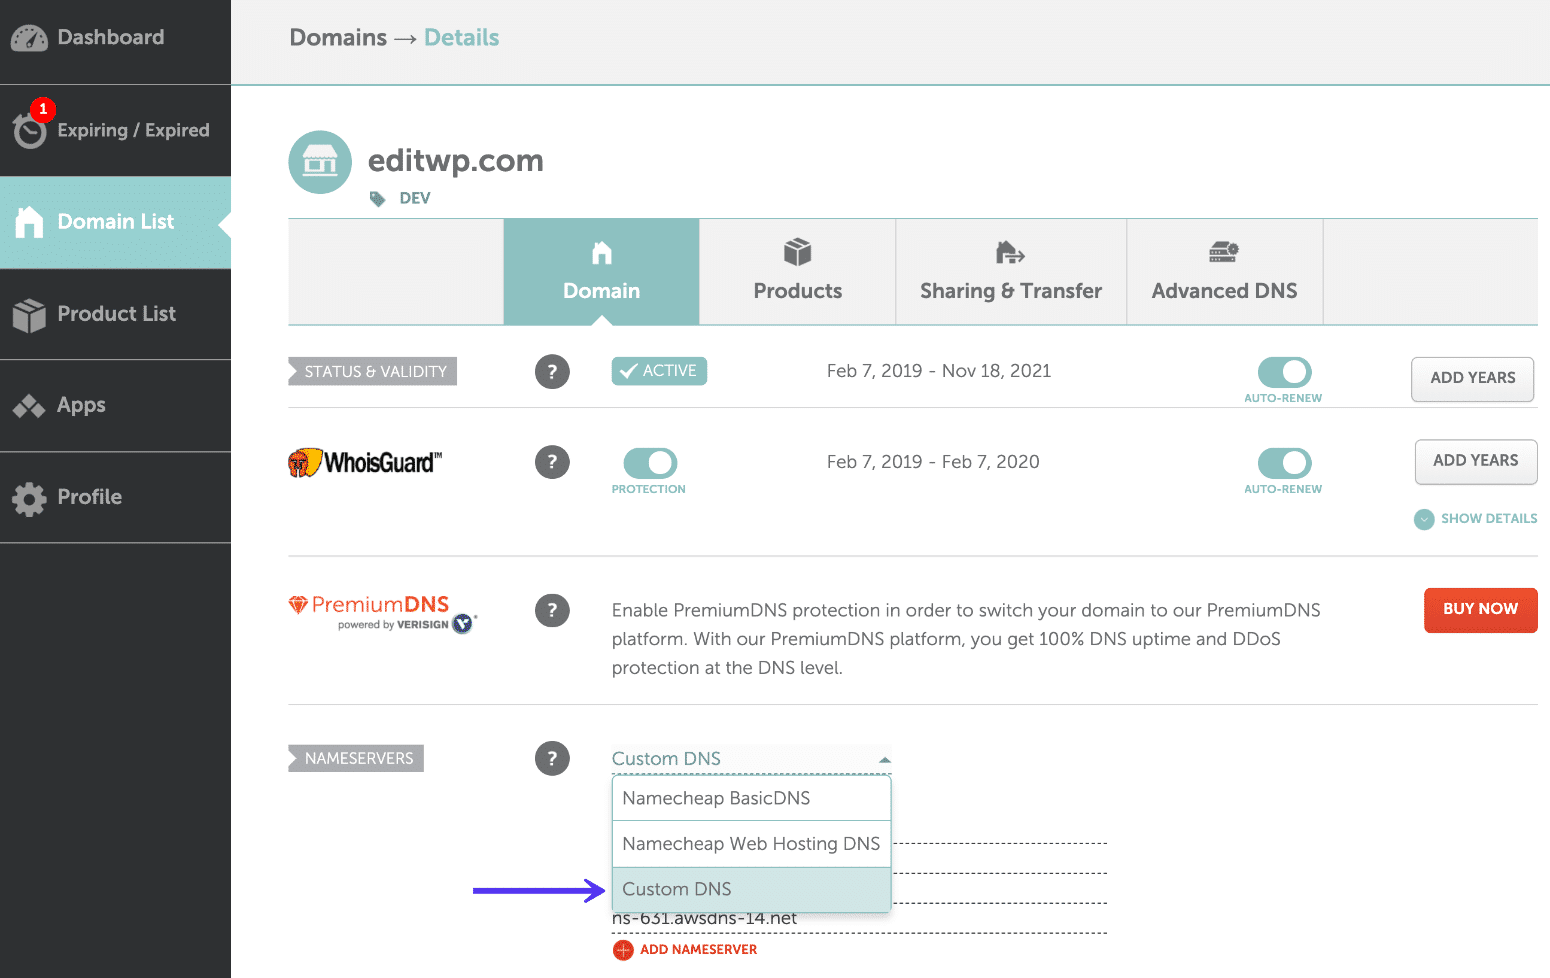
On the domain management page, locate the “Name Servers” section. It’s typically below the domain registration details. You’ll notice a dropdown menu or a text field. This is where you can input your new name server information. ###Changing The Name Servers
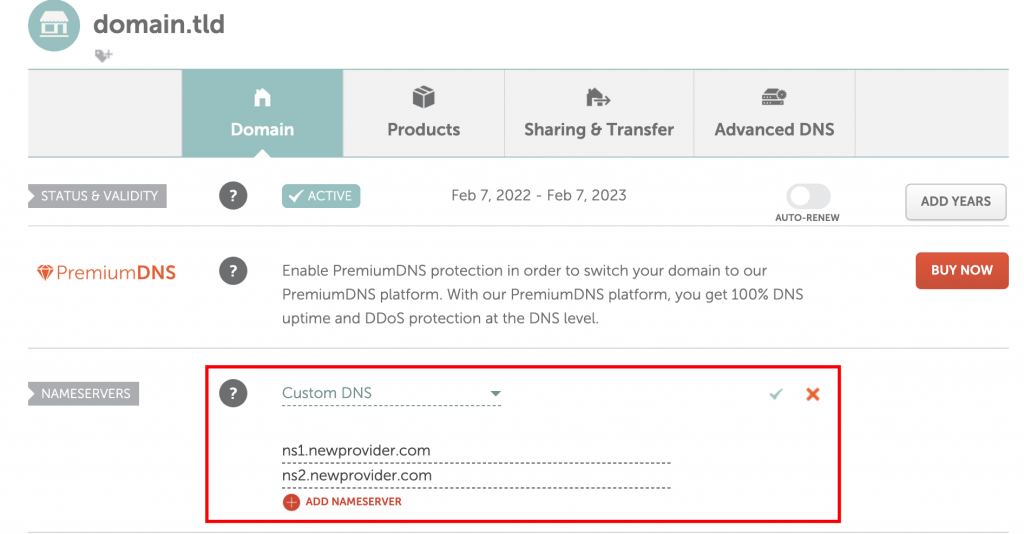
If you’re switching to custom name servers, select the “Custom DNS” option from the dropdown. This will allow you to enter the new name servers. Input the new name servers in the provided fields. Ensure you type them correctly to avoid connectivity issues. ###Saving Your Changes
After entering the new name servers, look for a “Save” or “Check” button. Click it to update your settings. Your changes might take some time to propagate. It typically takes up to 48 hours for the changes to take effect worldwide. ###Verifying The Update
After saving, verify that the name servers have been updated. You can use online tools to check DNS propagation. Have you ever had issues with updating name servers? Share your experiences in the comments. It might help someone else! Updating your name servers doesn’t have to be daunting. With these steps, you’re well-equipped to manage your domain settings effectively. Remember, the key is to double-check each step and ensure accuracy.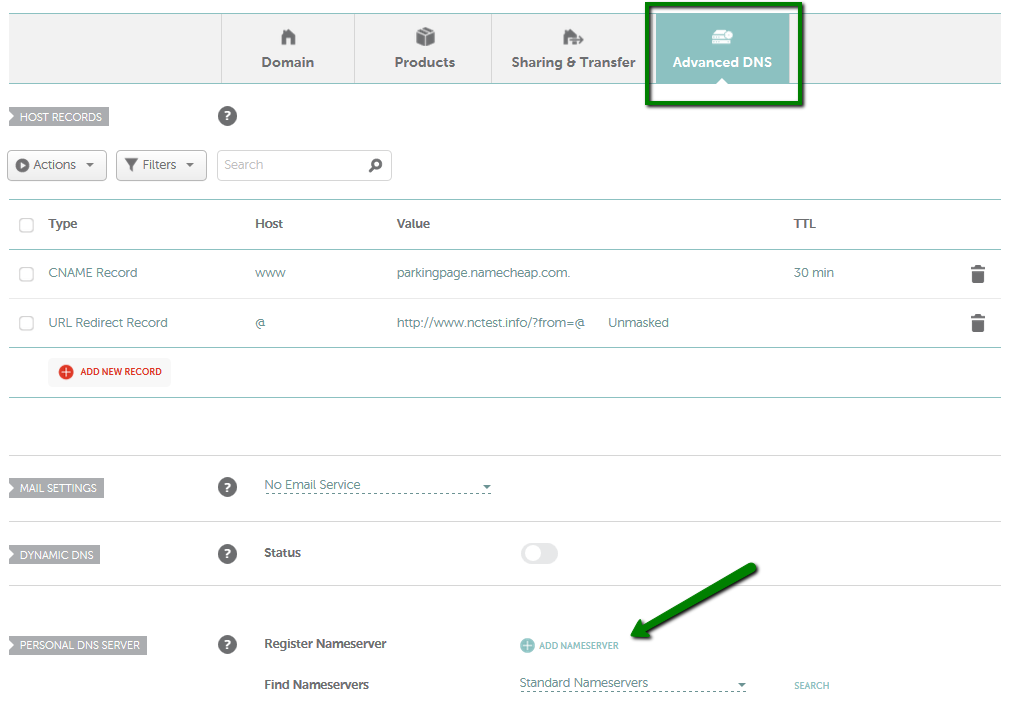
Credit: www.namecheap.com
Credit: www.hostinger.com
Frequently Asked Questions
How To Change Nameservers At Namecheap?
Log into your Namecheap account. Select “Domain List” and click “Manage” next to your domain. Choose the “Nameservers” option. Select “Custom DNS” and enter your new nameservers. Click “Save” to apply changes.
How Do I Change My Nameserver?
Log in to your domain registrar’s website. Locate the DNS settings or nameserver option. Enter the new nameserver details. Save changes and wait for DNS propagation. Contact support if needed.
What Is The Name Server Of Namecheap?
Namecheap’s default name servers are dns1. registrar-servers. com and dns2. registrar-servers. com. These servers help manage domain DNS settings. Always verify with Namecheap for any updates or changes to their name servers.
How Do You Change Your Dns Server?
To change your DNS server, access your network settings. Select the network connection, enter DNS details manually. Save changes to apply the new server. Restart your device for changes to take effect.
Conclusion
Changing your Namecheap name server is quite straightforward. Follow the steps, and you’ll succeed. First, access your Namecheap account. Then, navigate to the domain list. Select the domain you wish to update. Click on ‘Manage’ to proceed. Find the name server settings.
Enter your new name server details. Save your changes. Wait for them to propagate. It usually takes a few hours. With these steps, your domain should connect correctly. Practice makes it easier each time. You’ve got this! Feel confident managing your domain settings.
Stay informed, and keep your website running smoothly.
