Are you ready to give your WordPress site a fresh new look? Changing the general theme settings can seem like a daunting task, but it doesn’t have to be.
Imagine transforming your website’s appearance with just a few clicks. Sounds exciting, right? In this guide, you’ll discover how to easily navigate and tweak your WordPress theme settings to better align with your brand and vision. Whether you’re a seasoned pro or a beginner, this step-by-step approach will empower you to make impactful changes with confidence.
Keep reading to unlock the secrets to a more vibrant and engaging website that captivates your audience from the very first glance.
Accessing The WordPress Dashboard
First, open your browser. Type your website URL in the address bar. Add /wp-admin at the end. Press Enter. You will see the login page. Enter your username and password. Click the Log In button. Now, you are in the dashboard.
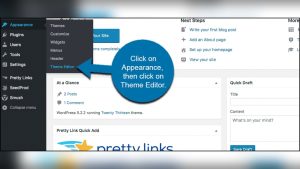
The dashboard is the heart of your website. You can change many things here. Look at the left menu. You will find all the options. Find the Appearance tab. Click it to see more options. This is where you can change themes.
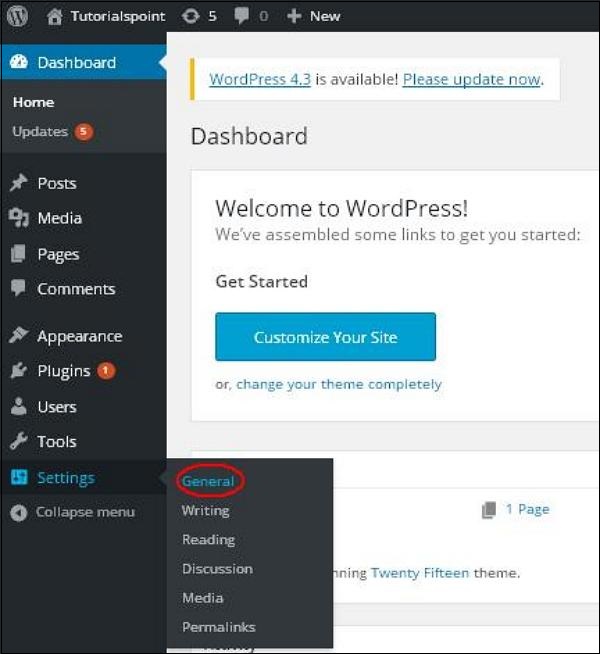
Navigating To Theme Settings
Open your WordPress dashboard. Find the Appearance section on the left sidebar. Click on it. Then choose Themes from the menu. This will show all installed themes. Select your active theme. Click on the Customize button. This opens the theme settings. The settings allow you to change colors and fonts. You can also adjust the layout. Explore each option carefully. Preview changes before saving. Use the Save & Publish button when done. Check your site to see the updates. Repeat these steps as needed.
Customizing Site Identity
The site title is the name of your website. It shows up on the browser tab. Go to the WordPress dashboard. Click on Appearance, then Customize. Find the Site Identity section. Here, you can type your new site title. Make sure it is clear and short. Click Publish to save changes.
The tagline is a short sentence about your site. It is next to the site title. To change it, stay in the Site Identity section. Look for the Tagline box. Type your new tagline. Make it catchy and informative. Click Publish to keep it.
The site icon is the small image in the browser tab. In the Site Identity section, find Site Icon. Click on it to upload a new image. The image should be square. A size of 512×512 pixels works best. After choosing the image, click Publish to save.
Credit: www.elegantthemes.com
Adjusting Colors And Background
Choose your site’s primary colors wisely. They should match your brand. Click on Appearance in the dashboard. Then, select Customize. Find the Colors option. Pick your desired color. This changes the main look of your site. It affects buttons and links too.
Your background color sets the tone. Go to Appearance again. Select Customize. Click on Background Colors. Choose a color that suits your content. Make sure it’s easy on the eyes. A simple color works best. It should not distract readers.
A background image can add depth. Navigate to Appearance. Click Customize. Select Background Image. Upload a picture from your computer. Ensure it is clear and relevant. The image should not overpower text. Adjust its size if needed.
Configuring Typography
Choose fonts that match your site’s mood. Sans-serif fonts are clean and modern. Serif fonts feel classic and formal. Explore Google Fonts for free options. Popular choices are Roboto and Open Sans. Ensure readability across devices. Test how fonts look on mobile and desktop.
Font size impacts readability. Body text should be easy to read. Use 16px to 18px for paragraphs. Headings need to stand out. Try 24px or larger for titles. Consistent sizes help users navigate. Compare sizes to ensure they complement each other.
Text alignment affects design flow. Left alignment is common for paragraphs. It feels natural and easy to follow. Center alignment suits headings or quotes. It grabs attention but use sparingly. Avoid justified text for web content. It can create uneven spaces.
Credit: www.tutorialspoint.com
Modifying Layout And Design
Selecting the right layout is key. Layout options decide the look of your site. Choose from full-width or boxed styles. Full-width stretches content across the screen. Boxed keeps content in a neat box. Both have unique vibes. Test them out. Find what fits your site best.
Headers sit at the top. Footers stay at the bottom. Style them to match your site’s theme. Change colors and fonts. Add logos or images. Make sure they stand out but also blend well. A good header and footer make navigation easy.
Sidebars hold extra info. They can show menus, ads, or links. Customize them to fit your needs. Change the width or position. Add widgets for extra functions. Keep the sidebar clean. Too much info can confuse visitors.
Setting Up Menus
To create a new menu, go to the Appearance section. Then, click on Menus. You’ll see an option to create a new menu. Click it. Give your menu a name. This helps you remember it later. After naming, click Create Menu. Now, your new menu is ready.
Add items to your menu. You can add pages, posts, or links. Just check the boxes next to the items. Then, click Add to Menu. Drag and drop items to arrange them. Make sure the order makes sense. It’s easy and fun.
Assign your menu to a location. Go to Menu Settings. Choose a location like Primary Menu. This shows your menu on the site. Click Save Menu to confirm. Now, your menu is live. Everyone can see it.
Adding And Managing Widgets
Explore how to change general theme settings in WordPress by adding and managing widgets. Widgets offer customization options, letting you adjust your site’s layout and functionality. Tailor your website’s appearance with ease, enhancing user experience with simple steps.
Inserting Widgets
Widgets make your site special. They can be added in seconds. Go to the WordPress dashboard. Find the Appearance menu. Click on Widgets. There, you see many options. Drag the widget you want. Drop it in the right spot. It’s easy. Your site now has more features.
Configuring Widget Settings
Each widget can be changed. Click on the widget you added. You will see settings. Change them to fit your needs. Make sure to save. This keeps your changes. Now, your widget shows the right info.
Removing Unused Widgets
Too many widgets can slow your site. Remove ones you don’t use. Go back to the Widgets menu. Find the widget you don’t want. Click and drag it away. Now your site is faster. Keeping it simple is best.
Previewing And Saving Changes
Live Preview lets you see changes instantly. Visit the WordPress dashboard. Click on Appearance and then Customize. The screen will split into two parts. The left side has options. The right side shows the preview. Try different colors and fonts. See the changes in real-time. This helps in making the best choices. No need to guess how it looks. It’s a fun way to design your site.
After making changes, look for the Save button. This button is often at the top. Press it to keep your changes. To show changes online, click Publish. Now, everyone can see your new design. If not happy with changes, use the Back button. This returns to the previous look. Always remember to save your work.

Credit: qodeinteractive.com
Frequently Asked Questions
How Do I Access Theme Settings In WordPress?
To access theme settings, log in to your WordPress dashboard. Navigate to “Appearance” and click on “Customize. ” Here, you’ll find various options to change and personalize your theme. Explore settings like colors, fonts, and layout to match your preferences.
Remember to save changes before exiting.
Can I Change Colors In WordPress Theme Settings?
Yes, you can change colors in WordPress theme settings. Go to “Appearance” and click “Customize. ” Look for the “Colors” option. Here, you can adjust the color scheme of your theme. Be sure to preview changes before saving them to ensure they fit your design vision.
Where To Find WordPress Header Settings?
Find WordPress header settings by going to “Appearance” and selecting “Customize. ” In the Customizer, look for the “Header” section. Here, you can modify elements like logo, title, and header image. Make changes as needed and remember to save them to apply the new settings.
Can I Change Fonts In WordPress Themes?
Yes, you can change fonts in WordPress themes. Access “Appearance” and click “Customize. ” Look for the “Typography” or “Fonts” section. Here, you can select different font styles and sizes for your theme. Adjust settings to enhance readability and aesthetics, then save your changes.
Conclusion
Changing theme settings in WordPress is simple and rewarding. You customize your site to match your vision. Start by exploring theme options. Adjust colors and fonts. Experiment with layouts. Save your changes frequently. Preview your site to see updates. Don’t rush the process.
Take time to find what works best. This enhances your site’s appearance. Makes it more appealing to visitors. Always check for mobile responsiveness. This ensures a smooth user experience. With patience, you’ll create a site you love. Now, enjoy your personalized WordPress journey.