
Are you looking to switch your domain name on Namecheap but unsure where to start? Changing your domain name might seem daunting, but it doesn’t have to be.
Imagine the potential of a fresh, eye-catching domain that perfectly aligns with your brand or personal identity. You have the power to enhance your online presence and make a memorable impact. In this guide, we’ll walk you through the simple steps to change your domain name on Namecheap.
You’ll discover how easy it is to transform your digital landscape and unlock new opportunities. Dive in and learn how to take control of your domain today!
Accessing Your Namecheap Account
Accessing your Namecheap account is the first step in changing your domain name. Ensuring you can log in smoothly is crucial. This section guides you through logging into your Namecheap account. Follow these easy steps for a seamless experience.
How To Find The Login Page
Visit the Namecheap website. Look for the login button at the top right corner. Click it to proceed.
Entering Your Credentials
Type your username and password carefully. Double-check for any typing mistakes. Click the login button once done.
Using Two-factor Authentication
If you have two-factor authentication, prepare your device. Enter the code sent to your phone. This adds an extra layer of security.
Navigating The Dashboard
Once logged in, you will see your dashboard. The dashboard displays your domains and account details. Familiarize yourself with this area for easy navigation.
Locating Domain Management
Find the domain management section. It is usually under the ‘Domains’ tab. Click to access and manage your domains.
Credit: www.namecheap.com
Navigating To Domain Settings
Access Domain Settings to change your domain name on Namecheap. Log into your account and select the Domain List. Find your domain, then click “Manage” to access the settings.
Changing your domain name on Namecheap can feel like a daunting task, especially if you’re new to managing domains. But don’t worry, navigating to domain settings is straightforward and essential. Once you’re familiar with the process, you can make changes with ease and confidence. Let’s dive into the steps you need to follow to access your domain settings on Namecheap. ###Access Your Namecheap Account
First things first, you’ll need to log into your Namecheap account. Head over to the Namecheap website and click on the “Sign In” option at the top right corner. Enter your username and password. If you’ve forgotten your password, Namecheap offers a simple recovery option to help you regain access. ###Find Your Domain List
Once you’re logged in, navigate to your dashboard. You’ll see a menu on the left side of the screen. Click on “Domain List” to view all the domains you own. This section is like your domain hub—it’s where you can manage everything related to your domains. ###Select The Domain You Want To Change
In your domain list, find the domain name you wish to change. This list can get long if you own multiple domains, so use the search bar if necessary. Click on “Manage” next to the domain you want to modify. This will take you to the domain settings page, where the real action begins. ###Explore The Domain Settings Page
On the domain settings page, you’ll see several tabs. The “Domain” tab is where you can change your domain name settings. Here, you can update DNS settings, manage auto-renewal, and more. Each option on this page is clearly labeled, making it easy to find what you need. ###Why Understanding Domain Settings Matters
You might wonder why it’s important to know how to navigate domain settings. Imagine you need to update your DNS to point to a new server quickly. Knowing where to go saves you time and prevents potential downtime for your website. It’s all about being prepared and proactive. Have you ever had a moment where you needed to make a change quickly, but couldn’t find the right settings? Understanding how to navigate your domain settings on Namecheap empowers you to make necessary changes without hassle. It’s a small skill that can make a big difference in managing your online presence.Updating Domain Name
Changing your domain name with Namecheap might seem daunting. But it’s a simple process with the right guidance. Updating your domain name is essential for maintaining your online identity. This guide will help you through every step of the process.
Step 1: Access Your Namecheap Account
First, log in to your Namecheap account. Navigate to the dashboard. This is where you manage your domains.
Step 2: Locate Your Current Domain
Find the domain you want to update. Click on it. This will open the domain settings page.
Step 3: Update Your Domain Name
Look for the domain name section. Enter the new domain name. Ensure it is available and correct.
Step 4: Save Your Changes
After entering the new domain name, save changes. This will update your domain settings.
Step 5: Verify The Update
Check if the new domain name works. Visit your website with the updated domain. Ensure everything is functioning properly.
Credit: www.youtube.com

Credit: www.youtube.com
Frequently Asked Questions
How Do I Change A Domain Name On Namecheap?
Log in to Namecheap, go to “Domain List,” select the domain, and click “Manage. ” Choose “Advanced DNS,” then update your domain settings. Save changes to finalize.
How Do I Change My Existing Domain Name?
To change your domain name, register the new domain, update DNS settings, and redirect traffic from the old domain. Notify users and update search engines through Google Search Console.
Can You Change A Domain Name After Registration?
Changing a domain name after registration is not possible. You need to register a new domain. Transfer existing content to the new domain for continuity. Update links and inform visitors about the change to maintain traffic and SEO rankings.
How Do I Manage My Domain On Namecheap?
Log into your Namecheap account. Go to “Domain List” and select your domain. Use the “Manage” button to update settings like DNS, contacts, and nameservers. Use Namecheap’s dashboard for domain management tasks efficiently.
Conclusion
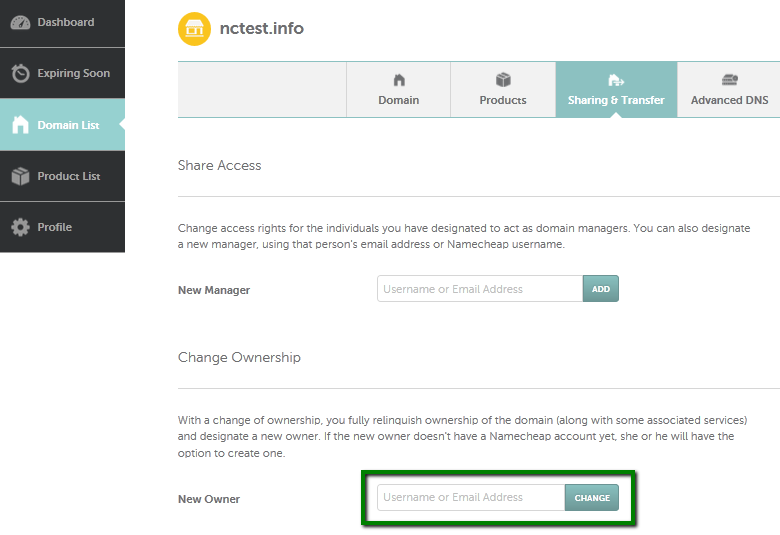
Changing your domain name on Namecheap is simple. Follow the steps carefully. Log in to your account first. Then, navigate to the “Domain List” tab. Find your domain and click “Manage”. Look for the “Sharing & Transfer” tab. Update your domain name as needed.
Remember to save changes after each step. This ensures a smooth transition. Always double-check the details before finalizing. Mistakes can disrupt your website. Keep your information up-to-date. This helps maintain your online presence. With careful attention, your domain name change will be successful.
Enjoy your updated domain!
