
Imagine you’ve finally found the perfect domain name that truly represents your brand or passion. It’s catchy, memorable, and fits like a glove.
But, you’ve already registered a domain on Namecheap that just doesn’t feel right anymore. You might be wondering how you can switch to your dream domain without losing what you’ve built so far. The good news is, changing your domain name on Namecheap is possible, and it can be a seamless experience if you know the right steps.
In this guide, you’ll learn exactly how to change your domain name on Namecheap, ensuring that your online presence stays strong and your audience continues to find you effortlessly. You’ll discover simple techniques and insider tips to make the transition as smooth as possible. Whether you’re a seasoned website owner or a newbie, this article will equip you with the knowledge to confidently make the switch. Let’s dive in and turn your digital vision into reality.
Credit: www.youtube.com
Choosing A New Domain Name
Choosing a new domain name for your site is crucial. It impacts your brand and online presence. A domain name should be memorable and easy to spell. It must reflect your business or personal identity. Let’s explore how to select the perfect domain name.
Brainstorm Ideas
Start with brainstorming several ideas. Think about your brand and mission. Jot down words that resonate with your goals. Get creative, but keep it simple. The name should be easy to recall.
Consider Keywords
Keywords can boost your site’s visibility. They help search engines understand your site. Choose relevant keywords related to your niche. This can improve search rankings and attract more visitors.
Check Availability
Ensure your desired name is available. Use Namecheap’s domain search tool. Verify if someone else owns it. If taken, consider variations or alternative names. Always check the availability to avoid issues later.
Evaluate Length
Short domain names are easier to remember. They are quicker to type and share. Aim for something concise, ideally under 15 characters. Long names can be confusing and forgettable.
Avoid Numbers And Hyphens
Numbers and hyphens complicate domain names. They are often misunderstood or mistyped. Stick to letters for clarity. A clean name is more professional and straightforward.
Think Globally
Consider your audience. Think about how your domain sounds globally. Ensure it doesn’t have negative meanings in other languages. A universally appealing name can broaden your reach.
Test Pronunciation
Say the domain name aloud. It should be easy to pronounce. If you struggle, it might confuse others. An easy-to-pronounce name helps in word-of-mouth promotion.

Credit: www.youtube.com
Preparing For Domain Transfer
Changing your domain name with Namecheap involves a few simple steps. First, log into your Namecheap account. Then, navigate to the Domain List and select the domain you want to transfer. Follow the on-screen instructions to ensure a smooth transfer process.
Changing your domain name can feel like a daunting task, but with careful preparation, it’s easier than you think. Before diving into the process, it’s essential to lay the groundwork for a successful transfer. This ensures your website remains accessible and that you don’t lose any important data or traffic. ###Check Domain Eligibility
First, verify that your domain is eligible for transfer. Domains must be registered for at least 60 days before they can be transferred. Check your domain’s age in your Namecheap account dashboard. ###Unlock Your Domain
Log into your Namecheap account and find the domain you want to transfer. Make sure it’s unlocked. An unlocked domain allows you to transfer it without restrictions. ###Obtain Your Epp Code
The EPP code is like a password for your domain. You’ll need this to authorize the transfer. Request the EPP code from Namecheap, and they will send it to your registered email. ###Back-up Your Website
Imagine the nightmare of losing all your data. To avoid this, back up your website files and databases. Use a trusted backup tool or service to ensure everything is safely stored. ###Update Your Contact Information
Ensure your contact details are current in your Namecheap account. This is crucial, as you’ll receive important emails about the transfer process. ###Inform Your Audience
Think about how a sudden change might confuse your visitors. Inform your audience about the upcoming domain change. Use newsletters or social media to keep them in the loop. ###Evaluate Your Seo Impact
Changing your domain can impact your SEO ranking. Plan how you’ll address this. Consider using 301 redirects to maintain your search engine visibility and preserve your traffic. By preparing thoroughly, you not only streamline the transfer process but also safeguard your website’s integrity. Have you ever had a seamless domain transfer experience? What steps did you find most crucial?Executing The Domain Change On Namecheap
Changing your domain name on Namecheap is a straightforward process. Log into your account, navigate to the Domain List, and select the domain you wish to change. Follow the prompts to update your domain name with ease.
Executing a domain change on Namecheap might seem daunting, but breaking it into manageable steps can make the process smoother. Whether you’re rebranding or just want a fresh start with a new domain, making this change effectively is key to maintaining your online presence. Let’s walk through how you can seamlessly transition to your new domain on Namecheap. ###Access Your Namecheap Account
First, log in to your Namecheap account. You’ll find the login option at the top right corner of the homepage. Once inside your account dashboard, you’ll see a list of your domains. This is where the magic begins! ###Locate Your Domain
Navigate to the “Domain List” section. Here, you can find the domain you wish to change. Clicking on “Manage” next to your domain will open up a new set of options. ###Modify Domain Settings
In the management panel, head to the “Advanced DNS” tab. This is where you can adjust your domain’s settings. Don’t worry, you won’t need to be a tech wizard to make these changes. ###Update Your Domain Name
Within the settings, look for the option to update your domain name. This might be labeled as “Change Domain Name” or something similar. Have your new domain ready and follow the prompts to enter it. ###Verify The Change
After submitting the new domain name, double-check the details. Accuracy is crucial here to avoid any disruptions. You’ll receive a confirmation email once the changes have been processed. ###Check Dns Propagation
Once you’ve made the change, give it some time to propagate. This process might take a few hours. Check if your new domain is live by typing it into your browser. ###Update External Links
Remember, changing your domain means updating all external links pointing to your old domain. This includes social media profiles and any other online platforms you use. ###Inform Your Audience
It’s good practice to let your audience know about your new domain. Use newsletters or social media announcements to update them. This ensures your followers can still find you with ease. ###Monitor Your Traffic
After the change, keep an eye on your website traffic. Are people finding your new domain easily? Use analytics tools to ensure your SEO remains strong. Has changing your domain been a seamless process for you? Or did you hit any bumps along the way? Your experience could help others embarking on the same journey!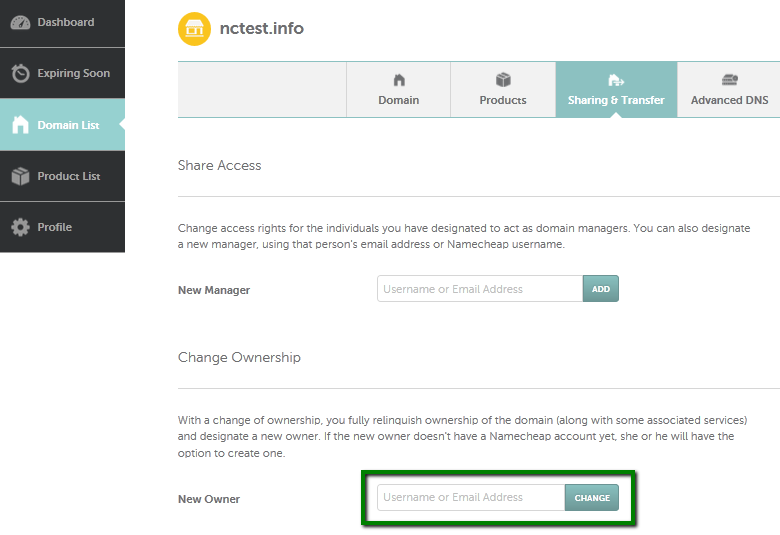
Credit: www.namecheap.com
Frequently Asked Questions
Can I Change The Name Of My Domain On Namecheap?
You cannot directly change a domain name on Namecheap. You must register a new domain and transfer your content.
How Do I Change My Existing Domain Name?
Contact your domain registrar to initiate a name change. Update DNS settings and inform users. Ensure all website links and email addresses reflect the new domain. Backup your site before making changes.
Can You Change A Domain Name After Registration?
You cannot directly change a domain name after registration. You must register a new domain. Transfer website content to the new domain and update all links. Redirect the old domain to the new one for SEO benefits. Always ensure both domains remain active during the transition process.
How To Change Domain Ownership On Namecheap?
Log into your Namecheap account. Go to “Domain List. ” Click “Manage” next to your domain. Select “Sharing & Transfer. ” Enter the new owner’s email and follow the instructions to complete the transfer.
Conclusion
Changing your domain name with Namecheap is simple. Follow the steps carefully. Start by logging into your account. Make sure your new domain is available. Update settings as needed. Double-check everything to avoid errors. Contact support if you face issues.
Keep your audience informed of the change. Monitor your website’s performance after the switch. A new domain can refresh your online presence. Be patient with the process. Enjoy your new domain and its possibilities.
