
Are you looking to improve your website’s performance and security on Namecheap? Changing your DNS settings can be a game-changer.
Whether you’re experiencing slow loading times or want better control over your domain, adjusting your DNS settings is a powerful tool at your disposal. Imagine the ease of managing your online presence with a few simple tweaks. In this guide, you’ll learn how to change DNS on Namecheap step-by-step, ensuring your website runs smoothly and efficiently.
Dive in and discover how these changes can enhance your online experience. Your website deserves the best, and you’re just moments away from unlocking its potential.
Credit: www.namecheap.com
Access Your Namecheap Account
Access your Namecheap account to adjust DNS settings effortlessly. Navigate to the dashboard, select your domain, and find DNS options. Update settings to ensure your domain points to the correct server.
Accessing your Namecheap account is the first step towards managing your DNS settings effectively. Whether you’re a seasoned webmaster or a newcomer to the digital landscape, knowing how to navigate your Namecheap account is crucial. This process is straightforward, but having a clear guide can make it even simpler. Let’s dive into the specifics of accessing your Namecheap account and prepare you to make the necessary DNS changes with ease.Log In To Your Namecheap Account
Begin by heading to the Namecheap website. Look for the “Sign In” button, typically located at the top right corner. Click on it. If you don’t have your login details handy, double-check your email for any Namecheap communication containing your username or password. Once you’re on the login page, enter your credentials. If you’ve forgotten your password, don’t stress. Use the “Forgot Password” link to reset it quickly.Navigate To Your Dashboard
After logging in, you’ll be greeted by your account dashboard. This is your control center for all things Namecheap. It’s filled with essential information about your domains, services, and account settings. Take a moment to familiarize yourself with the layout. You’ll notice sections for domain management, billing, and account settings. This overview helps you understand where to find the DNS settings when the time comes.Locate Your Domain List
To change your DNS settings, you need to first find your domain list. Look for the “Domain List” section in your dashboard. It’s usually on the left-hand side or under a tab labeled “Domains.” Clicking on “Domain List” will display all the domains registered under your account. From here, you can select the specific domain whose DNS settings you wish to modify.Prepare For Dns Changes
Before jumping into DNS changes, it’s wise to have a plan. Ask yourself: What are you aiming to achieve with these changes? Are you redirecting your domain, or integrating with a new hosting provider? Having a clear goal will streamline the DNS modification process. It’s always better to know what you’re doing than to change settings blindly, hoping for the best. Engaging with your Namecheap account doesn’t have to be daunting. Each step you take is a move towards greater control over your online presence. Are you ready to take full charge of your domain management? The journey begins with understanding your Namecheap account.Credit: help.mailgun.com
Locate The Domain List
Find the Domain List in your Namecheap account by navigating to the “Domain List” section. Access this area to view and manage your domains, enabling DNS changes smoothly and efficiently.
Navigating through Namecheap’s interface can feel like a maze, especially when you’re trying to change your DNS settings. The first step on this journey is to locate the Domain List. This list is your control center, where you can manage all your domain settings with ease. But how exactly do you find it? Let’s dive into the details.Step 1: Log Into Your Namecheap Account
First things first, you need to be logged in. Head over to the Namecheap website and enter your credentials. A tip from my personal experience: keep your login details saved in a secure password manager to save time and avoid frustration.Step 2: Access The Dashboard
Once logged in, you’ll land on your dashboard. Look for the navigation menu on the left-hand side. It’s easy to get distracted by all the options, but remember, your focus is the Domain List.Step 3: Find The Domain List
In the left menu, you’ll find the “Domain List” option. Click on it. This is where all your registered domains are displayed. Seeing your domains neatly listed brings a sense of order amidst the chaos of digital management.Step 4: Select Your Desired Domain
Scan through the list and find the domain you want to update. Click on “Manage” next to your domain. This is your gateway to customizing DNS settings and other configurations.Pro Tip: Bookmark The Domain List Page
Once you have successfully accessed the Domain List, consider bookmarking the page. This simple action can save you time on future visits. It’s a little trick I learned after countless searches, and it’s a game-changer. Changing your DNS settings on Namecheap starts with locating the Domain List. With the steps outlined above, you’re well on your way. What do you think? Does this make the process feel more approachable? Let me know your thoughts in the comments!Modify Dns Settings
Changing DNS settings on Namecheap is simple. Log into your account and navigate to the Domain List. Select the domain, find the DNS settings, and update them to your desired nameservers. Save changes to complete the process.
Changing DNS settings on Namecheap might seem daunting at first, but it’s a straightforward process if you follow the right steps. Modifying DNS settings is a crucial task that allows you to manage how your domain name connects with web servers. Whether you want to point your domain to a new hosting provider or set up custom email servers, understanding how to change DNS settings can empower you with greater control over your domain. ### First, log in to your Namecheap account. Navigate to the “Dashboard,” where you can see a list of your purchased domains. If you’ve ever wondered how tech-savvy people manage their domains with ease, this is how it all starts. ###Locate Your Domain
Find the domain you wish to modify. Click on “Manage” next to the domain name. Have you ever felt the satisfaction of organizing your digital assets? This is your moment. ###Choose The Dns Settings
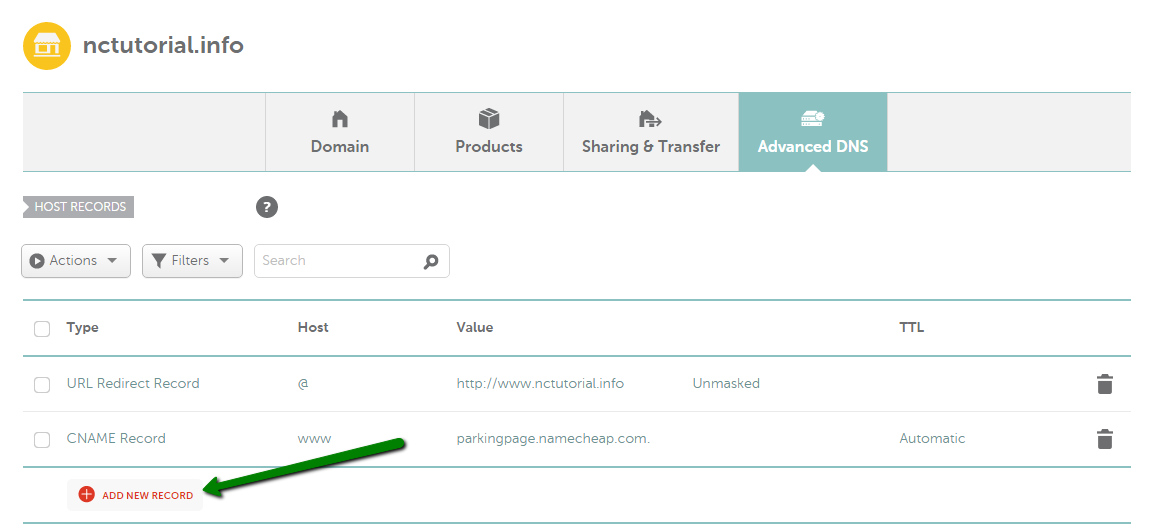
Once you’re in the domain management section, select the “Advanced DNS” tab. This is where the magic happens. Here, you can view your current DNS settings, and decide what changes are needed. ###Modify Dns Records
Identify the DNS records you need to change. You can add new records, modify existing ones, or delete those that are no longer needed. Do you need to point your domain to a different IP address? Simply edit the A Record. ###Save Your Changes
After making the necessary changes, save them. Namecheap usually takes a few minutes to update these settings, but sometimes it might take up to 24 hours. Ever felt a sense of accomplishment after completing a task? That’s what saving your DNS changes feels like. ###Verify Your Dns Changes
To ensure your changes are correctly implemented, use online tools like DNS Checker. Check if your domain points to the desired server. Isn’t it reassuring to know that you have the power to verify your actions? By following these steps, you can confidently modify your DNS settings on Namecheap. Whether you’re tech-savvy or a newbie, taking control of your domain’s DNS settings can be a rewarding experience. What’s the first change you’ll make to your DNS settings?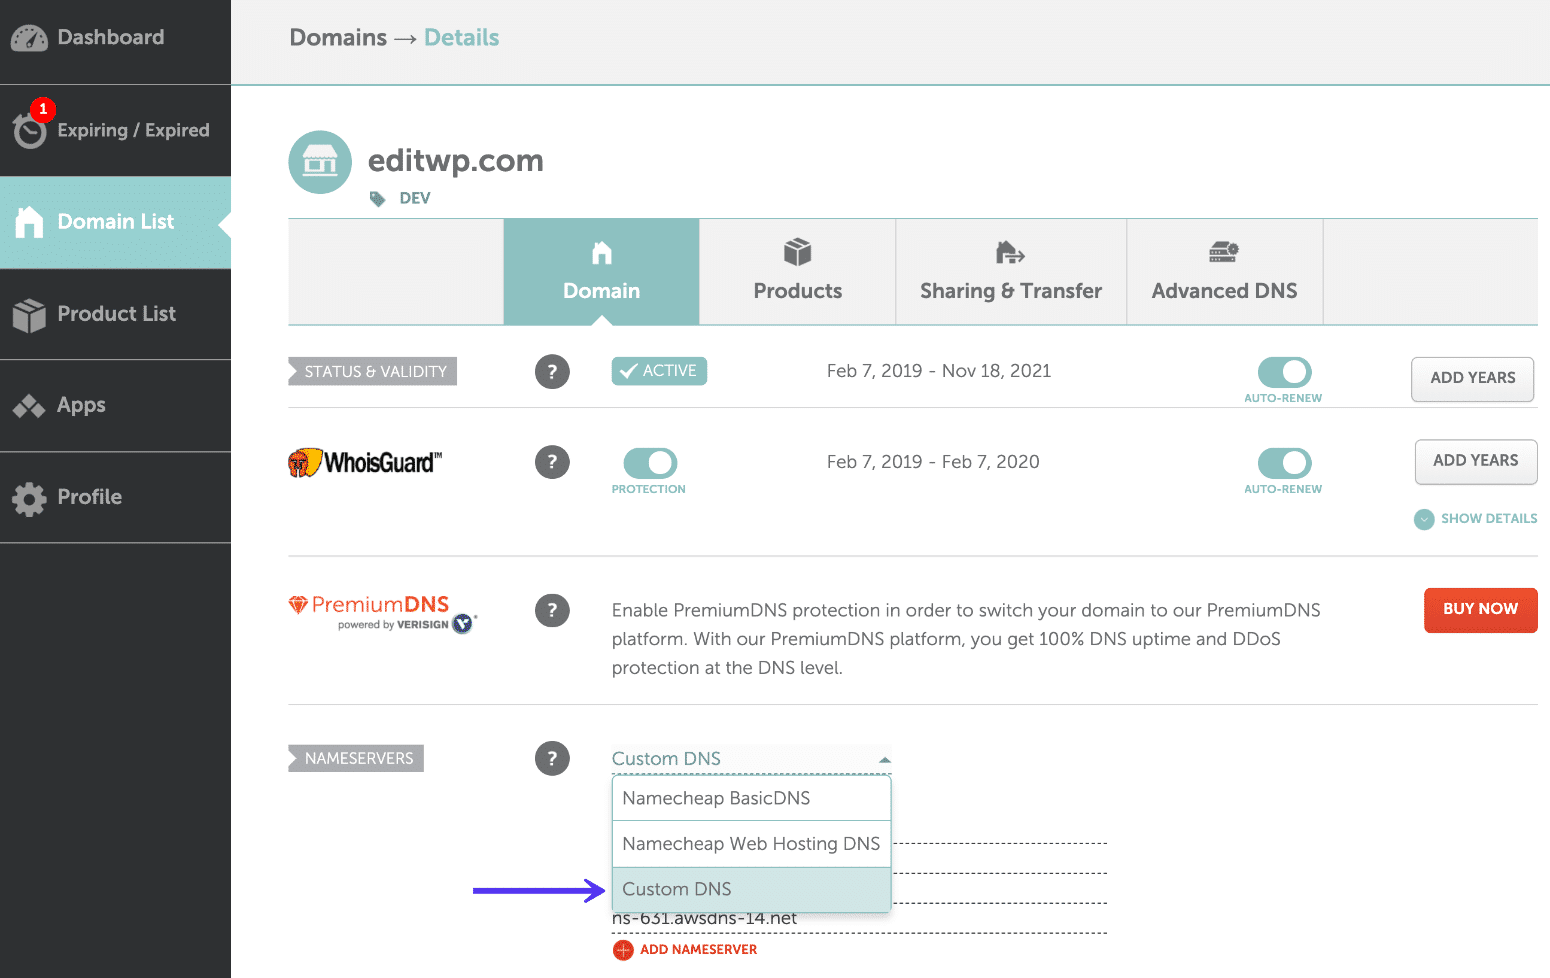
Credit: kinsta.com
Frequently Asked Questions
How To Edit Dns Namecheap?
Log into your Namecheap account. Navigate to “Domain List”. Click “Manage” next to your domain. Select “Advanced DNS”. Edit records as needed. Save changes.
Where Are Dns Settings In Namecheap?
Find DNS settings in Namecheap by logging into your account. Navigate to “Domain List. ” Click “Manage” next to your domain, then select the “Advanced DNS” tab to access settings. Adjust DNS records as needed for your domain.
How Do I Change My Domain Dns?
Log in to your domain registrar’s account. Locate DNS settings in the control panel. Update DNS records as needed. Save changes to apply updates. Allow propagation time for changes to take effect globally.
How Do I Manually Change My Dns Address?
Open network settings on your device. Select your network connection. Navigate to DNS settings. Enter new DNS addresses. Save changes.
Conclusion
Changing DNS on Namecheap is easy with the right steps. Follow the guide, and you’ll be done in minutes. Remember to double-check entries before saving them. This ensures everything works smoothly. DNS changes might take some time to update. Patience is key during this process.
Need help? Namecheap’s support is always ready to assist. With these tips, your DNS setup will be seamless. Feel confident in managing your domain settings. Practice makes perfect, so keep exploring DNS features. Your website’s performance can benefit from the right DNS settings.
Keep learning and improving your website management skills.
