
Have you ever wondered how to change DNS settings on Namecheap? Maybe you’re looking to enhance your website’s performance or boost its security.
Whatever your reason, managing DNS settings is a crucial step in optimizing your online presence. But navigating through these settings can seem intimidating. Don’t worry; you’re in the right place to learn how to do it easily and efficiently. By the end of this guide, you’ll have the confidence to update your DNS settings on Namecheap, ensuring your website runs smoothly and securely.
Let’s dive in and make your website management a breeze!
Credit: kinsta.com
Accessing Your Namecheap Account
To change DNS on Namecheap, log into your account and locate the domain list. Select your domain, then navigate to the DNS settings. Update the DNS records as needed and save your changes. This process ensures your domain points to the correct servers.
Accessing your Namecheap account is the first step in changing your DNS settings. It’s as straightforward as logging into your favorite social media platform. Knowing how to navigate your account is crucial, whether you’re a seasoned domain owner or a beginner. This guide will walk you through the process with ease, ensuring you’re ready for the DNS change.Logging Into Your Namecheap Account
Start by visiting the Namecheap website. Locate the login button at the top right corner of the page. Enter your username and password, and click the login button. Consider bookmarking the login page for quick access in the future. This simple action can save you time, especially when managing multiple domains.Finding Your Domains
Once logged in, head to the dashboard. Here, you’ll see an overview of your account activities. Click on ‘Domain List’ to view all your registered domains. If you have numerous domains, use the search bar to find the specific domain you want to modify. This feature is a lifesaver when you’re in a hurry.Navigating To Dns Settings
Select the domain you wish to update by clicking on it. You’ll be directed to the domain management page. Look for the ‘Advanced DNS’ tab. The ‘Advanced DNS’ section is where the magic happens. It’s your control center for changing DNS settings and customizing your domain’s behavior.Understanding The Importance Of Dns Changes
Changing DNS settings can enhance your website’s performance and security. But why is this important for you? Are you optimizing your site for faster loading times or integrating new features? Think about how these changes will impact your visitors. A quick, reliable website can mean the difference between a new customer and a missed opportunity.Double-checking Your Settings
Before finalizing any changes, review your entries carefully. Mistakes in DNS settings can lead to downtime or connectivity issues. A simple double-check can prevent headaches down the road. Remember, your website’s functionality is in your hands.Experiencing The Satisfaction Of A Successful Change
After updating your DNS settings, take a moment to appreciate the accomplishment. You’ve taken charge of your domain’s technical aspects. Doesn’t it feel empowering to have control over your site’s performance? Celebrate your success and enjoy the improved experience for your visitors. Accessing your Namecheap account and changing DNS settings is not just a task but a part of your digital journey. How will you leverage these changes for your website’s growth?Credit: help.mailgun.com
Locating Dns Settings
Easily change DNS settings on Namecheap by accessing your account’s domain list. Find the domain to modify, then click “Manage. ” Update the DNS settings as needed for your specific requirements.
Locating the DNS settings on Namecheap can feel like finding a needle in a haystack if you’re unfamiliar with the interface. But, don’t worry—it’s easier than you think! Once you know where to look, changing your DNS settings is a breeze. Let’s dive into the steps you need to take to find these settings and make necessary changes. First things first, you need to log into your Namecheap account. Use your credentials to access the dashboard. This is your command center for managing domains, hosting, and other services. Once logged in, you’ll see a list of your domains. It’s like entering a digital marketplace where each domain represents a unique storefront. Click on the domain you want to modify.Navigating To Domain List
After selecting your domain, head over to the ‘Domain List’ on the left-hand side of the dashboard. This section lists all the domains associated with your account. Think of this as your personal library of domain names. Choose the domain for which you need to change the DNS settings.Finding The Manage Button
Next, locate the ‘Manage’ button next to your chosen domain. This button is your gateway to all the settings you can tweak. Once you click ‘Manage,’ you’ll be directed to a new page. This page is where the magic happens and where you can adjust your DNS settings.Locating Dns Settings Tab
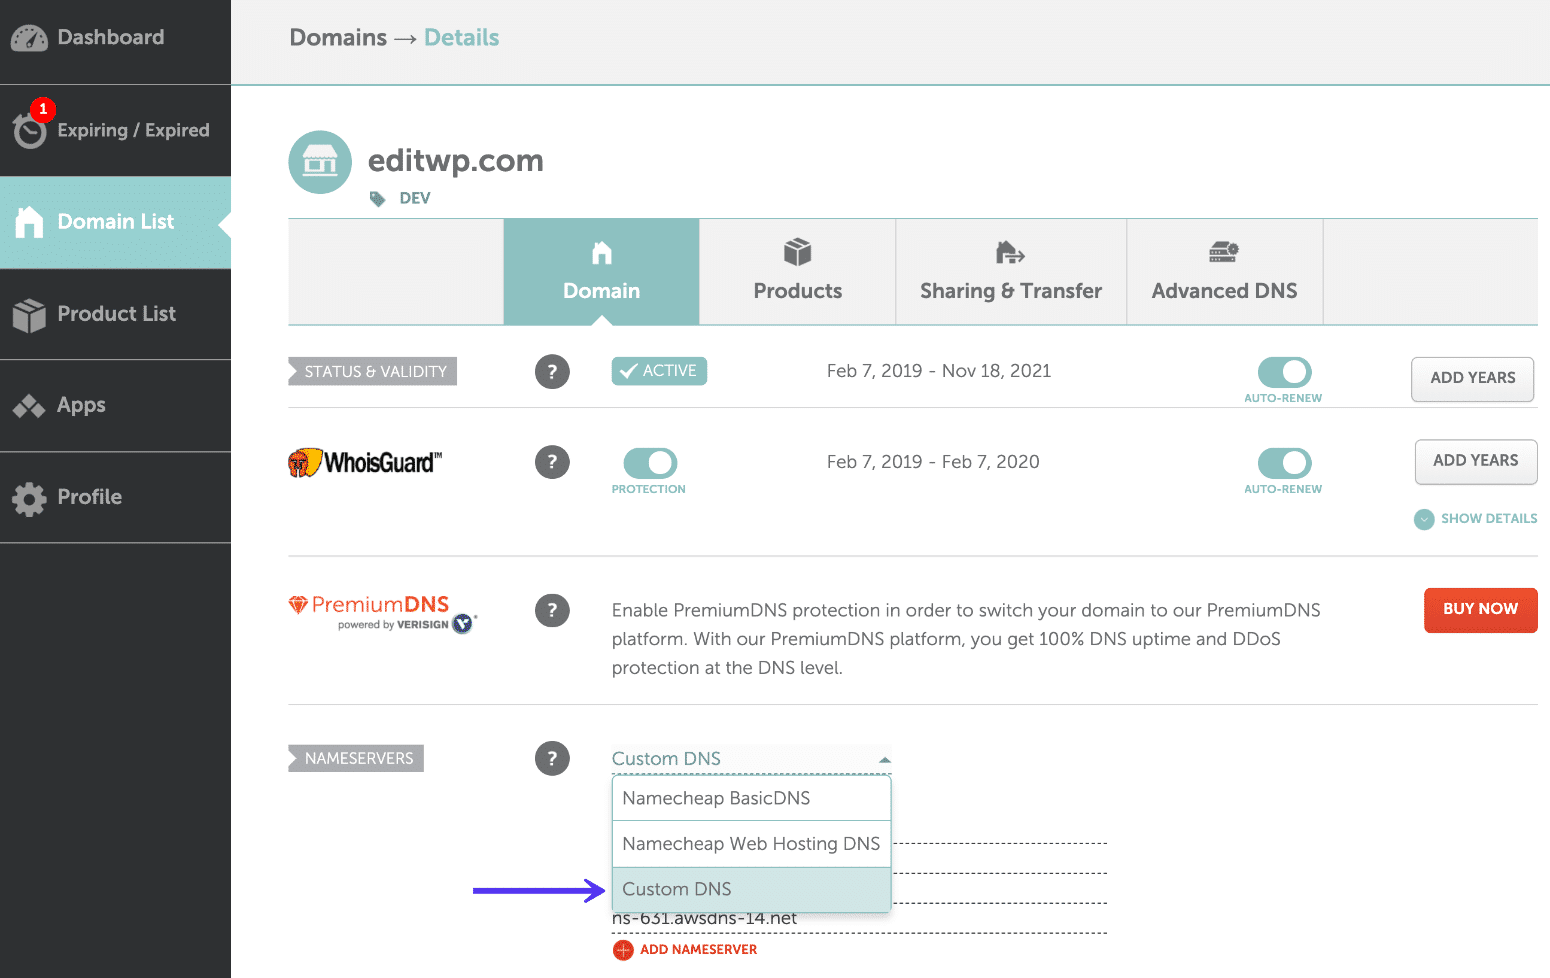
On the ‘Manage’ page, look for the ‘Advanced DNS’ tab. This tab is where you’ll find the DNS settings. It’s like finding the control panel of a spaceship—exciting, right? Click on it, and you’ll be presented with various DNS options.Understanding The Dns Page
Here, you’ll see different sections related to DNS settings such as host records, nameservers, and redirects. Each section serves a specific purpose. For instance, if you want to change your nameservers, this is where you can enter new ones. It’s important to know exactly what you wish to update before making changes.Making The Necessary Changes
Now that you’ve located the DNS settings, it’s time to make your desired changes. Whether you’re updating nameservers or adding a new record, ensure you save your changes. This step is crucial. Otherwise, your efforts could be lost, and you might wonder why nothing happened. Have you ever felt stuck trying to navigate a digital platform? Remember, with a little guidance, you can master these settings and manage your domains like a pro!Updating Dns Records
Updating DNS records on Namecheap is a straightforward process. It is essential for managing your website’s domain. By updating DNS records, you can control where your domain points. This can affect your email, website, and other services.
Accessing Your Namecheap Account
First, log in to your Namecheap account. Use your username and password. Navigate to the dashboard. Here, you can see all your domains.
Selecting The Right Domain
Find the domain you want to update. Click on it to access domain settings. This opens the domain management page. You can now manage DNS settings.
Navigating To Dns Settings
Look for the “Advanced DNS” tab. Click on it to open DNS settings. This tab lets you view and edit DNS records.
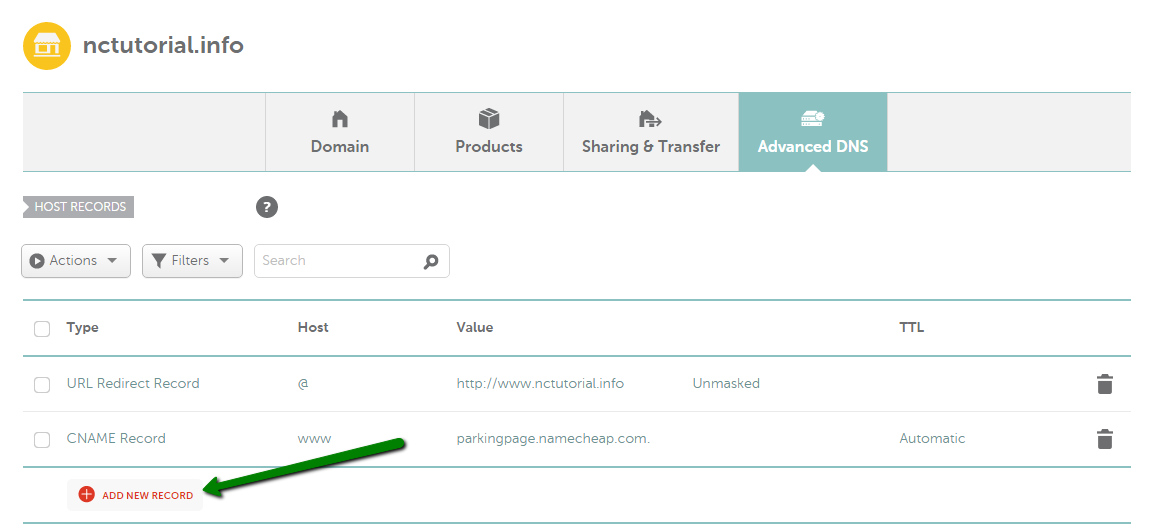
Adding Or Modifying Dns Records
Here, you can add new DNS records. Or modify existing ones. Use the “+ Add New Record” button for new entries. Edit existing records by clicking the “Edit” button.
Understanding Different Dns Record Types
Common DNS records include A, CNAME, and MX. The A record points your domain to an IP address. The CNAME record is an alias for another domain. MX records are for email services.
Saving Changes
After editing, save your changes. Use the “Save All Changes” button. Changes may take some time to propagate. Usually, it takes a few hours.
Checking Dns Propagation
Verify your changes using DNS propagation tools. These tools check if changes are live. If not, wait a little longer. DNS updates can be slow sometimes.
Credit: www.namecheap.com
Frequently Asked Questions
How To Edit Dns Namecheap?
Log into your Namecheap account. Navigate to the “Domain List. ” Click “Manage” next to your domain. Select “Advanced DNS” tab. Edit DNS records as needed. Save changes.
Where Are Dns Settings In Namecheap?
Find DNS settings in Namecheap by logging into your account. Navigate to “Domain List,” then click “Manage” next to your domain. Choose the “Advanced DNS” tab to access DNS settings. Easily modify records like A, CNAME, and MX from there.
Ensure your changes are saved.
How Do I Change My Domain Dns?
Log into your domain registrar account. Locate DNS settings. Edit DNS records to desired values. Save changes. Allow propagation time for updates to take effect.
How To Point To Basic Dns Namecheap?
Log into your Namecheap account, go to “Domain List,” click “Manage” next to your domain, select “Advanced DNS,” and add or edit records under “Host Records” to point to basic DNS. Save changes to apply them.
Conclusion
Changing DNS with Namecheap is simple and straightforward. Follow the steps carefully. Your website’s performance depends on correct DNS settings. Always double-check entries to avoid errors. Regularly updating DNS ensures smooth site operation. Remember, patience is key during propagation. Sometimes it takes a bit of time.
Keep your login details secure. Protect your account from unauthorized access. Need help? Namecheap’s support is always there for guidance. Understanding DNS settings can enhance your website management. You’ve got this. Enjoy your improved website functionality.
