When you manage your domain through Namecheap, ensuring your DNS settings are correctly configured is crucial for your website’s performance and reliability. But how exactly do you change DNS in Namecheap?
You might be wondering if it’s complicated or time-consuming. The good news is, it’s neither! With a few simple steps, you can easily update your DNS settings to optimize your site’s functionality and security. Are you ready to take control of your domain’s destiny?
By understanding how to change DNS in Namecheap, you can enhance your website’s speed, security, and even improve your SEO rankings. Imagine the peace of mind you’ll have knowing your site is configured correctly, efficiently directing visitors to your content without a hitch. We’ll guide you step-by-step through the process, ensuring you have the confidence to make these changes on your own. Whether you’re a seasoned pro or a newbie, you’ll find the information you need to make the best decisions for your site. Stick around, because your website’s success is just a few clicks away!
Credit: kinsta.com
Accessing Your Namecheap Account
Log into your Namecheap account to change DNS settings. Go to your domain list, then select “Manage” next to your domain. Click the “Advanced DNS” tab, and update your DNS records as needed. Save changes to complete the process.
Accessing your Namecheap account is the first step in managing your DNS settings. If you’ve ever felt a bit lost navigating through various account interfaces, you’re not alone. Many users find the process daunting at first, but with a bit of guidance, it becomes quite straightforward. Let’s simplify this task so you can focus on optimizing your website’s performance.How To Log Into Your Namecheap Account
Start by visiting the Namecheap website. Look for the “Sign In” button on the top right corner. Click it to reveal the login page. Enter your username and password. If you’re like me and forget your password occasionally, use the “Forgot Password?” link to reset it.Exploring Your Dashboard
Once logged in, you’ll land on your dashboard. This is your command center for all things related to your domains and services. Notice the clear layout. It neatly displays your domains, hosting packages, and more. Spend a moment familiarizing yourself with these sections. You might discover useful tools you didn’t know were available.Locating Your Domain List
Find the “Domain List” section in your dashboard. It’s typically easy to spot with a distinct icon. Click on it to see all your registered domains. Each domain has specific management options. This is where you’ll initiate DNS changes.Preparing For Dns Changes
Select the domain you wish to modify. You’ll see options like “Manage” or “Settings”. Click on these to access DNS settings. Consider double-checking your current DNS details. It’s a good practice to note them down before making changes. Have you ever tried reversing a change without knowing the original settings? It can be quite a challenge!Why Accessing Your Account Matters
Accessing your Namecheap account efficiently sets the foundation for seamless DNS management. But why is this crucial? Imagine needing to troubleshoot a website issue urgently. Knowing your way around the account ensures quick adjustments, minimizing downtime. Doesn’t it make you wonder how much time you could save with just a little practice? Your website’s performance and reliability often hinge on these small yet significant tasks.Locating Dns Settings
Changing your DNS settings on Namecheap can seem challenging. But it’s quite simple once you know where to look. Locating the DNS settings is the first step. This allows you to manage your domain’s DNS records. Follow these steps to find your DNS settings on Namecheap easily.
Access Your Namecheap Account
Start by logging into your Namecheap account. Use your username and password. Once logged in, you’ll see the dashboard. This is where you manage your domains and services.
Find The Domain List
On the left side of the dashboard, find the ‘Domain List’ tab. Click on it to see all your registered domains. This section displays every domain you own with Namecheap.
Select Your Domain
Locate the domain whose DNS you want to change. Click on the ‘Manage’ button next to your domain. This will take you to the domain details page. Here, you can access various settings for your domain.
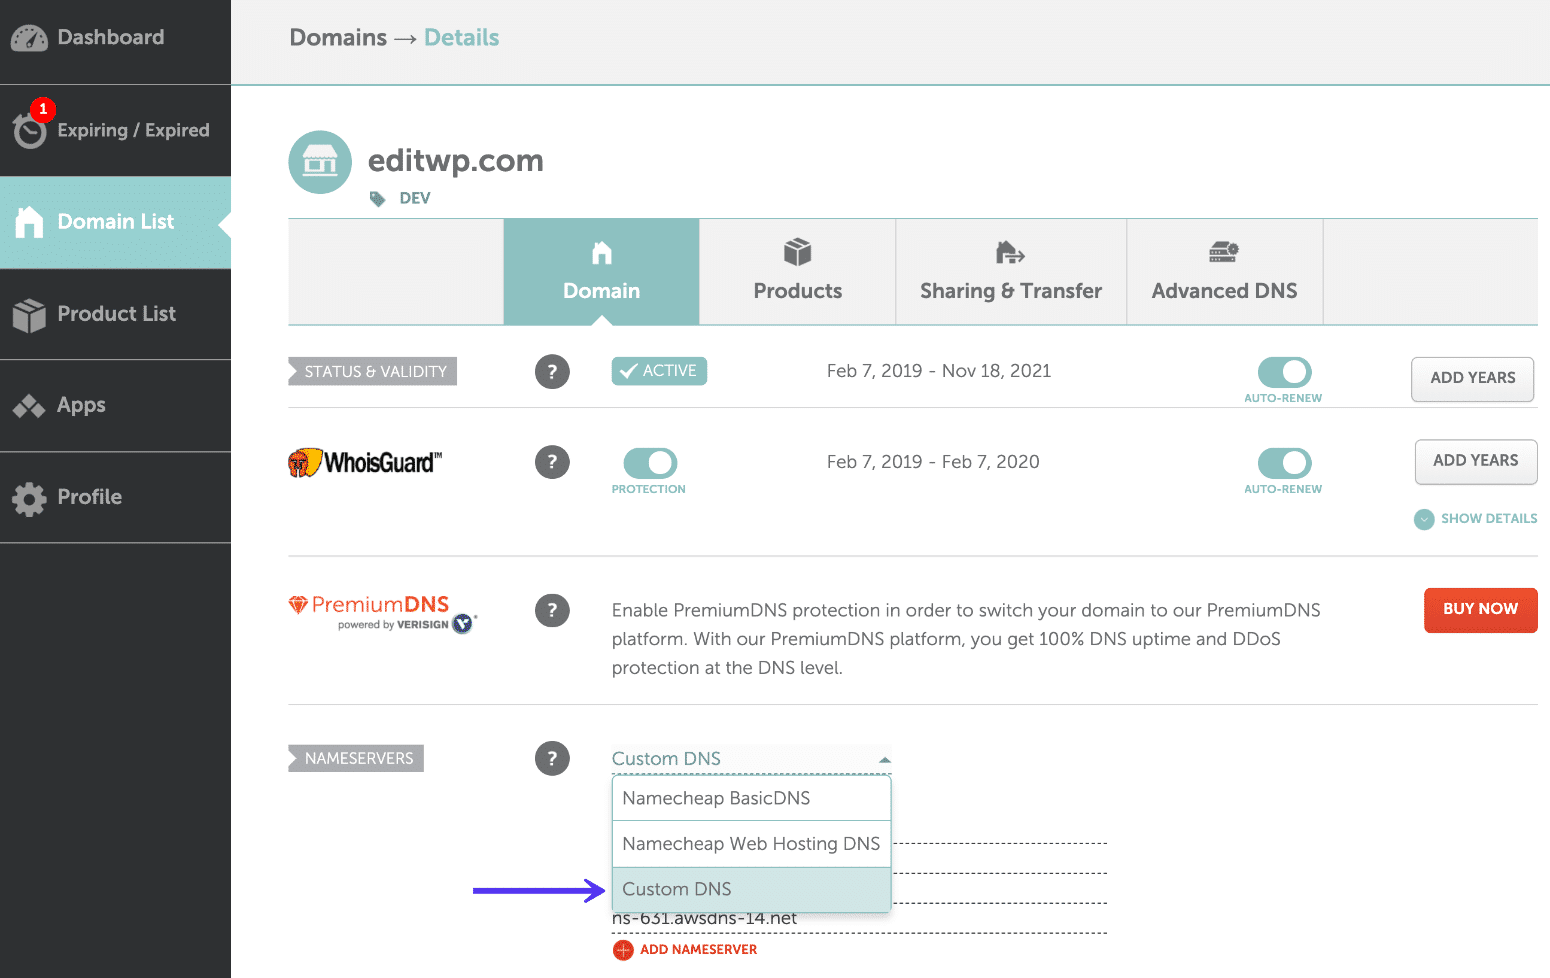
Navigate To The Dns Settings
On the domain details page, find the ‘Advanced DNS’ tab. Click on it to enter the DNS settings section. This is where you can modify DNS records as needed.
Updating Dns Records
Change DNS settings in Namecheap by logging into your account. Navigate to the “Domain List” and select “Manage. ” Update the DNS records under the “Advanced DNS” tab to point your domain to the desired server.
Updating DNS records is an essential step in managing your website’s domain settings. Whether you’re shifting to a new hosting provider or configuring your email settings, modifying DNS records in Namecheap can seem daunting. But with a clear, step-by-step approach, you can easily navigate this process. ###Accessing Your Domain List
First, log into your Namecheap account. Once you’re in, head over to the “Domain List” section on the left sidebar. This is where all your purchased domains are listed. Select the domain you want to update. Click on “Manage” next to it. This opens up a panel where you can start making changes to your DNS settings. ###Understanding Dns Record Types
In the DNS settings, you’ll encounter various types of records like A, CNAME, MX, and TXT. Each serves a unique purpose. An A record points your domain to an IP address, while CNAME is used for domain aliasing. MX records are critical for email delivery, and TXT records can be used for verification purposes. Knowing what each does helps you decide what changes to make. ###Modifying Existing Dns Records
Locate the specific DNS record you want to update. If you need to change an IP address, click on the existing A record. Enter the new IP address in the designated field and click the checkmark or save button. Your changes should reflect within a few minutes to a few hours, depending on DNS propagation. ###Adding New Dns Records
To add a new record, click the “Add New Record” button. Choose the type of record you need, such as A, CNAME, MX, or TXT. Fill in the required fields, like the host name and value. Make sure you double-check these details to avoid connectivity issues. Once filled out, click the save button to finalize your addition. ###Checking Dns Propagation
After updating or adding DNS records, it’s crucial to verify the changes. Use online tools to check DNS propagation across different locations. If your changes haven’t propagated, it might be due to caching. Patience is key here, as DNS updates can sometimes take up to 48 hours. Have you ever had to wait for DNS changes to propagate? It can be nerve-wracking, but staying informed helps ease the anxiety. ###Troubleshooting Common Issues
Sometimes, things don’t go as planned. If your website isn’t resolving correctly, revisit your DNS settings. Check for typos or incorrect entries. Ensure there are no conflicting records. If issues persist, contact Namecheap support for assistance. They can offer insights and solutions to get your site back on track. Updating DNS records might seem technical, but with these steps, you’ll feel more confident in managing your domain settings.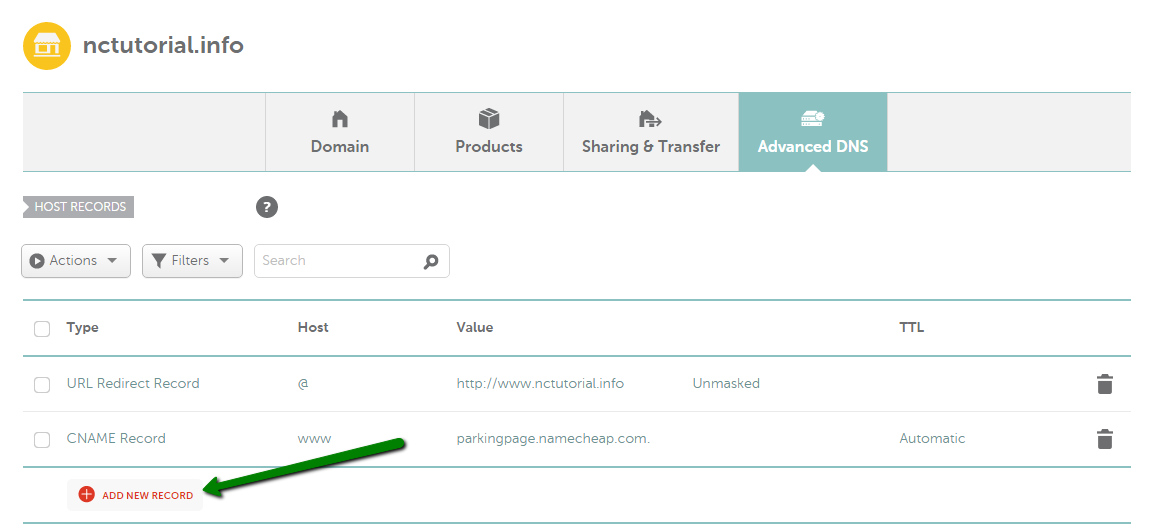
Credit: www.namecheap.com
Credit: help.mailgun.com
Frequently Asked Questions
How To Edit Dns Namecheap?
Log into your Namecheap account. Go to “Domain List” and click “Manage” next to your domain. Select the “Advanced DNS” tab. Edit the DNS records by clicking “Add New Record” or modifying existing ones. Save changes.
Where Are Dns Settings In Namecheap?
Find DNS settings in Namecheap by logging into your account. Go to the “Domain List” and click “Manage” next to your domain. Select the “Advanced DNS” tab to access and edit DNS settings.
How Do I Change My Domain Dns?
Log into your domain registrar account. Locate the DNS settings section. Update the nameservers with new DNS details. Save changes. Wait for propagation.
How Do I Manually Change My Dns Address?
Open your network settings. Select the network connection. Click on ‘Properties’ or ‘Settings’. Find ‘DNS settings’. Enter the new DNS address. Save changes. Restart your device to apply.
Conclusion
Changing DNS in Namecheap is simple with these steps. Start by logging into your account. Navigate to the domain list and find your domain. Click on “Manage” and then “Advanced DNS. ” Enter your new DNS records and save changes.
Always double-check your entries for accuracy. These changes might take some time to propagate. Patience is key. With these easy steps, managing your DNS becomes straightforward. Remember, keeping your DNS updated ensures smooth website operations. If needed, Namecheap support can assist.
Feel confident managing your domain. It’s all about practice and patience. Happy hosting!