
Are you planning to update your website’s DNS settings on Namecheap but aren’t sure how to change a record? You’re not alone.
Navigating the world of domain management can be tricky, especially if you’re new to it. But fear not! This guide is designed to help you easily change a record in Namecheap without feeling overwhelmed. Imagine the satisfaction of knowing your domain is perfectly configured to meet your needs.
With just a few simple steps, you can ensure your website functions smoothly and efficiently. Keep reading to discover how you can take control and make the necessary changes to your domain records with confidence.
Credit: help.mailgun.com
Accessing Your Namecheap Account
So, you’ve decided to change a record in your Namecheap account. Navigating through the digital space can be a little daunting, especially if you’re new to managing domain settings. But worry not! Accessing your Namecheap account is your first step, and it’s simpler than you might think. Whether you’re looking to update DNS records or tweak other settings, understanding how to get into your account efficiently is key. Let’s break down this process into manageable steps.
How To Log In To Your Namecheap Account
Your journey begins at the Namecheap homepage. Look for the “Sign In” button, usually located at the top right corner. Clicking it will lead you to the login page.
Enter your username and password. If you can’t remember your credentials, use the “Forgot Password” option. It’s quick and saves you from unnecessary frustration.
Navigating The Dashboard
Once logged in, you’ll be welcomed by the dashboard. Think of this as your control center. Here, you can manage all your domains, settings, and account preferences.
Explore the tabs and familiarize yourself with the layout. This will help you locate the sections you need swiftly, making future visits more efficient.
Finding Your Domain List
In the dashboard, look for the “Domain List” tab. This is where all your domains are listed. It’s like having a digital filing cabinet for your web properties.
Click on the domain you wish to modify. This action will open up the settings specific to that domain.
Accessing Advanced Dns Settings
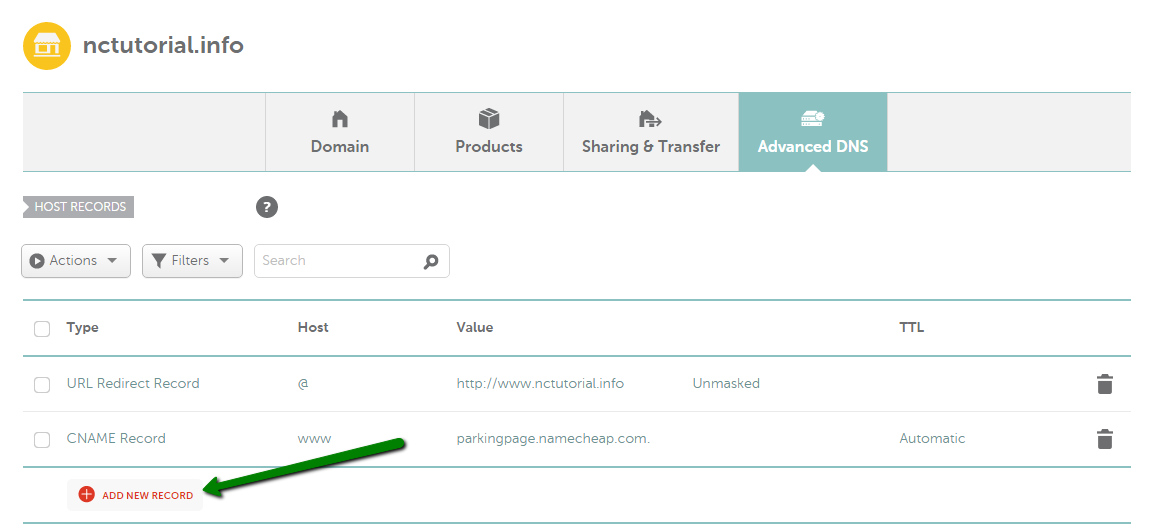
With your domain selected, navigate to the “Advanced DNS” tab. Here’s where the magic happens. You can add, edit, or delete DNS records as needed.
Don’t rush through this. Take your time to understand each option available to avoid any missteps.
Accessing your Namecheap account and navigating through it doesn’t have to be a chore. Have you ever thought about how these simple actions can empower you to control your online presence? With each click, you’re gaining more expertise and confidence. Next time, you’ll breeze through these steps like a pro! Remember, the key is to explore patiently and understand the options available to you.

Credit: www.youtube.com
Navigating To Domain Management
Changing a record in Namecheap starts with accessing Domain Management. This section is crucial for making any adjustments. Understanding how to navigate this area will simplify the process.
How To Access Domain Management
Begin by logging into your Namecheap account. Use your credentials to enter the dashboard. Once logged in, find the ‘Domain List’ on the left sidebar. This list contains all your registered domains.
Selecting The Correct Domain
In the ‘Domain List’, locate the domain you want to change. Click on the ‘Manage’ button next to it. This will take you to the Domain Management page.
Exploring The Domain Management Page
The Domain Management page is where changes happen. Here, you can update DNS settings, modify records, and more. It offers a straightforward interface for easy navigation.
Locating The Advanced Dns Tab
To change a record, find the ‘Advanced DNS’ tab. It’s usually at the top of the page. This tab allows you to access and edit DNS records efficiently.
Editing Dns Records
Editing DNS records in Namecheap is a straightforward process. DNS records control where your domain points and how it functions. Understanding this process helps manage your website effectively. Let’s explore the steps to edit DNS records.
Accessing Your Domain List
Start by logging into your Namecheap account. Once logged in, locate the “Domain List” on the left sidebar. Click on it to view your domains. This list shows all your registered domains. Select the domain you wish to edit.
Navigating To Advanced Dns
After selecting your domain, look for the “Manage” button. Click it to access more options. Here, you’ll see several tabs. Navigate to the “Advanced DNS” tab. This section allows you to manage DNS settings.
Identifying The Record To Edit
In the “Advanced DNS” section, you’ll see various records. These include A, CNAME, MX, and TXT records. Identify which record you need to change. Each record has specific functions and purposes.
Making The Necessary Changes
Click the “Edit” button next to the record. A form will appear, allowing you to make changes. Enter the new information in the appropriate fields. Ensure that you input the correct values to avoid errors.
Saving Your Changes
After editing the record, locate the “Save” button. Click it to update your DNS settings. The changes may take some time to propagate. Be patient as DNS updates can vary in time.
Verifying The Changes
Finally, verify that your changes are working correctly. Use online tools to check DNS propagation. Ensure that your website points to the correct server. This confirmation ensures your DNS changes were successful.
Credit: www.namecheap.com
Frequently Asked Questions
How To Edit Dns Records On Namecheap?
Log in to Namecheap. Go to ‘Domain List’, click ‘Manage’ next to your domain. Select ‘Advanced DNS’, then edit DNS records as needed. Save changes.
How Do I Update A Domain Record?
Log into your domain registrar account. Select the domain to update. Navigate to DNS settings. Edit the desired record and save changes. Always verify updates.
How To Change Mx Record On Namecheap?
Log in to Namecheap. Go to “Domain List” and click “Manage” next to your domain. Select “Advanced DNS. ” Find the “Mail Settings” section, choose “Custom MX,” and enter your new MX records. Save changes.
How Do I Change My Mx Record?
Log into your domain registrar’s control panel. Locate DNS settings and find MX records. Edit the existing record or add a new one. Save changes to update the MX records. Changes may take up to 48 hours to propagate.
Conclusion
Changing a record in Namecheap is simple and straightforward. Just follow the steps, and you’ll be done quickly. Remember to check details carefully. Errors can cause website issues. Always double-check your entries. Use Namecheap’s support if needed. They are helpful and responsive.
Regular updates to your records are important. It keeps your website running smoothly. With practice, you’ll get more comfortable. Don’t rush; take your time. Your website’s performance depends on it. Keep learning and exploring. It will enhance your skills. Happy managing your Namecheap records!
