
Struggling to manage multiple email accounts can feel overwhelming. If you use Namecheap for your domain and Gmail for your personal email, merging the two can simplify your digital life.
Imagine having all your messages in one place, making your day smoother and more organized. By adding your Namecheap email to Gmail, you unlock a seamless and efficient way to handle your communications. You’ll save time, reduce stress, and never miss an important email again.
Dive into this guide to discover how easy it is to integrate these platforms. Your productivity and peace of mind are just a few clicks away.
Credit: www.truehost.com
Configuring Namecheap Email Settings
Setting up Namecheap email with Gmail is straightforward. Access Gmail settings and add your Namecheap email using the POP3 protocol. Customize server settings to ensure seamless email delivery and synchronization.
Configuring Namecheap email settings might sound like a daunting task, especially if you’re new to the world of domain emails. But imagine the satisfaction of managing everything seamlessly through Gmail, where you can access your emails, contacts, and calendar all in one place. Let’s walk through how you can set up your Namecheap email in Gmail. With a few simple steps, you’ll be integrating your professional email with ease. ###Understanding Namecheap’s Email Server Settings
Before diving into Gmail, familiarize yourself with Namecheap’s email server settings. Typically, you’ll need the incoming and outgoing server details. These are often in the format of `mail.yourdomain.com`. You will also need your full email address and password. Namecheap’s website or your account dashboard will provide these specifics. Have you checked if your settings are up to date? ###Setting Up Pop3 Or Imap Access
Decide whether to use POP3 or IMAP. POP3 downloads emails to your device and removes them from the server, which can be useful if storage is a concern. On the other hand, IMAP keeps emails on the server and syncs across devices, ideal for accessing your email from multiple locations. Which method aligns better with your workflow? Choose wisely to avoid future headaches. ###Configuring Gmail To Receive Namecheap Emails
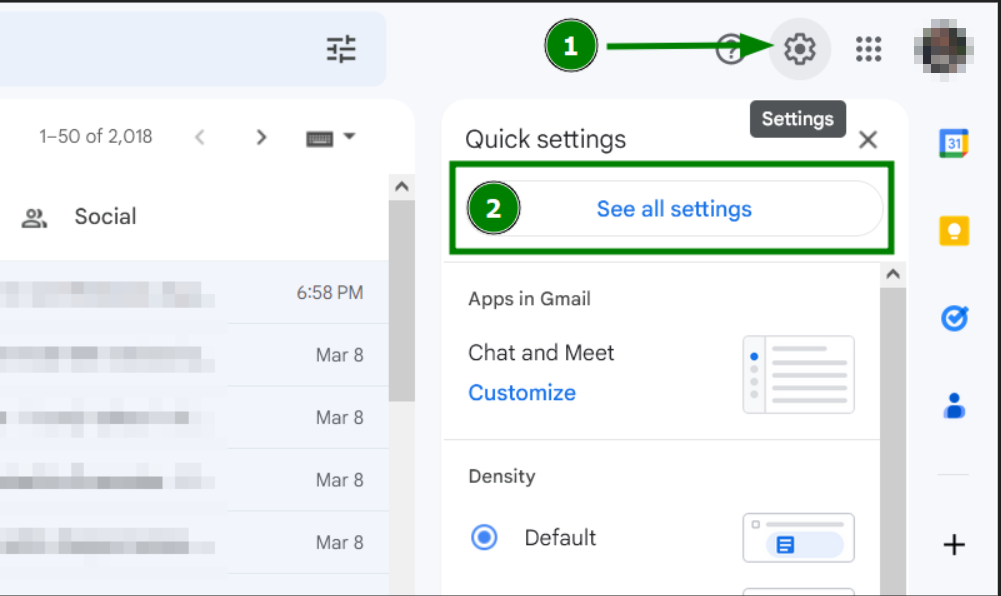
In Gmail, navigate to the settings gear in the upper right corner, then select ‘See all settings’. Click on the ‘Accounts and Import’ tab. Here, you’ll find the ‘Add a mail account’ option. Enter your Namecheap email address and follow the prompts. Remember, when entering server details, accuracy is key. Have you double-checked your entries? ###Sending Emails From Your Namecheap Address Via Gmail
To send emails from your Namecheap address, return to the ‘Accounts and Import’ tab. You’ll see an option to ‘Add another email address’. Follow the steps, entering your Namecheap email address and SMTP server details. Test sending an email to ensure everything is functioning correctly. How satisfying is it to see your professional email seamlessly integrated with Gmail? ### Encountering issues is normal. If emails aren’t syncing, recheck server settings and passwords. Sometimes, security settings in your Namecheap account might block Gmail’s access. Adjust these settings and try again. Have you noticed any patterns when troubleshooting similar tech tasks? By configuring your Namecheap email settings thoughtfully, you can streamline your communication and enhance productivity. Embrace this integration as a step towards more efficient email management. What strategies do you use to keep your digital workspace organized?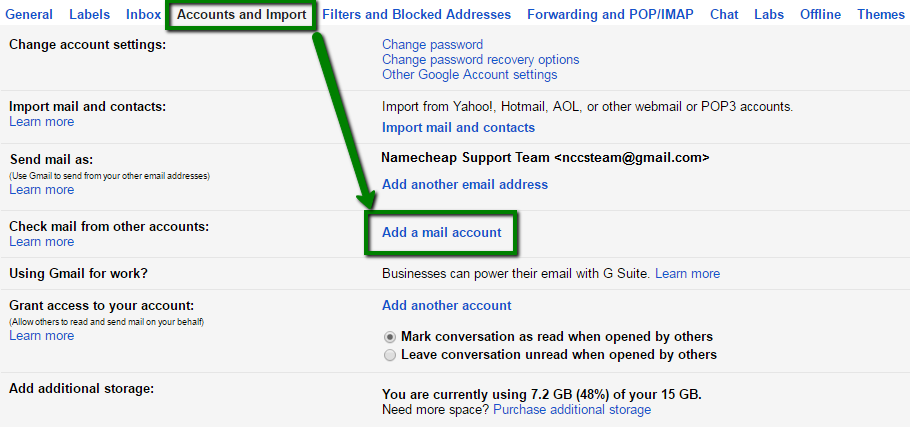
Credit: www.namecheap.com
Integrating Namecheap Email With Gmail
Easily link Namecheap email to Gmail by accessing Gmail settings. Enter Namecheap credentials under “Accounts and Import. ” Follow prompts to complete setup.
Integrating your Namecheap Email with Gmail can streamline your email management, allowing you to handle all your communications in one place. It’s especially useful if you’re already a fan of Gmail’s intuitive interface and robust features. Plus, integrating these two services can save you time, reduce stress, and increase productivity.Setting Up Email Forwarding
Start by setting up email forwarding from your Namecheap Email to your Gmail. Log into your Namecheap account, navigate to your email settings, and select the option to forward emails. Enter your Gmail address as the destination. This way, you’ll receive all your Namecheap emails directly in Gmail.Configuring Gmail To Send Emails From Your Namecheap Address
Once emails are forwarding, configure Gmail to send emails using your Namecheap address. Go to Gmail settings, click on the “Accounts and Import” tab, and add another email address. Follow the prompts to input your Namecheap email details. Now you can send emails from your Namecheap address without leaving Gmail.Why Use Gmail’s Features With Namecheap?
Gmail offers features like powerful search, spam filtering, and organization tools that can greatly enhance your email experience. By integrating Namecheap Email, you can utilize these features to better manage your communications. Imagine cutting down on clutter and quickly finding old emails when you need them.Personal Experience: Simplifying Email Management
A few months back, I integrated my Namecheap Email with Gmail, and it was a game-changer. I no longer needed to switch between platforms to manage my emails. The ease of having everything in one inbox made my daily routine smoother and more efficient.Potential Challenges And Solutions
Some users may face issues with email authentication or delivery. Ensure that your DNS settings are correctly configured on Namecheap. If problems persist, Namecheap’s support team can assist with troubleshooting.What’s Next?
Try integrating Namecheap Email with Gmail today to experience the benefits firsthand. Does managing emails in one place sound appealing to you? Give it a try and see how it can transform your workflow.Troubleshooting Common Issues
Encountering issues while integrating Namecheap Email with Gmail can be frustrating. These problems can disrupt your email flow. Understanding common issues can help resolve them quickly. Here, we explore some typical challenges and their solutions. This will ensure a smoother email setup experience.
1. Incorrect Imap/pop3 Settings
Double-check your IMAP or POP3 settings. Wrong settings can block email access. Use Namecheap’s provided settings for accuracy. Ensure you enter the server and port details correctly. Verify your username and password too.
2. Authentication Errors
Authentication errors often stem from incorrect login details. Ensure your email address and password are correct. Check for any extra spaces or typos. If problems persist, reset your password. Update it in Gmail settings afterward.
3. Ssl/tls Configuration Issues
Secure connections require proper SSL/TLS configurations. If emails fail to load, check these settings. Ensure SSL is enabled for incoming and outgoing servers. Use the right ports: 993 for IMAP or 995 for POP3. For SMTP, use port 465.
4. Gmail Security Settings
Gmail’s security settings may block Namecheap emails. Allow less secure apps in your Google Account. This setting lets third-party apps access Gmail. Ensure “Allow less secure apps” is turned on. Always review security settings after changes.
5. Email Forwarding Problems
Problems in email forwarding can cause delivery issues. Ensure forwarding settings are correctly configured. Check if emails are sent to the correct Gmail account. Test the forwarding by sending a test email. Make adjustments if necessary.
6. Server Connectivity Problems
Server connectivity issues may interrupt email syncing. Check your internet connection first. Make sure you have a stable connection. If the problem persists, consult Namecheap’s server status page. This page provides updates on server conditions.
Credit: www.namecheap.com
Frequently Asked Questions
How Do You Add Your Namecheap Email To Gmail?
To add Namecheap email to Gmail, navigate to Gmail settings. Click “Accounts and Import” then “Add a mail account”. Enter your Namecheap email details and follow instructions. Ensure POP3 settings are correct. Confirm setup by sending a test email.
Is Namecheap Email Pop Or Imap?
Namecheap email supports both POP and IMAP protocols. Choose IMAP for syncing across devices, or POP for downloading emails. These options offer flexibility based on your email management preferences.
How Do I Link A Domain Email To Gmail?
Link a domain email to Gmail by accessing Gmail settings, selecting “Accounts and Import,” then “Add a mail account. ” Enter your domain email details, configure settings, and verify. This integrates domain emails into your Gmail account for seamless management.
How To Integrate Private Email With Gmail?
Go to Gmail settings and click on “Accounts and Import. ” Add your private email in “Check mail from other accounts” and “Send mail as. ” Follow the prompts to configure POP3 or IMAP settings. Verify your email to complete the integration.
Conclusion
Adding Namecheap email to Gmail is simple and rewarding. It enhances your email experience. You save time managing all emails in one place. This setup boosts productivity and keeps you organized. Follow the steps carefully for a seamless process. Once configured, enjoy streamlined communication.
No more switching between accounts. Your email tasks are now more efficient. Make sure to check for any updates regularly. This ensures continuous smooth operation. Embrace this integration for a better email workflow. A unified inbox awaits you. Start today and simplify your email life.
