
Are you ready to elevate your online store with a custom domain? Adding a Namecheap domain to your Shopify store is a powerful move that can boost your brand’s credibility and make it easier for customers to find you.
Imagine the satisfaction of seeing your business name in the URL, creating a seamless and professional online presence. You might be wondering if the process is complicated or time-consuming. Don’t worry; it’s easier than you think! We’ll guide you through the simple steps to connect your Namecheap domain to Shopify effortlessly.
By the end, you’ll have the confidence and knowledge to make your online store truly yours. So, let’s dive in and get your domain up and running!

Credit: help.shopify.com
Connect Domain To Shopify
Easily connect your Namecheap domain to Shopify to start selling online. Update DNS settings in your Namecheap account. Then, add the domain to your Shopify store for seamless integration.
Connecting your Namecheap domain to Shopify is a vital step in establishing your online presence. It’s not just about having a website; it’s about owning a digital storefront that reflects your brand. Ever wondered how seamless it would be to have everything under one roof? Let me guide you through this process, breaking it down into easy-to-follow steps. You’ll find it’s not as daunting as it might seem, especially if you want your domain to shine on Shopify. ###Access Shopify Admin
Firstly, log into your Shopify account. Your dashboard is where the magic happens. The admin area is your control center. Look for the “Online Store” option in the left-hand menu. Clicking it opens a world of possibilities. Here, you can manage everything from your store’s appearance to your domain settings. Isn’t it amazing how a few clicks can pave the way for your brand’s digital journey? ###Add Custom Domain
Now that you’re in the admin area, let’s move on to adding your domain. Find the “Domains” tab and click on it. You’ll see an option for adding a domain. Select “Connect existing domain.” Type your Namecheap domain name in the provided field. Got it? Perfect! It’s like fitting a puzzle piece into the bigger picture of your online store. Follow the instructions Shopify provides. These steps ensure your domain points to your store. You might need to adjust DNS settings on Namecheap. This part might seem tricky but stay with me. You’re closer to making your store live. As you tweak these settings, think about the audience you’ll attract. A domain is more than a web address; it’s your digital handshake. Why not make it memorable? This process guarantees your domain is ready to welcome visitors. Are you ready to see your store flourish with your Namecheap domain linked seamlessly? Remember, each step you take is a stride towards building your brand’s credibility online. With your domain connected, your Shopify store becomes a beacon for new opportunities. So, what’s stopping you from taking this step today?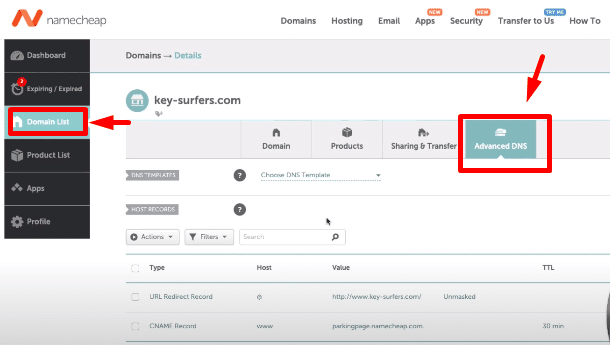
Credit: keycommerce.com
Configure Dns Settings
Easily connect your Namecheap domain to Shopify by configuring DNS settings. Update the A record and CNAME to point to Shopify’s servers. Ensure your domain is verified within Shopify for seamless integration.
Configuring DNS settings is a pivotal step when connecting your Namecheap domain to Shopify. It might sound complex, but it’s actually a straightforward process. This involves tweaking a few settings so that your domain points directly to your Shopify store. Think of it as setting up a direct line of communication between your domain name and your online store. Once configured, your customers can effortlessly find you online.Locate Namecheap Dns Management
First, log into your Namecheap account and head to the dashboard. Look for the “Domain List” on the left sidebar. Click on “Manage” next to the domain you want to connect to Shopify. Now, you’re in the DNS management area. Here, you’ll adjust the settings to ensure your domain points to Shopify. This might sound like a daunting task, but it’s just a matter of adjusting a few numbers and letters.Update Records
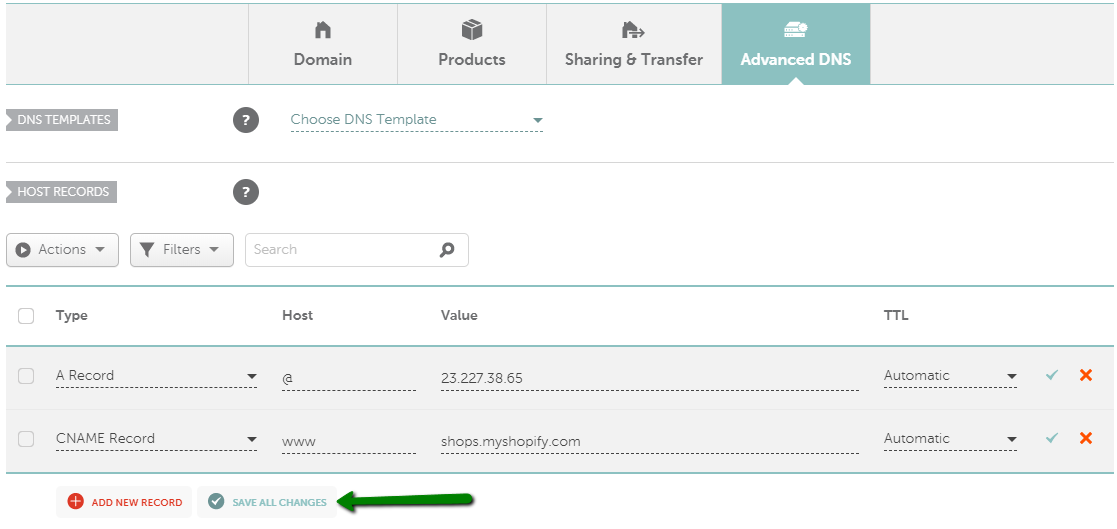
Begin by setting the A Record to point to Shopify’s IP address, which is typically 23.227.38.65. This step ensures that when someone types your domain into their browser, they land on your Shopify store. Next, update the CNAME record. Set it to point to shops.myshopify.com. This tells the internet that any subdomains should also direct visitors to Shopify. Don’t forget to save your changes. It might take a few minutes to propagate, but soon your domain will be seamlessly linked with Shopify.Doesn’t it feel empowering to take control of your online presence? Knowing how to adjust these settings can make a world of difference. Have you ever encountered issues with DNS settings before? What did you learn from that experience?
Verify Domain Connection
After connecting your Namecheap domain to Shopify, verifying the connection is key. This step ensures your domain is correctly linked to your Shopify store. A smooth verification process means fewer disruptions for your customers. Let’s explore how to verify your domain connection effectively.
Check Domain Status
Begin by checking your domain status in Shopify. Log into your Shopify account. Navigate to the “Domains” section in your admin panel. Look for your connected Namecheap domain. It should display as “Connected” if set up correctly.
If the status shows “Not connected,” there might be an issue. Ensure DNS settings in Namecheap are correct. The A record should point to Shopify’s IP address. The CNAME record should point to shops.myshopify.com. These settings are vital for connection.
Troubleshoot Common Issues
If your domain isn’t connecting, troubleshoot common issues. First, clear your browser cache. Cached data can sometimes interfere with real-time checks. Next, double-check your DNS settings in Namecheap. Small errors in entries can cause big problems.
Ensure DNS propagation is complete. This can take up to 48 hours. If all settings are correct, but there’s still an issue, contact Namecheap support. They can help resolve DNS problems quickly.
Credit: www.namecheap.com
Frequently Asked Questions
How Do I Link My Domain To My Shopify Store?
To link your domain to Shopify, go to your Shopify admin. Navigate to “Domains” and select “Connect existing domain. ” Follow the instructions to update your DNS settings with your domain provider. Ensure your domain points to Shopify’s IP address.
Verify the connection in Shopify once updated.
How Do I Verify Domain Ownership On Shopify Namecheap?
To verify domain ownership on Shopify with Namecheap, access your Namecheap account. Add the provided TXT record to your DNS settings. Save changes and return to Shopify to complete verification.
How Do I Register My Domain On Shopify?
To register your domain on Shopify, log into your Shopify admin. Go to “Settings” then “Domains”. Click “Buy new domain”, enter your desired domain name, and follow the purchase instructions. Ensure your domain is properly connected to your Shopify store for seamless operation.
How Do I Add Dns To Shopify?
To add DNS to Shopify, log into your Shopify admin. Go to “Domains” and click “Connect existing domain. ” Follow the instructions to update your DNS settings through your domain provider. Ensure the A record points to Shopify’s IP address and CNAME points to shops.
myshopify. com. Save changes.
Conclusion
Adding a Namecheap domain to Shopify is simple and effective. Follow the steps carefully to ensure success. Start by logging into your Namecheap account. Then, access your domain settings. Adjust the DNS settings as required. Next, head over to Shopify.
Connect your domain there. Remember to save all changes. This ensures your domain functions properly. With this setup, your online store gains a unique identity. Customers can find you easily. Enjoy the benefits of a custom domain. Happy selling with Shopify and Namecheap!
