
Are you looking to streamline your email setup with Namecheap? Adding an MX (Mail Exchange) record is a crucial step in ensuring your emails reach their destination smoothly and efficiently.
Whether you’re a small business owner or an individual managing your own domain, understanding how to add an MX record can save you from potential email hiccups. Imagine the frustration of missing important emails due to incorrect settings. By mastering the simple process of adding an MX record in Namecheap, you can avoid these pitfalls.
This guide will walk you through each step with clear instructions, ensuring you can complete the task confidently and without hassle. Dive into the article to discover how easy it is to enhance your email reliability and get the most out of your Namecheap account. Your inbox awaits!

Credit: www.lemwarm.com
Accessing Dns Settings
To add an MX record in Namecheap, first log into your account and navigate to the Domain List. Select your domain, then click on the Advanced DNS tab. Locate the Mail Settings section and use the Add New Record button to input the MX record details provided by your email service.
Accessing DNS Settings is a crucial step when you’re looking to add MX records in Namecheap. It might sound a bit technical, but once you get the hang of it, it’s surprisingly straightforward. Imagine you’re setting up a digital mailbox; you need to ensure the mailman knows where to deliver your emails. The DNS settings act like the address in this scenario. So, how do you access these DNS settings on Namecheap? Let’s dive in and make it simple for you. ###Login To Your Namecheap Account
First things first, you need to log in to your Namecheap account. This is where all the magic happens. Look for the ‘Account’ button at the top of the page. Click it, and enter your credentials. You’re now on your dashboard, and it’s time to move on to the next step. ###Locate Your Domain List
Once logged in, go to the Domain List section. It’s like flipping through your digital catalog of domains. You will find this option on the left side of your dashboard. Here, all your domains are neatly organized. ###Select The Domain To Edit
Choose the domain for which you want to add the MX record. Click on the ‘Manage’ button next to the domain name. This takes you to a page where you can tweak various settings related to your domain. ###Navigate To Advanced Dns
Now, head over to the Advanced DNS tab. Don’t be intimidated by the name; it’s just a place where you can manage detailed settings. Here, you will find different types of records listed, and MX records are among them. ###Add Your Mx Record
You’re almost there! In the Advanced DNS section, look for the option to add a new record. Choose ‘MX Record’ from the dropdown list. It’s essential to input accurate values for the mail server and priority. Mistakes here could mean missing out on important emails. ###Save Your Changes
After inputting the correct details, make sure to save your changes. There’s usually a ‘Save Changes’ button at the bottom of the page. Click it, and you’re done! Your new MX records should be active shortly. ###Test Your Configuration
Finally, how do you know it worked? Try sending an email to your domain. If it lands in your inbox, congratulations, you’ve successfully added an MX record. What if it doesn’t? Double-check your settings. Isn’t it satisfying to take control of your online presence? By accessing DNS settings, you’re ensuring that your emails reach the right destination. Have you ever had an unexpected hiccup while setting up DNS? Share your experience in the comments, and let’s learn from each other.Locating Mx Records Section
Find the MX Records section in Namecheap by navigating to the domain management page. Add new MX records by clicking “Advanced DNS” and selecting “Mail Settings. ” Enter the required values and save changes to ensure proper email routing.
Locating the MX records section in Namecheap is a crucial step for anyone wanting to manage their email settings effectively. If you’ve ever felt overwhelmed by the technical jargon and endless menus, you’re not alone. The good news is that finding this section is simpler than you might think. Have you ever tried to set up email for your domain and hit a wall when looking for MX records? ###Access Your Namecheap Account
Start by logging into your Namecheap account. This is your control center where you’ll make all domain-related changes. Once you’re in, head to the “Dashboard” where you can see all your domains listed. ###Navigate To Domain List
From your dashboard, locate the “Domain List” tab on the left-hand side. This is where all the action happens. Clicking on it will reveal a list of all your purchased domains. ###Select Your Domain
Choose the domain for which you want to add or modify MX records. Once selected, you’ll see a range of settings available for that domain. This is your cue to move to the next step. ###Find The Advanced Dns Tab
Look for the “Advanced DNS” tab, usually located at the top of the page. Clicking here will take you to a detailed view of your DNS settings. It’s like peering behind the curtain of your domain’s operation. ###Locate The Mail Settings Section
Scroll down to find the “Mail Settings” section. Here, you’ll see the MX records that determine how your email traffic is handled. This section is your gateway to configuring email for your domain. ###Edit Your Mx Records
You’ll find options to add, modify, or delete MX records. Ensure the values you input align with your email service provider’s instructions. A minor error here can lead to major email disruptions. Remember when I first tried changing MX records? I was daunted but soon realized it was a straightforward process with the right guidance. So, what are you waiting for? Dive in and take control of your email settings today!Configuring New Mx Record
Add an MX record in Namecheap by accessing your domain’s DNS settings. Enter the mail server’s address provided by your email service. Save changes to ensure your email works correctly.
Configuring a new MX record on Namecheap might seem daunting at first, but with a step-by-step guide, you can master it effortlessly. MX records are crucial for directing emails to the correct mail server. Whether you’re setting up a business email or personal account, understanding this process is key to seamless email communication. ###Understanding Mx Records
MX records, short for Mail Exchange records, are a type of DNS record used to specify the mail server responsible for receiving emails on behalf of a domain. They help route emails to your inbox. Without them, sending and receiving emails would be chaotic. ###Accessing Your Namecheap Account
Log into your Namecheap account and head over to the Dashboard. Click on the ‘Domain List’ tab. Find the domain you want to configure and click on ‘Manage.’ ###Navigating To Advanced Dns
Once inside the domain settings, click on the ‘Advanced DNS’ tab. This is where you’ll add your MX record. Seeing the array of settings might feel overwhelming, but focus on the task at hand. ###Adding A New Mx Record
Scroll down to the ‘Mail Settings’ section. Click on ‘Add New Record’ and select ‘MX Record’ from the dropdown. Enter your mail server’s address and set the priority level to guide email delivery. Lower numbers have higher priority. ###Testing Your Mx Record
After adding the record, it’s essential to test it. Use online tools or email clients to ensure emails route correctly. If emails bounce back, recheck the configuration. ###Common Pitfalls And How To Avoid Them
Mistakes happen. Entering an incorrect server address or setting wrong priorities are common errors. Double-check each entry and consider reaching out to Namecheap’s support if issues persist. ###Personal Experience With Mx Records
When I first added an MX record, I misspelled the server address, leading to undelivered emails. It taught me the importance of accuracy. Have you ever faced a similar situation that taught you a valuable lesson? ###Why This Matters
Proper MX configuration ensures your emails reach their destination. It’s not just about technical accuracy but also about maintaining professional communication. Is your email setup optimized for success? By following these steps, you can confidently configure MX records on Namecheap. Remember, precision is key to preventing email mishaps. Dive in, make those changes, and enhance your email management skills.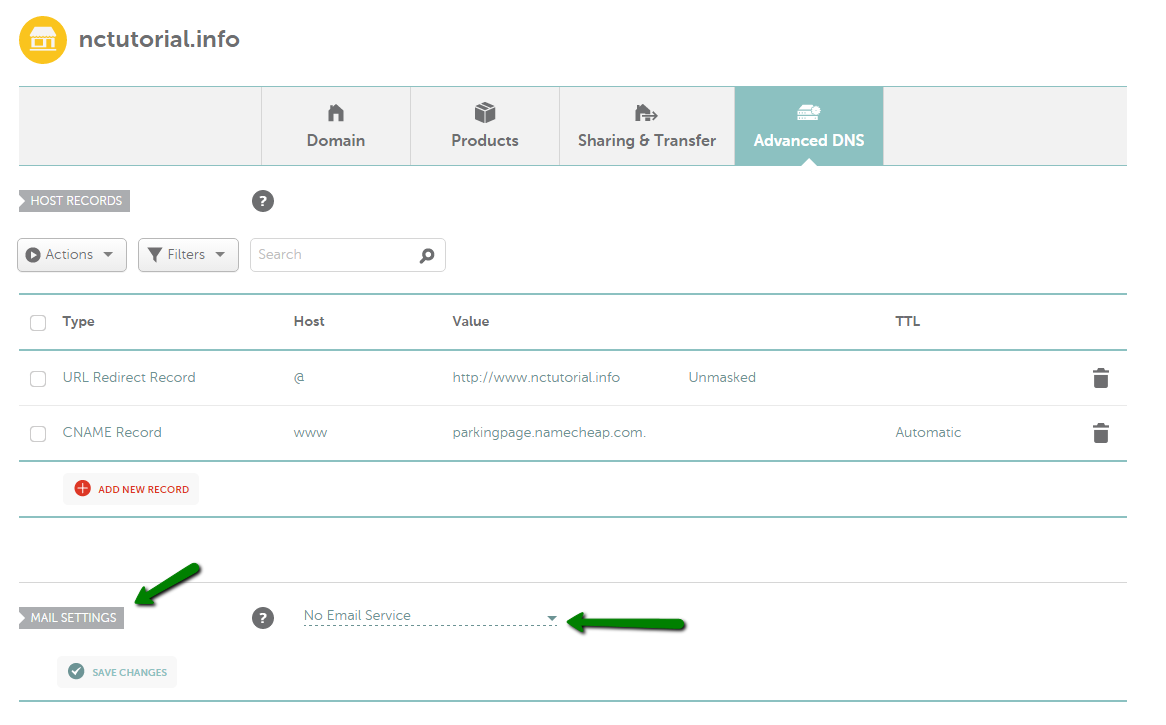
Credit: www.namecheap.com

Credit: support.titan.email
Frequently Asked Questions
How Do I Add An Mx Record In Namecheap?
Log in to Namecheap. Go to “Domain List” and click “Manage” next to your domain. Select “Advanced DNS. ” Click “Add New Record,” choose “MX Record,” and enter the required details. Save your changes.
How Do I Add A Mx Record To My Domain?
Log into your domain registrar’s account. Access DNS settings. Select “Add MX Record. ” Enter priority and mail server address. Save changes.
How Do I Add A Record On Namecheap?
Log into your Namecheap account. Go to the “Domain List”. Click “Manage” next to your domain. Select the “Advanced DNS” tab. Click “Add New Record”. Choose record type, fill in the details, and save.
Where To Add Txt Record In Namecheap?
To add a TXT record in Namecheap, log into your account. Go to “Domain List,” then “Manage. ” Click “Advanced DNS” and select “Add New Record. ” Choose “TXT Record,” enter the details, and save changes.
Conclusion
You’ve learned how to add MX records in Namecheap. This process helps manage your email effectively. Follow the steps carefully for best results. Double-check entries for accuracy. Mistakes can lead to email delivery issues. Namecheap’s interface makes it easy to update records.
Remember, changes may take time to apply. Patience is key. If problems persist, Namecheap support can assist. Understanding MX records is crucial for smooth email operations. Keep exploring and learning to improve your skills. Good luck with managing your domain settings!
