If you want to understand how visitors interact with your WordPress website, adding Google Analytics is a must. But if you’re unsure how to do it, don’t worry—you’re in the right place.
This guide will show you step-by-step how to add Google Analytics code to your site quickly and easily. By the end, you’ll have powerful insights at your fingertips, helping you make smarter decisions and grow your online presence. Ready to unlock the full potential of your website?
Let’s get started.
Credit: www.pair.com
Benefits Of Google Analytics
Google Analytics helps website owners understand their visitors. It shows what people do on your site. This data helps improve your website’s performance and user experience.
Knowing your audience better leads to smarter decisions. It saves time and money by focusing on what works.
Understanding Visitor Behavior
Google Analytics shows how visitors find your site. It tracks which pages they visit and how long they stay. You see what content interests them most.
Improving Website Performance
Data from Google Analytics helps identify slow pages or errors. Fixing these issues makes your site faster and easier to use. A better website keeps visitors longer.
Tracking Marketing Success
Google Analytics tracks traffic from ads and social media. You learn which marketing efforts bring the most visitors. This helps plan better campaigns next time.
Setting And Measuring Goals
Set goals like newsletter signups or product purchases. Google Analytics measures progress toward these goals. This shows if your website meets business needs.
Enhancing User Experience
Data on visitor devices and locations helps tailor your site. You can create a better experience for mobile users or local audiences. Happy visitors return and share your site.
Creating A Google Analytics Account
Creating a Google Analytics account is the first step to track your website traffic. It helps you understand your visitors and their behavior. Setting up an account is simple and free. Follow clear steps to get started quickly.
Create A Google Account
You need a Google account to use Google Analytics. Use your existing Gmail account or create a new one. Visit the Google sign-up page and fill in your details. Having a Google account allows you to access all Google services.
Sign Up For Google Analytics
Go to the Google Analytics website. Click on the “Start for free” or “Sign up” button. Enter your Google account details to log in. This takes you to the Google Analytics setup page.
Set Up Your Property
Enter your website name in the Property setup. Choose your website’s time zone and currency. This ensures your data matches your location and business needs. Click “Next” to proceed.
Fill In Business Information
Provide basic information about your business size and industry. Choose how you plan to use Google Analytics. This helps Google tailor your experience. Click “Create” to finish setup.
Accept Terms And Conditions
Read Google’s terms of service carefully. Accept the terms to continue. This step is necessary to use Google Analytics legally. You are now ready to get your tracking code.
Getting The Tracking Code
Getting the tracking code is the first step to connect Google Analytics with your WordPress site. This code helps you see how visitors use your website. You need to copy this code and add it to your WordPress site.
Follow these simple steps to find and get your tracking code quickly.
Sign In To Google Analytics
Go to the Google Analytics website. Use your Google account to sign in. Make sure this is the account linked to your website.
Select Or Create A Property
Choose the right property for your website. If you don’t have one, create a new property. Enter your website name and URL carefully.
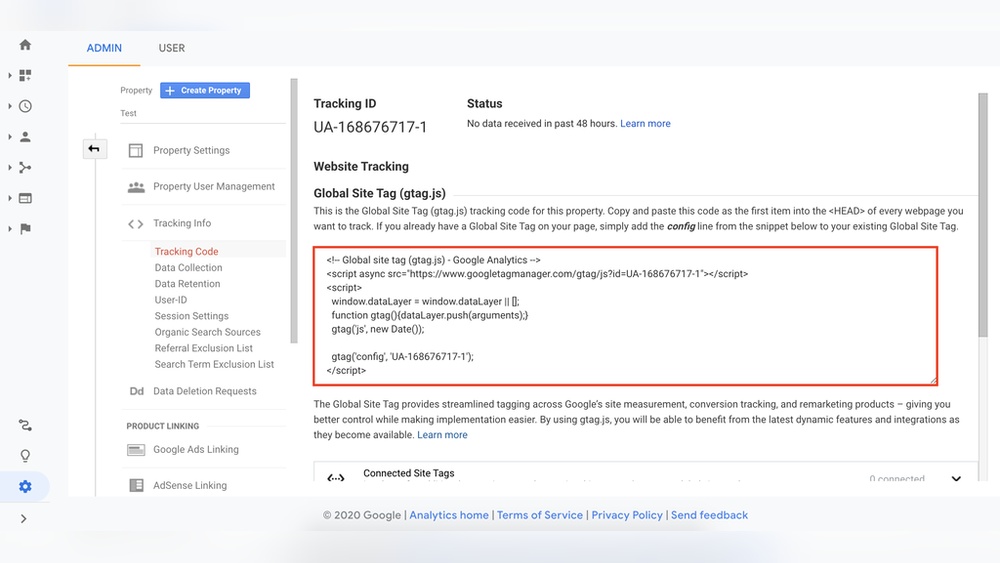
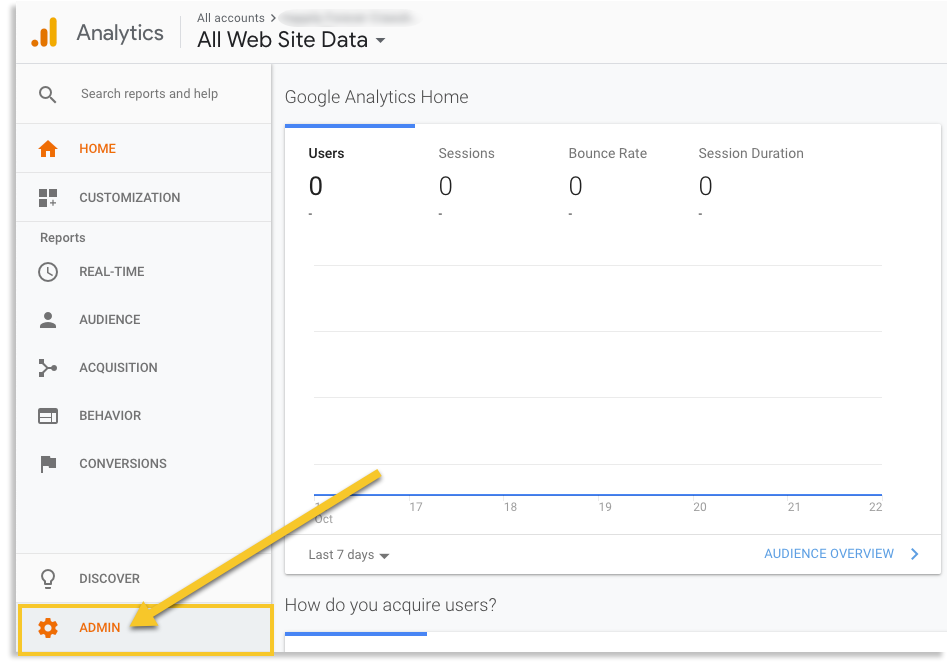
Find The Tracking Code
Open the Admin section on the left menu. Under the property column, click on “Tracking Info.” Then select “Tracking Code.” Your unique code will show here.
Copy The Tracking Code
Highlight the entire tracking code. Click “Copy” or press Ctrl+C (Cmd+C on Mac). Keep this code ready for the next step.
Adding Code Via WordPress Plugin
Adding Google Analytics to your WordPress site using a plugin is simple and safe. Plugins handle the code for you. No need to touch your theme files or worry about updates removing your code.
This method suits beginners and those who want a quick setup. Plugins offer easy interfaces to insert tracking codes. Some even add extra features like stats dashboards inside WordPress.
Choosing The Right Plugin
Pick a plugin that fits your needs and has good reviews. Popular options include “Google Analytics for WordPress” and “Site Kit by Google.” Check plugin updates and user feedback. Avoid plugins with few installations or poor ratings.
Installing And Activating The Plugin
Go to your WordPress dashboard and open the Plugins menu. Click “Add New” and search for your chosen plugin. Click “Install Now” then “Activate” once installation finishes. The plugin will appear in your dashboard menu.
Inserting Tracking Code Using Plugin
Open the plugin settings from your dashboard. Locate the field to enter your Google Analytics tracking ID. Paste the tracking ID from your Google Analytics account. Save the changes and clear any caches. Your site is now ready to track visitors.
Adding Code Manually To Theme
Adding Google Analytics code manually to your WordPress theme helps track your website traffic accurately. This method gives direct control over where the tracking code goes. You can place the code in files that load on every page. It is important to back up your site before editing theme files. Small mistakes can cause your site to break.
Editing The Header.php File
The header.php file loads on every page of your site. You can insert the Google Analytics code here. Open your WordPress dashboard and go to Appearance > Theme Editor. Find the header.php file on the right side. Paste the Analytics code just before the closing tag. Save the changes and check your site. The code will now track all page visits.
Using Functions.php For Code Injection
The functions.php file is another good place for the code. This method avoids editing the header directly. Open functions.php in the Theme Editor. Add a function that prints the Analytics script inside the section. Use wp_head action hook for this. Save the file. This keeps your theme files cleaner and makes updates easier.
Verifying Tracking Code Installation
Verifying the Google Analytics tracking code installation is a crucial step after adding it to your WordPress site. This process confirms that your website is correctly sending data to Google Analytics. Without verification, you may miss valuable visitor insights. Testing ensures you collect accurate data from the start. It also helps avoid future tracking errors.
Using Google Tag Assistant
Google Tag Assistant is a free Chrome extension. It scans your website for Google Analytics tags and other tracking codes. After installing the extension, open your WordPress site in the browser. Click the Tag Assistant icon to see detected tags. It shows if the Google Analytics code is present and working. The tool highlights errors or warnings to fix quickly. This simple check confirms your tracking code is active and valid.
Checking Real-time Analytics
Google Analytics offers a Real-Time report to test tracking immediately. Open your Google Analytics dashboard and navigate to Real-Time > Overview. Visit your WordPress site in a new browser tab. The Real-Time report should show your active visit. This confirms the tracking code collects visitor data right now. If no activity appears, check your code setup again. Real-Time analytics provides quick feedback on your tracking status.
Troubleshooting Common Issues
Adding Google Analytics to a WordPress site is simple but issues can arise. These problems may stop tracking or cause data errors. Troubleshooting helps fix these issues fast.
Check common problems to keep your analytics working well. This guide covers frequent errors and how to solve them.
Incorrect Tracking Id
Using the wrong tracking ID stops Google Analytics from working. Copy the ID carefully from your Google Analytics account. Paste it exactly in your WordPress settings or plugin.
Code Placed In The Wrong Location
Placing the code outside the
section can cause errors. Always insert the code in the area of your site. Many themes have a header section for this.Plugin Conflicts
Some plugins can block or duplicate the analytics code. Disable other plugins one by one to find conflicts. Use only one analytics plugin for best results.
Cache Issues
Site caching may prevent new code from loading. Clear your cache after adding the code. Check your site in a private browser window to see changes.
Wrong Google Analytics Property
Using the wrong property shows no data or wrong data. Confirm the property matches your site URL exactly. Double-check your account settings in Google Analytics.

Credit: www.hostinger.com
Tips For Maximizing Analytics Data
Collecting data with Google Analytics is just the first step. To get real value, use that data smartly. These tips help you see clear patterns and make better decisions for your WordPress site.
Focus on key actions visitors take. Track these to understand what works and what does not. Set up goals in Google Analytics to measure these actions easily. This shows how well your site meets its aims.
Use Filters To Clean Your Data
Filters remove unwanted traffic like spam or your own visits. This keeps your reports accurate and useful. Set filters to exclude IP addresses or certain regions. Clean data leads to better insights and less confusion.
Segment Your Audience
Break data into smaller groups by age, location, or device. This reveals how different visitors behave. Tailor your content and marketing based on these groups. Segments make data easier to understand and act on.
Track Site Speed
Fast sites keep visitors happy and improve rankings. Use Google Analytics to check your site speed regularly. Identify slow pages and fix them quickly. A smooth experience helps keep users engaged longer.
Use Event Tracking
Events track clicks, downloads, and video views. Set up events to see how people interact beyond page views. This adds detail to your reports and shows user engagement. Knowing this helps improve site features.
Check Real-time Reports
Real-time data shows current visitor activity. Use it during promotions or new content launches. See how visitors respond immediately. This helps adjust your strategy quickly for better results.
Credit: deeperlook.com.au
Frequently Asked Questions
How Do I Add Google Analytics To WordPress?
To add Google Analytics, create an account and get your tracking code. Then, paste the code into your WordPress site’s header or use a plugin like “Google Site Kit” for easy integration.
Can I Add Google Analytics Without A Plugin?
Yes, you can manually add the Google Analytics tracking code to your WordPress theme’s header. php file. This requires editing theme files, so use a child theme to avoid losing changes during updates.
How Long Does Google Analytics Take To Work?
Google Analytics typically starts tracking data within 24 to 48 hours. You may see real-time data immediately, but full reports take some time to populate.
Is Google Analytics Code Safe For WordPress?
Yes, adding Google Analytics code is safe and does not harm your WordPress site. Ensure you get the code from the official Google Analytics account to avoid security risks.
Conclusion
Adding Google Analytics code to your WordPress site is simple and important. It helps you see who visits your site and what they like. Tracking this data lets you improve your content and grow your audience. Just follow the steps carefully, and check your site’s performance regularly.
This small effort can give you useful insights about your visitors. Start today to make your website smarter and more user-friendly.