
Are you ready to expand your online presence? Adding a domain to your Namecheap hosting is a crucial step in growing your website and boosting your visibility.
Whether you’re launching a new project or branching out with additional sites, this process can seem daunting at first. But don’t worry, with the right guidance, you’ll be able to navigate it smoothly. Imagine having all your digital assets seamlessly integrated under one roof, making management easier and more efficient.
This guide will walk you through each step, ensuring you feel confident and empowered to handle your domain additions like a pro. Ready to dive in and simplify your web management tasks? Let’s get started!
Domain Setup Basics
Setting up a domain with Namecheap hosting is straightforward. It involves a few basic steps, ensuring your website is ready for visitors. Understanding the process helps in managing your site efficiently.
Domain Registration
First, choose a domain name that represents your brand. Make it memorable and easy to spell. Register it through Namecheap’s platform. This secures your online identity.
Pointing Your Domain To Namecheap Hosting
After registration, link your domain to Namecheap hosting. Access your Namecheap account and navigate to the domain list. Select your domain and find the ‘Nameservers’ option. Set them to Namecheap’s hosting nameservers. This directs traffic to your hosting space.
Dns Configuration
Next, configure DNS settings. Use Namecheap’s DNS system for managing records. Add necessary DNS entries like A records and CNAMEs. This ensures your domain resolves correctly.
Ssl Certificate Setup
For security, install an SSL certificate. Namecheap offers free and paid SSL options. Enhance your site’s credibility and protect user data.
Testing Your Domain
Finally, test your domain setup. Visit your website and ensure it loads properly. Check all links and functionalities. Confirm everything works as expected.

Credit: www.youtube.com
Configuring Domain Settings
Configuring domain settings is a crucial step after adding a domain. It ensures your domain functions smoothly and directs visitors correctly. The process involves a few simple steps. Each step is essential for setting up your online presence.
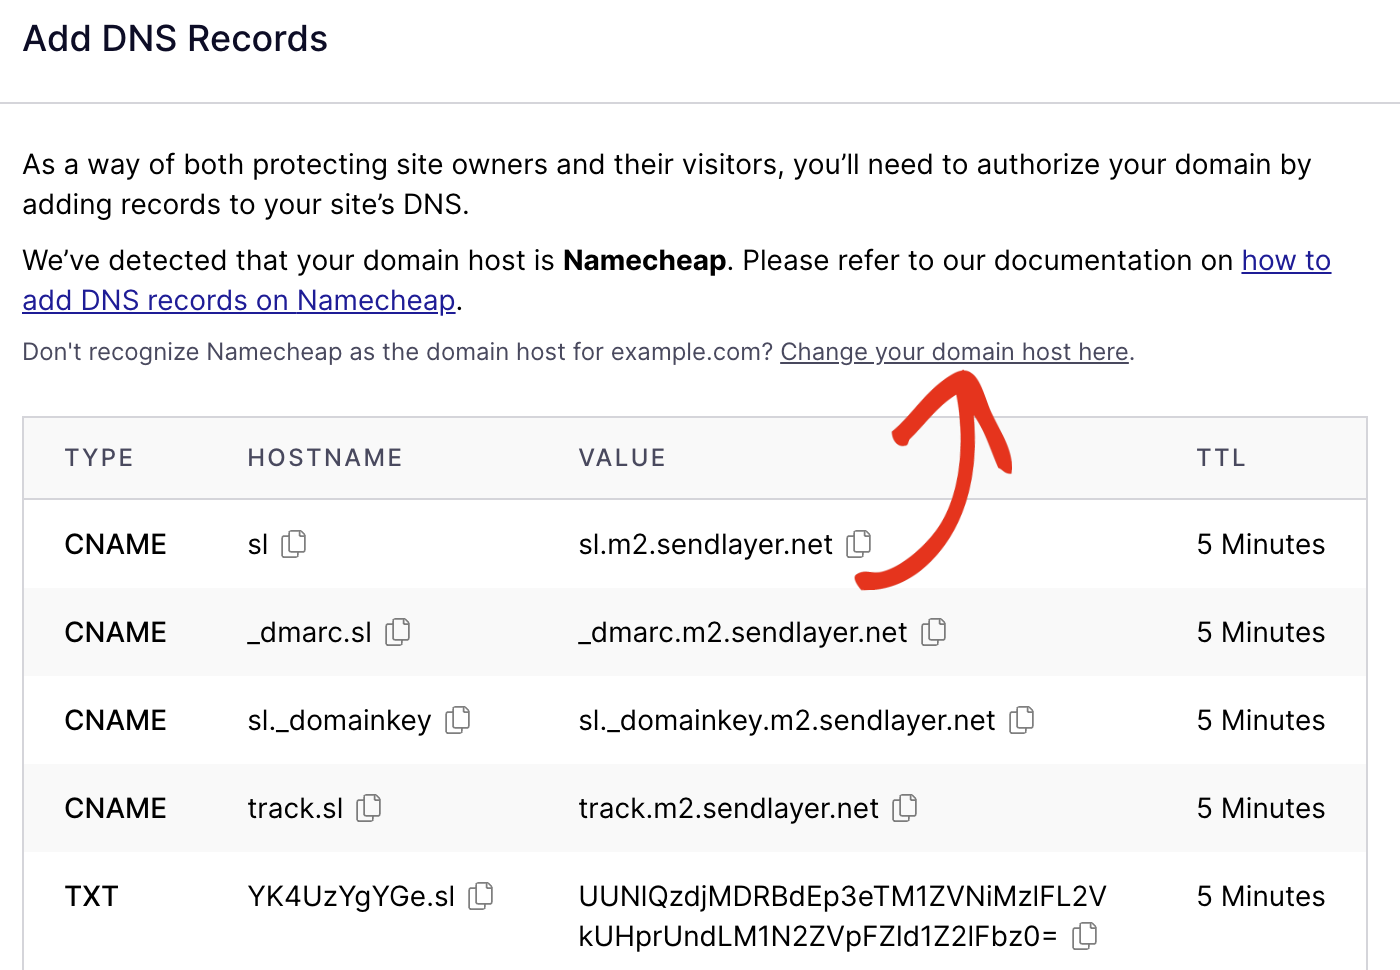
Understanding Dns Records
DNS records are like your domain’s address book. They tell the internet where to find your website. You need to manage these records correctly. This will ensure your site is accessible.
Accessing Namecheap’s Dashboard
Login to your Namecheap account. Navigate to the dashboard. Here, you can manage your domain settings. The dashboard is user-friendly. It offers easy navigation for beginners.
Changing Nameservers
Locate the nameservers section in your dashboard. You might need custom nameservers. This depends on your hosting provider. Enter the correct nameserver details. This step connects your domain to your hosting.
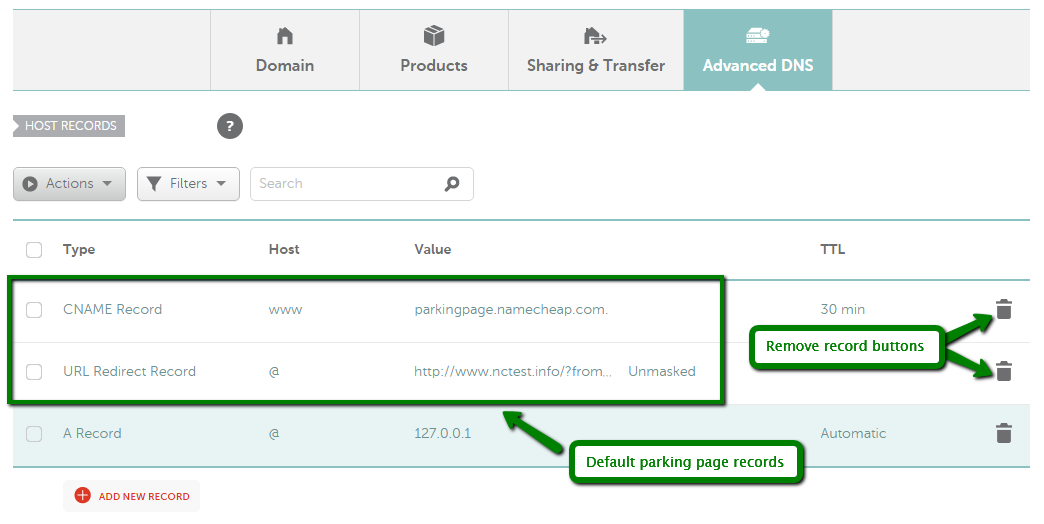
Updating A And Cname Records
Find the DNS settings in your dashboard. Update the A record to point to your hosting IP. Add a CNAME record for your subdomains. This ensures all parts of your site are reachable.
Verifying Your Domain Connection
After updating settings, verify your domain connection. Use online tools to check DNS propagation. This ensures your domain is correctly configured. It may take a few hours to update globally.
Troubleshooting Common Issues
Adding a domain to Namecheap hosting can sometimes present challenges. Many users face common issues during the setup process. Understanding these issues helps in resolving them efficiently. This guide will assist you in troubleshooting common problems effectively.
1. Incorrect Dns Settings
Ensure your domain’s DNS settings point to Namecheap’s servers. Incorrect settings often cause connectivity issues. Verify the correct DNS records in your Namecheap account. This step is crucial for a smooth domain addition.
2. Domain Not Propagating
Domain propagation can take up to 48 hours. During this time, your domain may not appear online. Check propagation status using online tools. Patience is key while waiting for changes to reflect globally.
3. Ssl Certificate Problems
Ensure your SSL certificate is correctly installed. Misconfigured certificates can lead to security warnings. Double-check the installation steps in your Namecheap dashboard. Contact support if issues persist.
4. Domain Already In Use
Sometimes a domain might be registered elsewhere. Ensure the domain is not linked to another account. Transfer the domain to your Namecheap account if necessary. This can resolve the “domain already in use” error.
5. Hosting Package Limitations
Check if your hosting package supports additional domains. Some plans have limitations on the number of domains. Upgrade your plan if you need to add more domains. This ensures you have the resources needed for your site.
6. Cache Issues
Clear your browser’s cache to view updated domain settings. Cached data can show outdated information. Use incognito mode for a fresh view. This often resolves display issues quickly.
7. Contacting Customer Support
If problems persist, reach out to Namecheap support. They provide 24/7 assistance for technical issues. Use live chat or email for faster response. Their guidance can help resolve complex issues efficiently.
Credit: sendlayer.com
Credit: www.namecheap.com
Frequently Asked Questions
How Do I Add A Domain To Namecheap Hosting?
Log in to your Namecheap account. Go to the “Domain List” section. Click “Manage” next to your domain. Select the “Advanced DNS” tab. Add your hosting nameservers or records. Save changes. Your domain is now added to Namecheap hosting.
How Do I Add A Domain In Hosting?
Log into your hosting account. Navigate to the domain management section. Click “Add Domain” or “Add New Domain. ” Enter the domain name and configure DNS settings. Save changes to finalize the process. Make sure your domain is registered and correctly pointed to your hosting server.
Does Namecheap Domain Come With Hosting?
Namecheap domains do not include hosting. You need to purchase hosting services separately for your website. Namecheap offers various hosting plans to meet different needs. Consider choosing a plan that suits your website’s requirements.
How Do I Manage My Domain On Namecheap?
Log in to Namecheap, go to the Dashboard, select your domain, and use the Domain Management panel. Adjust DNS settings, renew, or transfer domains easily.
Conclusion
Adding a domain in Namecheap hosting is straightforward. Follow the steps carefully. First, log into your Namecheap account. Then, navigate to the hosting section. Find the domain management area. Enter your domain details accurately. Ensure DNS settings are correct. Double-check all entries.
Save your changes. With this setup, your domain is ready to use. Always consult Namecheap’s support if needed. They can assist with any issues. Now, you can focus on building your site. Happy hosting!
