Are you ready to take control of your online presence with Namecheap? Adding DNS records is a crucial step in managing your domain effectively, ensuring your website runs smoothly and efficiently.
Whether you’re setting up a new website, transferring an existing domain, or optimizing your email setup, knowing how to add DNS in Namecheap can make all the difference. Imagine having the power to customize your online identity just the way you want, without any technical hassle.
In this guide, you’ll discover a simple, straightforward process to add DNS in Namecheap, empowering you to navigate the digital landscape with confidence. Stay with us, and you’ll soon master this essential skill, unlocking endless possibilities for your online ventures.
Credit: kinsta.com
Accessing Namecheap Account
Accessing your Namecheap account is the first step in managing DNS settings. It’s crucial for ensuring your domain settings are correct. Namecheap provides an easy-to-use interface for this process. Following these steps will help you access your account smoothly.
Start by visiting the Namecheap website. Locate the “Sign In” button at the top right corner. Click it to proceed to the login page.
Enter Login Credentials
On the login page, enter your username and password. These are the details you used during account creation. Ensure they are correct to avoid login issues.
Two-factor Authentication
If enabled, Namecheap will prompt for two-factor authentication. This adds an extra layer of security to your account. Follow the instructions to complete this step.
Navigate To Dashboard
After successful login, you will reach your account dashboard. Here, you can see all your domains and services. The dashboard is where you will manage DNS settings.
Locate Domain List
Within the dashboard, find the “Domain List” section. This is where all your registered domains are displayed. Choose the domain you wish to edit.
Select Manage Option
Next to your domain, click the “Manage” button. This will take you to the domain settings page. From here, you can access DNS settings.
Credit: www.namecheap.com
Navigating To Dns Settings
Accessing DNS settings on Namecheap involves logging into your account dashboard. Locate the domain list and select manage beside your chosen domain. Find the Advanced DNS tab to add or modify DNS records efficiently.
Navigating to DNS settings in Namecheap is a crucial step when you want to manage your domain’s DNS records. Whether you’re setting up a new website or modifying existing settings, knowing how to find and adjust these settings can save you time and avoid potential headaches. Here’s a guide to help you smoothly navigate this process. ###Accessing Your Namecheap Account
First, log in to your Namecheap account. If you’re like most users, you might have multiple accounts or domains, so make sure you’re accessing the right one. It’s easy to forget, and you don’t want to make changes to the wrong domain. ###Finding Your Domain List
Once logged in, head over to the dashboard. Here, you’ll see a list of your domains. It might seem overwhelming at first, especially if you have many domains, but don’t worry. Use the search feature to quickly locate the domain you need to modify. ###Selecting The Right Domain
Click on the domain name you wish to edit. This will take you to the domain management page. Have you ever clicked on the wrong domain by mistake? It happens more often than you’d think, so double-check that you’ve selected the correct one. ###Locating The Dns Settings
Once on the domain management page, look for the ‘Domain’ tab or the ‘Manage’ button next to your domain. Click on it, and you’ll see the option for ‘Advanced DNS’ or ‘DNS Settings’. These tabs hold the key to customizing your DNS records. ###Understanding The Dns Interface
The DNS settings page may look a bit technical, but it’s quite user-friendly once you get the hang of it. You’ll see options for adding A records, CNAME records, and more. Does the interface seem daunting at first? Take a deep breath and remember that each section is clearly labeled to guide you. ###Making Changes To Dns Records
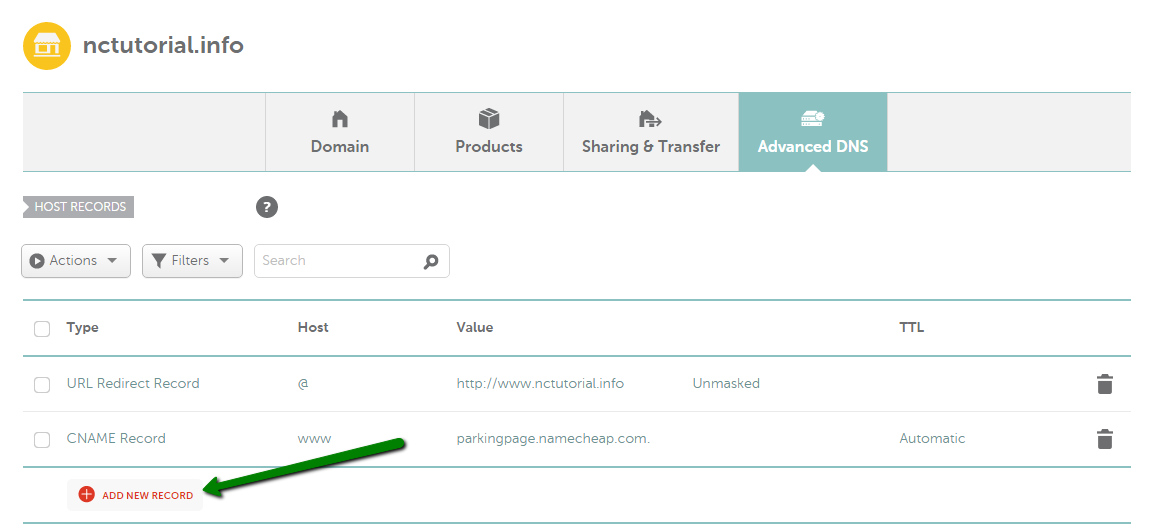
To make changes, simply click the ‘Add New Record’ button. A drop-down menu will appear, offering various record types like A, AAAA, CNAME, etc. Have you ever thought about what each type means? A quick online search can clarify, but Namecheap also offers helpful tooltips. ###Saving Your Changes
After adding or modifying a record, always remember to save your changes. This step is crucial and often overlooked. Think about how frustrating it would be to leave the page without saving, only to realize your changes didn’t take effect. Navigating DNS settings in Namecheap doesn’t have to be a daunting task. With practice, you’ll become more confident in managing your domain settings. Have you considered setting up a reminder to periodically review your DNS settings? This proactive step can ensure your website always runs smoothly.Updating Dns Records
Adding DNS records in Namecheap involves accessing the domain list, selecting your domain, and navigating to the DNS settings. Once there, you can add or edit records like A, CNAME, or TXT by clicking the relevant button. Save changes to ensure your DNS setup is correctly updated.
Updating DNS records in Namecheap can be a straightforward task if you follow the right steps. DNS, or Domain Name System, is crucial for directing internet traffic to your website. Whether you’re setting up a new site or migrating an existing one, managing these records correctly ensures your visitors can find you online. Let’s dive into the process of updating DNS records in Namecheap and ensure your site is reachable. ###Accessing Your Namecheap Account
First, log in to your Namecheap account. You’ll find the login option at the top right corner of the website. Once logged in, navigate to the ‘Dashboard’ where you can see a list of all your domains. Select the domain you wish to update. ###Navigating To The Dns Settings
In your dashboard, find the ‘Domain List’ tab on the left-hand side. Click on it and locate the domain you’re working with. Next, click on ‘Manage’ next to the chosen domain. This action takes you to the domain management page, where you will find the ‘Advanced DNS’ tab. ###Adding Or Editing Dns Records
Under the ‘Advanced DNS’ tab, you will see options to add or edit DNS records. If you need to add a new record, click on ‘Add New Record.’ Choose the type of record you want to add, such as A, CNAME, or MX. Enter the necessary details for each field, like the host and the value. For instance, if you’re adding an A Record, you might enter ‘@’ for the host and your server’s IP address as the value. This directs your domain to your hosting server. ###Save And Check Changes
After making the necessary updates, ensure to click ‘Save Changes.’ It is essential to verify that the information is entered correctly. DNS changes can take up to 48 hours to propagate, but they often update much sooner. ###Common Mistakes To Avoid
Be cautious not to leave any fields blank unless specified. Double-check the spelling and numbers for accuracy. Have you ever wondered why your site isn’t loading? It could be due to a minor typo in your DNS records. ###Tips For A Smooth Update
Consider taking screenshots of your existing DNS settings before making changes. This way, you have a backup if something doesn’t work as expected. Also, testing your site after updates can help catch errors early. Updating DNS records doesn’t have to be daunting. By following these steps, you can ensure your domain points exactly where it needs to be. Are you ready to take control of your DNS settings and make your site accessible to the world?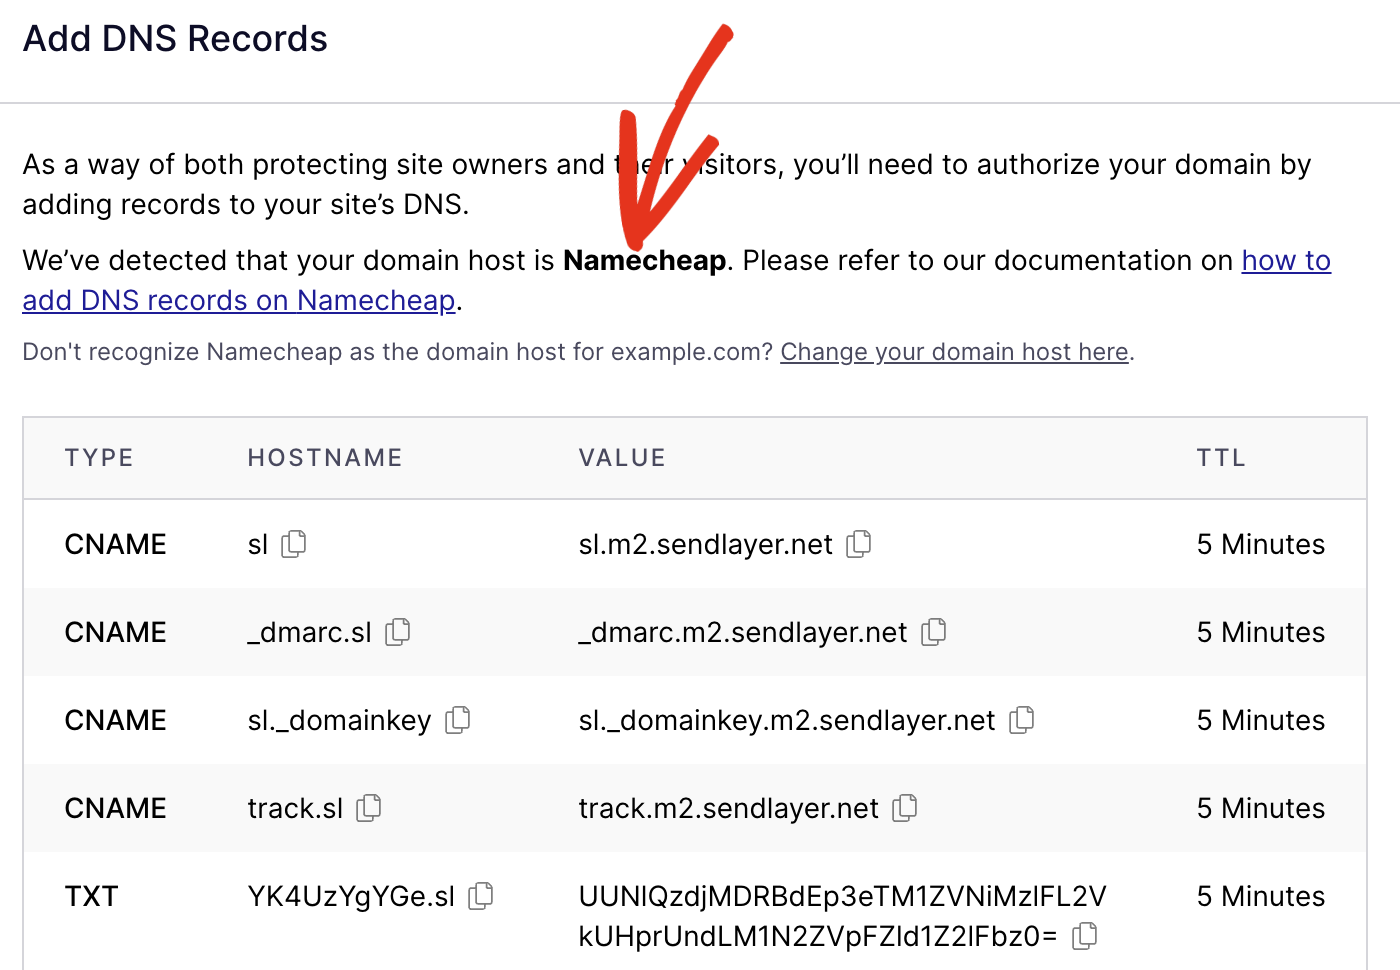
Credit: sendlayer.com
Frequently Asked Questions
How To Add Dns Records In Namecheap?
Log into your Namecheap account. Go to “Domain List. ” Click “Manage” next to your domain. Select the “Advanced DNS” tab. Add your DNS records by choosing the record type and entering the required information. Save changes.
How Do I Add A Dns To My Domain?
Log in to your domain registrar’s website. Navigate to DNS settings. Add the desired DNS records. Save changes. Allow time for DNS propagation.
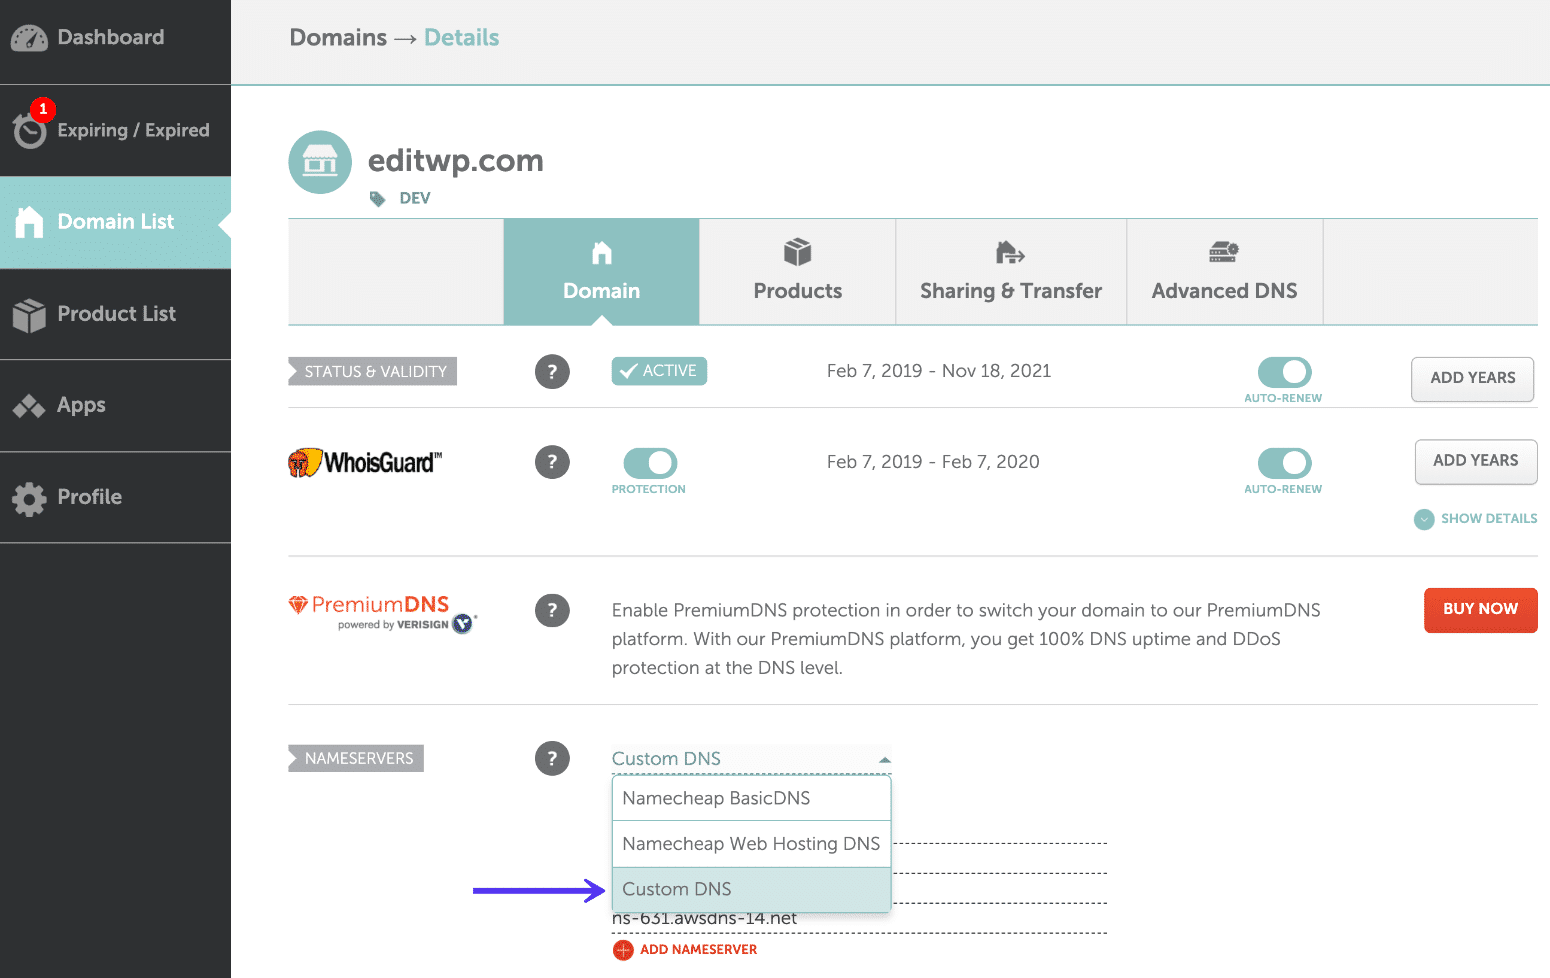
How To Point To Basic Dns Namecheap?
Log into Namecheap account. Navigate to Domain List. Select your domain. Click “Manage”. Choose “Custom DNS” under Nameservers. Enter desired DNS records. Save changes.
How Do I Add A Dns Entry?
Access your DNS management in your hosting provider’s dashboard. Select “Add Record” and enter the required information. Save changes.
Conclusion
Adding DNS records in Namecheap is simple and straightforward. Follow the steps outlined to ensure a smooth process. Start by logging into your Namecheap account. Go to the Domain List and select your domain. Click on “Manage” next to the domain.
Then, navigate to the DNS section. Input the required DNS records carefully. Save the changes. That’s it. You’ve successfully added DNS to your Namecheap domain. This enhances your domain’s functionality. Remember, changes might take time to propagate. Patience is key.
Enjoy the benefits of a well-configured domain.